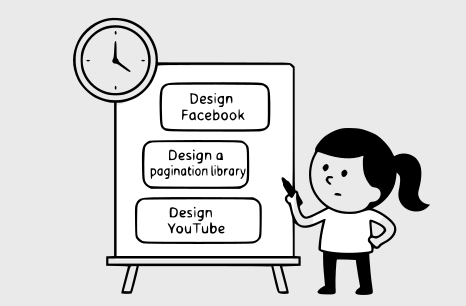
Mobile System Design (MSD) interviews have become a key part of the hiring process for mobile engineering roles at many companies. These interviews are typically brief, lasting no more than an hour, yet packed with broad, intentionally open-ended questions such as "Design Facebook", "Design a pagination library," or "Design YouTube". With such limited time and high expectations, it's crucial to ask the right questions to clarify requirements and focus on the areas that matter most.
Instructor
Manuel Vicente Vivo is a Staff Mobile Architect and seasoned Android engineer with experience at leading companies including Capital One, Google, and Bumble Inc. Beyond his technical expertise, Manuel is a dedicated mentor, accomplished public speaker, and prolific writer whose work has reached and inspired millions around the world.
This book is your practical companion whether you're a mobile engineer preparing for interviews, a technical lead sharpening your architectural thinking, or someone interested in mobile development. With real-world case studies, reusable frameworks, and implementation strategies, you'll learn how to approach complex design problems with clarity and confidence.
Why companies ask MSD interview questions
MSD interviews fill an essential gap in the hiring process. While data structures and algorithms interviews assess coding proficiency, system design questions evaluate senior-level competencies that are harder to measure elsewhere. These interviews help calibrate your abilities across several critical dimensions:
Your ability to navigate ambiguity by defining requirements and scope.
How you approach and break down complex and ambiguous design challenges.
Strong problem-solving and technical knowledge.
Your insight into different options or trade-offs of designing complex systems.
Your communication and collaboration skills within a team environment.
MSD interviews intentionally present scenarios with multiple valid approaches. While many companies value your thought process and reasoning abilities above specific solutions, others may expect solutions that closely follow established industry patterns or align with their internal architecture standards. What consistently matters across all interviews is demonstrating a structured approach to problem-solving, making deliberate design choices, and clearly articulating the trade-offs behind your decisions. The strongest candidates show both technical depth and the adaptability to refine their solutions based on requirements and feedback.
Unlike coding interviews, MSD interviews rarely involve writing actual code. You might occasionally be asked to sketch pseudocode or represent data exchanges between components, but the focus remains on architecture and design decisions. With this unique interview format in mind, let's examine what interviewers are looking for at different seniority levels.
Rubric leveling explained
From an interviewer's perspective, expectations vary significantly across different seniority levels. While each company establishes its own evaluation criteria and emphasizes different aspects of system design, certain general expectations apply across the industry. Let's explore what interviewers typically look for at each level.
It's important to note that the level definitions we're discussing are mainly based on “Big Tech” companies such as Google, Meta, Amazon, and Microsoft, where engineering ladders are clearly structured with multiple levels. In contrast, smaller companies and startups often have more compressed leveling systems and titles.
📝 Note:
MSD interviews are rarely part of junior-level hiring processes. These interviews are designed to assess advanced capabilities that typically develop with experience, making them less effective indicators for early-career engineers.
Mid-level
Mid-level candidates should demonstrate foundational mobile system design knowledge and take initiative during the interview process. They're expected to:
Establish a clear understanding of the problem by asking relevant questions about requirements and constraints.
Create a coherent high-level design with logically connected components.
Identify common mobile patterns and appropriate technologies for the given problem.
Design basic API structures that support the required functionality.
Demonstrate awareness of basic state management approaches.
Recognize basic trade-offs in performance, security, and user experience.
Design challenges at this level typically focus on complete features or services of moderate complexity. Mid-level engineers may need occasional prompting to consider certain aspects of the system, which is completely normal. Interviewers expect this and will often guide the conversation toward important considerations when necessary.
Mid-level designs should demonstrate awareness of mobile-specific concerns such as network reliability, battery usage, and storage limitations. While solutions might not thoroughly address every aspect of the system, interviewers are primarily evaluating the ability to create a functional foundation with clear component relationships.
Senior
Senior candidates are expected to demonstrate greater independence and technical depth. They're expected to:
Drive the requirements-gathering phase with minimal guidance.
Proactively identify critical aspects of the design without prompting.
Create a comprehensive high-level architecture that addresses major functional requirements.
Recognize and address non-functional requirements such as performance, security, and scalability.
Design well-defined components with clear API contracts and communication patterns.
Thoughtful state management across the application.
Make informed decisions about trade-offs and be able to justify their choices.
At this level, candidates may face the same design challenges as mid-level engineers but with greater expectations for depth and breadth. Senior engineers should naturally consider issues such as error handling, edge cases, and potential failure scenarios without explicit prompting.
Senior-level designs should show a strong understanding of mobile platform capabilities and constraints. Components should have well-defined roles with clear APIs, and the overall architecture should reflect mobile best practices. They should demonstrate awareness of how their design decisions impact user experience, battery life, data usage, and other mobile-specific concerns.
Staff+
Staff+ candidates are expected to demonstrate comprehensive leadership and technical mastery throughout the interview. They're expected to:
Conduct thorough and proactive requirements gathering with minimal guidance.
Drive the conversation confidently, navigating through ambiguity with ease.
Design systems that scale efficiently and demonstrate a deep understanding of system complexities and their implications.
Communicate with technical precision and fluency.
Make rapid, well-justified decisions that reflect extensive experience.
Anticipate future challenges and design for extensibility.
Demonstrate strategic thinking that considers business impact and product evolution.
Articulate risk assessment and mitigation strategies.
Staff+ candidates should identify and address challenging aspects without prompting, independently exploring advanced topics such as sophisticated caching strategies, offline-first architectures, cross-platform considerations, performance optimization, and failure recovery mechanisms.
Solutions at this level often involve sophisticated trade-offs between competing factors such as user experience, performance, and security. Staff+ engineers are expected to not only create effective designs but also demonstrate the strategic thinking that differentiates them in complex situations. Their designs should reveal a deep understanding of mobile architecture patterns, platform-specific optimizations, and the broader ecosystem in which mobile applications operate.
Interviewers may intentionally introduce constraints or edge cases to evaluate how staff+ candidates optimize under limitations. At this level, the ability to adapt quickly, recognize the implications of design choices across the entire system, and articulate clear reasoning behind decisions is essential.
How to use this book effectively
This book is designed to provide a comprehensive approach to MSD interviews, offering both a structured framework and detailed case studies. To get the most value from these resources, consider the following approach on how to navigate the content effectively.
Progressive structure
The book follows a deliberate progression in how concepts are introduced and explained. Early chapters devote significant attention to foundational architecture choices and client-backend communication patterns, establishing core principles that guide all mobile designs. As you advance through later chapters, this knowledge is assumed rather than repeated, allowing us to focus on new challenges specific to each use case.
Case studies with unique focus areas
Mobile system design is a challenging field with many technical aspects to explore. To address these effectively, we created a carefully planned map that assigns unique challenges to each chapter. This approach allows us to cover a wide range of topics essential for technical interviews.
Reservation holds, time synchronization, payment processing, search autocomplete suggestions, data prefetching, full-text search (FTS) capabilities.
Chapter 8: Design the Google Drive App
File management, storage strategies, block-level synchronization, resumable file uploads, version history management, data encryption.
Chapter 9: Design the YouTube App
HTTP field selection, media streaming, content prefetching, enhanced video UX.
Chapter 10: Mobile System Design Building Blocks
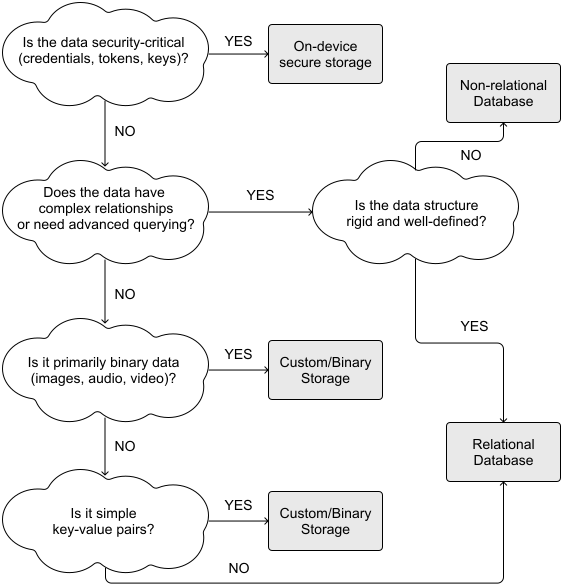
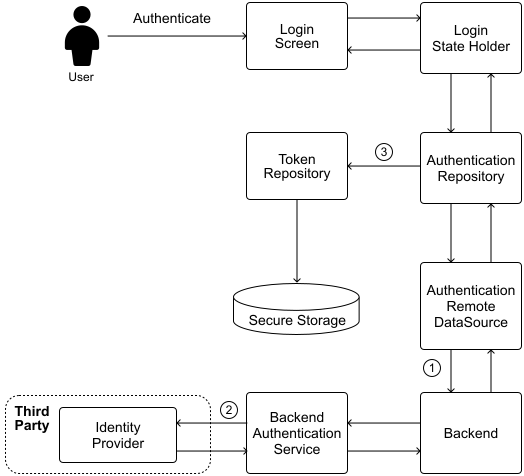
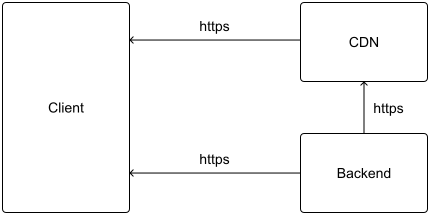
Architecture (common patterns, arch layers, model mapping, modularization, dependency injection, testing), Data storage (types and file visibility), Networking (REST, authentication, CDN, pagination), Feature development (gradual releases, force upgrading, feature flags, observability, localization, privacy, CI/CD, accessibility, performance, push notifications, app size), Device fragmentation (form factors, OS versions).
Table 1: Main topics covered in each chapter
Going beyond the interview
You'll quickly notice that each chapter contains significantly more detail than you could possibly cover in a one-hour interview. This is intentional. The comprehensive explanations help you understand not just what decisions to make, but why those decisions make sense given specific constraints and requirements. This deeper understanding enables you to:
Explain your reasoning confidently when an interviewer probes your design choices.
Adapt your approach when faced with unexpected requirements or constraints.
Recognize trade-offs and explain why certain compromises might be necessary.
Extending your learning
At the end of each case study, you'll find additional requirements or feature suggestions that weren't addressed in the main discussion. These extensions provide excellent practice opportunities to test your understanding by designing solutions to these requirements on your own before comparing your approach with the book's suggestions.
Embracing multiple valid options
Throughout this book, we present design decisions based on our best judgment given the requirements. You may disagree with some choices, and that's perfectly fine. Real-world mobile system design often has multiple valid solutions to the same problem.
If you prefer a different approach than what we present, practice explaining why your solution might work better in certain contexts while acknowledging its limitations. Use this book as a guide rather than a source of definitive answers. This mindset will develop the critical thinking skills needed for impressive interviews and effective real-world system design.
CHAPTER 02
A framework for Mobile SD interviews
02
Having a clear framework for Mobile System Design (MSD) interviews is more important than many realize. Without a clear structure, the interview can feel disorganized and challenging for both you and the interviewer. Unlike coding interviews with defined solutions, system design challenges invite multiple valid approaches, making a methodical strategy essential.
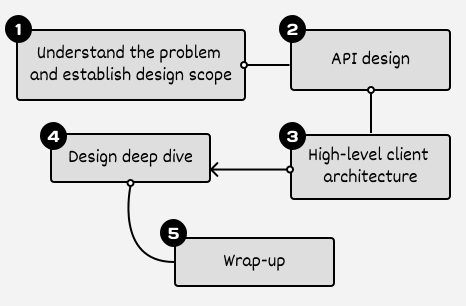
Below, we briefly outline a 5-step framework to give you a high-level understanding. Detailed explanations and practical applications of each step are explored through case studies in later chapters.
A 5-step framework for effective mobile system design interviews
Step 1: Understand the problem and establish design scope
MSD interviews typically start with broad questions such as "Design a News Feed app" or "Design a Pagination library." While these questions may seem straightforward, understanding exactly what you need to design is a crucial part of the interview.
Your first task is to clarify what's in and out of scope by asking targeted questions to define the boundaries of your design. The interviewer's answers will guide your technology choices and help you make informed trade-offs. This initial scoping sets the foundation for your solution, making each interview unique.
What kind of questions should you ask? Here's a list of different types of questions to help you get started:
What are we building? These help uncover both functional and non-functional requirements, as well as what is out of scope for the interview. For example, you could ask:
What features, screens, or critical user journeys are we designing?
Are we pre-fetching data? Are we including user authentication in the design?
For whom are we building? These help understand the scale, usage patterns, and how performant the solution should be. For example, you could ask:
How many daily active users (DAU) does the product have? What's the expected growth?
Are we building a minimum viable product (MVP) or a final product?
What's our target market? A specific region or worldwide? What's the typical usage scenario? At home or on the train?
What are the system's constraints? These clarify the system boundaries and technology choices. For example, you could ask:
Which mobile platforms are we targeting (e.g., iOS, Android, or both)?
Are there any existing systems or APIs the mobile app must integrate with?
While gathering requirements, you may find that some answers reveal information about other aspects of the system. Feel free to make reasonable assumptions based on these responses, just be sure to state them clearly so your interviewer can correct any misunderstandings.
The goal isn't to ask every possible question. Instead, focus your questions on what's most relevant for the specific problem at hand, using your judgment to determine which details are most important to clarify.
📌 Remember: Your interviewer's answers to these questions will guide your technical decisions and trade-offs throughout the design process. Make sure to reference back to these requirements when explaining your choices later in the interview.
Step 2: API design
The API design step is where you establish the contract between our client apps and external dependencies. This step is crucial because it helps align your understanding with the interviewer's expectations and creates a solid foundation for the rest of your design.
When designing an app that needs to communicate with a backend, start by defining the appropriate communication protocols for your specific use cases and the endpoints involved. On the other hand, if you're designing a mobile library, focus on outlining its public APIs, including how host apps will initialize, configure, and interact with your library.
As you define the API, outline the data models that will power these interactions. Whether you're working with JSON payloads, Swift structs, Kotlin data classes, or even protocol buffers for efficiency, these models need to capture the data's structure and relationships clearly.
Step 3: High-level client architecture
After finishing the API design, it's time to create a high-level client architecture diagram that shows how these components work together.
This high-level diagram sets the stage for the design and shows exactly which components you need to fulfill our requirements. Most importantly, it helps you validate that you have a complete end-to-end flow that meets all the functionality our system needs. As you create the diagram, you should also identify interesting points that warrant deeper discussion in the deep dive step later.
Step 4: Design deep dive
In this step, work with your interviewer to identify bottlenecks and explore specific components in greater detail. Generally, you should aim for two to three strong deep-dive discussions, though this isn't a strict rule and can vary depending on the situation.
You should continue refining your client architecture during this step. Make sure to update your diagrams to reflect any new decisions or components you introduce.
Pay attention to your interviewer's reactions and questions. If they express interest in multiple topics, manage your time carefully to give each topic the attention it deserves while staying within the interview's time constraints.
Step 5: Wrap-up (optional)
If time allows, the final phase of your interview provides an opportunity to demonstrate your ability to think critically about your design and consider future improvements. Here's how to wrap up effectively:
Summarize key decisions. If your discussion involved multiple trade-offs or complex decisions, consider providing a brief recap. This helps solidify the key points of your design and ensures the interviewer understands your reasoning, particularly after a detailed technical discussion.
Showcase critical thinking. When asked about potential improvements to your design, resist the urge to defend it as perfect. Instead, thoughtfully discuss areas where your solution could evolve. This demonstrates self-awareness and analytical thinking, qualities that interviewers value highly.
Address edge cases. Take this opportunity to discuss any failure points or error cases you haven't covered earlier. This shows that you think holistically about system reliability and user experience, not just the happy path.
Consider future scale. Think about how your system would handle growth, whether that's supporting more users or accommodating a larger development team. This demonstrates that you design with the future in mind and understand both technical and organizational scaling challenges.
Time allocation for each step
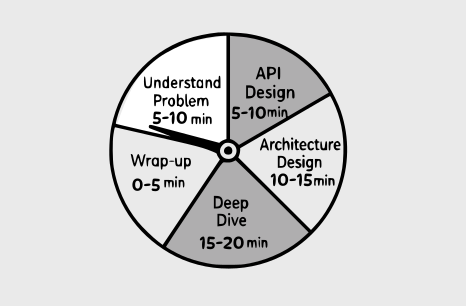
Time management is key in MSD interviews. With only 45-60 minutes to work with and a lot of ground to cover, having a solid plan helps you stay on track. Here's how to break down a typical 45-minute interview:
Understand the problem and establish design scope (5-10 minutes): Take time to fully understand the problem and define its scope.
API design (5-10 minutes): Map out how your app will communicate with backend services and define the core data models.
High-level client architecture (10-15 minutes): Outline the main components of your system and how they work together.
Design deep dive (15-20 minutes): Focus on the most important technical challenges and implementation details.
Wrap-up (0-5 minutes): Summarize key decisions and discuss potential improvements or trade-offs.
Remember that these are guidelines rather than strict rules. Be ready to adjust based on the specific problem and your interviewer's interests. The key is maintaining enough flexibility to explore important areas while ensuring you complete the full design within the time limit.
CHAPTER 03
News feed app
03
News feeds are the core feature of many popular social media platforms. From Facebook News Feed and X (formerly Twitter) Timeline to the Instagram Feed, these continuously updating streams of content keep users engaged by providing fresh updates from friends, family, and followed accounts, encouraging them to keep scrolling.
At its heart, a news feed is a continuously updating list of content items. This content typically includes status updates, photos, videos, links, etc. While each platform might brand their feed differently, the fundamental concept remains largely the same across applications. Most news feed systems share these key features:
A scrollable list of content items.
Detailed views for individual posts.
Endless scrolling functionality.
Common social interactions like likes, comments and shares.
While the core structure is often similar, specific content types and interviewer requirements can lead to varying technical approaches. In this chapter, we'll walk through the process of designing a news feed app, tackling the challenge step-by-step.
Step 1: Understand the problem and establish design scope
The first step in any system design interview is to gather information and clarify requirements. This helps us understand the features to support and overall scope of the project. Here's how a typical conversation between the candidate and an interviewer might unfold:
Candidate: Before diving into the mobile app specifics, I'd like to understand the broader ecosystem. Are we designing only for mobile, or should we consider other clients like web or wearables that might share the same backend? Interviewer: Good question. While today's focus is on mobile, we should keep in mind that there will likely be other clients in the future.
Candidate: That's helpful, thanks. I'm thinking the app should support the following features: Users can view their feed, share and like posts, see post details, and create new content. The feed would implement infinite scrolling, loading more content as users reach the bottom. And posts are displayed in the order we receive them from the server. Is this aligned with what you're envisioning? Interviewer: That's spot on.
Candidate: Great. Are we limiting posts to text only, or can users include media like photos and videos? Interviewer: Let's make it more interesting. Users can include text and media attachments such as images and videos. Additionally, let's support rich text editing, so posts can have headers, bold text, italics, and so on.
Candidate: That adds a nice touch. What about real-time features? Are we implementing live updates for things like share counts and likes? Or push notifications for new posts from close friends? Interviewer: For simplicity, let's exclude real-time updates and notifications in this design.
Candidate: Fair enough. Can you give me an idea of the scale we're working with? How many users are we expecting, and what's their geographical distribution? Interviewer: We're aiming big: 500 million monthly active users, spread across the globe.
Candidate: That's a substantial scope. Given the global distribution and the fact that users will be accessing our app from regions with varying network reliability, should we include an offline mode for viewing previously loaded content? And what about pre-fetching content to speed up initial load times? Interviewer: Offline mode is a yes, great idea. Let's skip pre-fetching for this exercise.
Candidate: Noted. Are we designing user authentication, or can we assume users are already logged in? Interviewer: Assume they're authenticated within the system.
The conversation can continue covering other topics we might consider interesting and relevant to news feed apps. Through this back-and-forth, we can build a clear picture of what needs to be designed. Let's summarize what we need to build.
Requirements
Based on our discussion, we're designing a news feed system with the following functional requirements:
Users can browse a feed of posts from others.
Users can like and share posts directly in the feed.
Users can compose posts with rich text, images, and videos.
Tapping a post opens a detailed view.
Infinite scrolling fetches more posts as users scroll down.
Offline mode allows access to previously loaded content without connectivity.
As for non-functional requirements, we need to build a system that ensures:
Scalability: Our system should handle 500 million monthly active users globally, adapting to varied network conditions while maintaining responsive performance.
Performance: The app must deliver smooth scrolling experiences and efficient post creation, with optimized handling of media content across all device types.
Reliability: Users should experience consistent functionality even with poor network connectivity, with effective caching for offline access.
Data efficiency: The system should minimize data consumption for users on limited plans through smart caching and selective content loading strategies.
Consistency: The app should maintain eventual consistency for actions performed offline, ensuring reliable synchronization when connectivity is restored.
Features that are out of scope for this exercise:
Real-time updates and push notifications.
Pre-fetching of posts before the user opens the app for quicker post loading.
Authentication, we'll assume users are already authenticated.
UI sketch
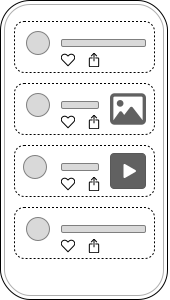
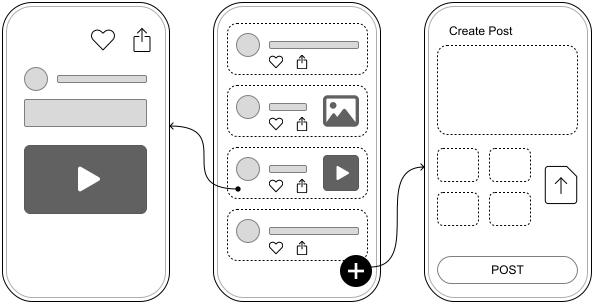
The News/Posts Feed screen is the heart of our app, displaying an endless list of posts. Users can like and share posts directly from this screen. Tapping a post opens its detailed view. A Floating Action Button (FAB) allows users to create new posts.
The Create Post screen allows users to compose new posts with rich text, images, and videos.
The Post Detail screen shows the full content of a selected post, along with options to like and share.
Having framed the problem and outlined the user experience, we've built a strong foundation for our design. Next, we'll explore the API design to support these features.
Step 2: API design
The purpose of the API design is to establish a clear and detailed agreement between the clients and the backend system. Well-defined APIs ensure that both you and the interviewer are aligned on the functional requirements. In this section, we will talk about three main areas:
Communication protocol.
API endpoints.
Additional considerations for API design.
Communication protocol
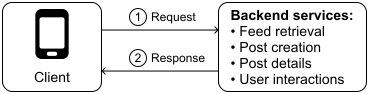
Let's first examine the main interactions that will occur between our client and backend:
Feed retrieval: When a user opens the app, the client requests recent posts from the backend.
Post creation: As users create new posts, the client sends this content to the backend.
Post details: When a user taps on a post, the client fetches additional details from the backend.
User interactions: The client notifies the backend when a user likes or shares a post.
Notice that in all these scenarios, the client initiates the interaction. Given our app's large scale and the variety of client types we're supporting, HTTP with REST APIs emerges as a suitable choice for our communication protocol. Let's examine the advantages and disadvantages in Table 1:
HTTP with REST Advantages
HTTP with REST Disadvantages
Widely used and well-understood. Developers are generally familiar with it, making implementation and maintenance easier. Servers are stateless. Each request contains all the information needed to process it, simplifying horizontal scaling and handling multiple clients. Can leverage HTTP caching mechanisms to reduce server load and improve response times by serving cached data when appropriate.
Managing different versions of an API can become cumbersome as the API evolves. Without a solid versioning strategy, some APIs may become bloated or difficult to maintain. Stateless means each request is independent and carries all necessary info, such as auth tokens or session data, every time. This repetitive overhead, especially without persistent connections, can impact mobile performance through extra data usage and connection setup latency. Some clients might receive more data than needed (over-fetching) or require multiple requests to get all necessary data (under-fetching).
Table 1: HTTP with REST advantages and disadvantages
While there are other options for client-server communication, such as GraphQL that can avoid over-fetching by allowing clients to specify exactly what data they need in a single request, we'll focus on HTTP with REST APIs in this chapter. This approach is widely used in the industry, with prominent examples including Meta's Graph API [1], Reddit APIs [2], and X (formerly Twitter) APIs [3].
For data encoding, we have several choices, including JSON, XML, and protocol buffers. Table 2 compares these options to determine the best fit for our news feed app.
JSON
XML
Protocol Buffers
Human-readable and results in smaller payloads compared to XML. Natively supported in most programming languages and commonly used with REST APIs.
Given we won't need to send much metadata in our news feed app's network requests, JSON is preferable to XML.
Could be a good option for our news feed app. However, we're not making our app performance-critical in this exercise, so we can avoid the steep setup cost by using JSON.
Table 2: Trade-offs for encoding data over the network in the news feed
For our news feed app, we'll use JSON as our data format. This choice offers a good balance of simplicity, readability, and efficiency. While Protocol Buffers could be a potential optimization, it's a more specialized technology, and not every developer is familiar with it. For simplicity, we'll opt for JSON in our design. However, if you're comfortable with Protobufs, feel free to use it for the API design. It's a great option too.
✅ Decisions made!
HTTP with REST APIs for client-server communication.
JSON as the data format for these network exchanges.
API endpoints
Now that we've chosen our communication protocol and data format, let's design the specific endpoints our system needs. We'll focus on the core interactions required for our news feed functionality.
Feed retrieval
Code
Authentication: Bearer <token>
GET /v1/feed?after=<some-value>&limit=30
    Body: empty
    Response: 200 OK. Payload of type FeedApiResponse
📌 Remember: Including a version in endpoint APIs, such as /v1/, gives us
flexibility to introduce breaking changes in newer versions while maintaining
stability in older ones. This versioning approach allows for controlled API
deprecation when needed. For more on API versioning, see Chapter 10: Mobile
System Design Building Blocks.
Data models
Since this is a GET request, the request body is empty. As a response, we receive a FeedApiResponse object with the following structure:
Kotlin
Swift
data class FeedApiResponse feed: List<PostPreview> paging: PaginationMetadata
data class PostPreview postId: Long contentSummary: String author: AuthorPreview createdAt: String liked: Boolean likeCount: Int attachmentCount: Int attachmentPreviewImageUrl: String?
struct PostPreview postId: Int64 contentSummary: String author: AuthorPreview createdAt: String liked: Bool likeCount: Int attachmentCount: Int attachmentPreviewImageUrl: String?
data class AuthorPreview id: Long name: String profileImageThumbnailUrl: String
The PostPreview data model is designed with efficiency in mind. It fetches just enough data to create a rich user experience without overloading network or client resources. Instead of retrieving all attachments, we only fetch a count and a single preview thumbnail URL. We also include key interaction details such as whether the user has liked the post.
🛠️ Platform implementation details
Throughout this book, we present API responses as Kotlin and Swift data models rather than raw JSON. In practice, these JSON payloads get converted to platform-specific data structures within the network layer (specifically in the network data sources shown in our architecture diagrams).
On Android, developers often rely on libraries such as kotlinx.serialization, or Moshi for JSON serialization and deserialization.
On iOS, Swift's built-in Codable protocol handles this elegantly, mapping JSON fields to Swift struct properties.
Pagination
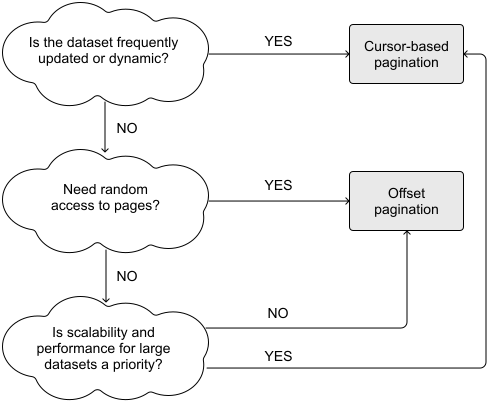
Our feed endpoint needs to support pagination since we're displaying posts in an infinite scrolling list. In Chapter 10, we cover different pagination types and their trade-offs. For our news feed, offset pagination would struggle with our frequently updated content. As users scroll deeper, the query performance degrades, and the content window becomes inaccurate as new posts are added.
Cursor-based pagination works better for our use case because it:
Handles large datasets more efficiently by using indexed columns instead of calculating offsets.
Provides better feed consistency by using unique identifiers to maintain stable ordering.
Works well with real-time content that's constantly changing
✅ Decision made! We use cursor-based pagination in the feed retrieval endpoint.
Other headers
The presence of the Authentication header in the endpoint indicates that the user needs to be authenticated to call this endpoint. Also, as we use JSON as the data format, you can assume all our requests include an Accept: application/json header by default.
Post creation
Unlike the GET requests we use to fetch data, we use POST requests to send new information to the backend:
Code
Authentication: Bearer <token>
POST /v1/posts
    Body: NewPostRequest
    Response: 201 Created
When creating a new post, the client sends a POST request with a NewPostRequest in the body. This contains all the details about the new post. The server responds with a 201 status code to indicate successful creation, but doesn't include any data in the response body.
Kotlin
Swift
data class NewPostRequest requestId: Long content: String attachments: List<NewAttachment>
Note that the requestId sent by the client isn't the same as the postId assigned by the server. Some critical information, such as the postId and created_at timestamp, is generated by the backend rather than sent by the client. This approach ensures the backend remains the source of truth for critical data. We'll explore this concept in the "Additional considerations for API design: ID and timestamp generation" section.
For attachments, our endpoint design assumes that media has already been uploaded to our servers before creating the post. The client simply includes the URL of the uploaded attachment in the NewAttachment's contentUrl field. This two-step process (first uploading attachments, then creating the post) helps manage large files more efficiently. We'll explore this process in more detail in the deep dive section.
Post details
Code
Authentication: Bearer <token>
GET /v1/posts/`{postId}`
    Body: empty
    Response: 200 OK. Payload of type PostDetailApiResponse
Following REST API guidelines, the request path includes the postId parameter to identify exactly which resource we want to retrieve.
Kotlin
Swift
data class PostDetailApiResponse post: PostDetail
struct PostDetailApiResponse post: PostDetail
data class PostDetail postId: Long content: String author: AuthorPreview createdAt: String liked: Boolean likeCount: Int shareCount: Int attachments: List<Attachment>
struct PostDetail postId: Int64 content: String author: AuthorPreview createdAt: String liked: Bool likeCount: Int shareCount: Int attachments: [Attachment]
data class Attachment id: Long type: String contentUrl: String previewImageUrl: String? caption: String?
Unlike the PostPreview data model, PostDetail contains all the information associated with a post, including the full content and all attachments with their respective content.
📌 Remember!
In apps with a list-detail structure such as our news feed, it's common to use two different data models for the same content:
A lightweight model for the list view (PostPreview in our system) that contains just enough information for a good list experience and uses thumbnails or low-resolution images to save bandwidth.
A full model for the detail view (PostDetail in our system) that includes all post details and higher-resolution images, loaded only when a user shows interest by tapping on a post.
This two-tier approach balances app responsiveness with user experience. It helps both the client and server save resources by loading detailed data only when necessary, optimizing network usage, processing power, and memory consumption. This is especially important for low-end mobile devices.
User interactions with a post
The endpoint for user interactions with posts follows a similar pattern to post creation:
Code
Authentication: Bearer <token>

POST /v1/posts/`{postId}`/interactions
    Body: PostInteractionRequest
    Response: 201 Created
Kotlin
Swift
data class PostInteractionRequest requestId: Long type: String
The interaction's type could be an enum with different values such as LIKED, REMOVED_LIKE, or SHARED. The requestId is typically a random UUID [4] generated by the client which helps the backend identify unique requests but isn't stored long-term.
📝 Note: These POST requests don't include the user's ID. Instead, the
backend extracts this information from the authentication token. This approach
not only saves bandwidth by avoiding redundant data but also prevents
potential security issues that could arise from mismatched user IDs in the
request and the auth token.
Additional considerations for API design: ID and timestamp generation
You may have noticed that when creating a new post, we don't send the postId or created_at timestamp to the backend. This deliberate choice helps maintain data integrity at scale. In large-scale applications, centralizing ID and timestamp generation on the backend offers several advantages:
Consistency: The backend can enforce uniform formats and validation rules across all clients.
Reliability: Client devices might have incorrect system clocks or could be manipulated, leading to inaccurate timestamps.
Uniqueness: The backend can guarantee unique IDs without collisions, even under high transaction volumes.
Database integration: Backend systems can leverage database features such as auto-incrementing keys and timestamp functions (such as CURRENT_TIMESTAMP) to efficiently generate these values during insertion.
Many companies have developed specialized mechanisms for generating IDs at scale, such as X (formerly Twitter)'s Snowflake ID system [5], which creates distributed, time-based IDs that maintain proper ordering while avoiding collisions across multiple servers.
By keeping these critical operations on the backend, we establish a reliable foundation for our data that becomes increasingly important as our user base grows to hundreds of millions.
Step 3: High-level client architecture
With our backend communication protocol, endpoints, and data models defined, we're ready to design the high-level architecture of our mobile system. In this section, we'll cover:
High-level mobile architecture design.
External server-side components.
Key client architecture components for UI and data layers.
Data flow across app layers.
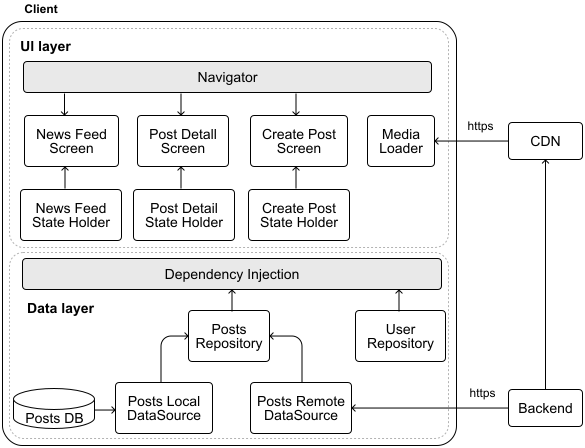
Let's build our design based on the requirements we've gathered and the APIs we've defined. These will guide our decisions about which components to include in our architecture. Figure 4 shows the high-level mobile architecture for our news feed system. Notice that the arrows represent data flow, not component dependencies. This distinction is important for understanding how information moves through our app.
Let's examine the key components of our architecture and how they work together, starting with the external server-side components.
External server-side components
Our system relies on two key external components to handle data storage, business logic processing, and content delivery.
Backend
The primary external component in our system is the Backend. As discussed earlier, it's a RESTful service that communicates with our client app using HTTPS and JSON for data exchange. The backend serves two primary functions:
It provides the client app with the data it needs such as posts, and user information.
It permanently stores users' posts and interactions.
The backend contains most of the business logic in our system, handling operations such as feed generation, post creation, and user interaction processing.
Content Delivery Network (CDN)
We can enhance our design by adding a Content Delivery Network (CDN). CDNs excel at distributing static content such as user profile images and media attachments across various geographical locations. This approach offers several benefits:
Helps load the news feed quickly and consistently regardless of the user's location.
Reduces load on servers, particularly helpful during traffic spikes or major events [6].
Improves overall performance by serving content from servers physically closer to users.
Given the scale of our system (500 million monthly active users) and the amount of static content we need to deliver, adding a CDN is a smart choice. It will help us maintain performance and user experience as our user base grows. In our setup, the backend is responsible for providing the CDN with the content to distribute.
Client architecture
Now that we've outlined the external components our client will interact with, let's dive into the core of our mobile system design. We're aiming to build an app that's robust, performant, and scalable. To achieve this, we've structured our architecture into two main layers:
The UI layer is where users interact with our app. It's responsible for displaying posts, handling user interactions, and preparing data for the screen. This layer creates the visual experience users engage with.
The Data layer acts as the backbone of our app, handling the client-side business logic for posts. It manages how posts are created, modified, and retrieved on the device.
💡 Pro tip!
During your interview, use the architectural patterns you're most comfortable with, whether that's the repository pattern, Clean Architecture, MVVM, MVI, or MVP.
What matters most isn't which pattern you choose, but how clearly you can explain your reasoning and demonstrate how data flows through your design. Interviewers want to see your thought process and how you organize components to solve real problems.
For comprehensive coverage of architectural patterns and topics, refer to Chapter 10: Mobile System Design Building Blocks.
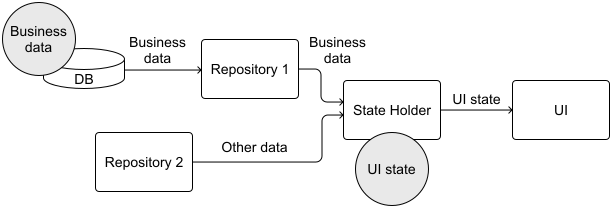
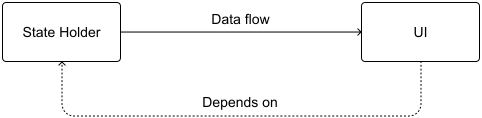
To ensure our app remains predictable and error-resistant, we're implementing Unidirectional Data Flow (UDF) and Reactive programming to propagate data through our architecture. With UDF, data flows in one direction (from data sources through our repositories to UI components) while user actions flow in the opposite direction through clearly defined channels. Reactive programming complements this by providing tools to handle asynchronous data streams and propagate changes throughout the app. Together, these approaches create a predictable, maintainable system with clear data paths and efficient state management.
🛠️ Platform implementation details
To implement UDF and Reactive Programming, Android developers can leverage Kotlin Coroutines and Flow APIs. On iOS, the Combine framework offers similar capabilities.
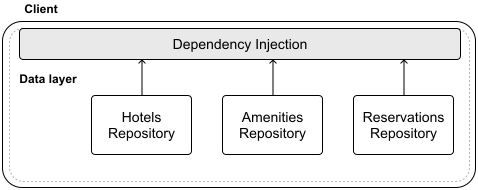
We're also adhering to key software design principles such as separation of concerns and single responsibility. Each component in our diagram has a specific, well-defined role. To tie everything together and make our app more modular and testable, we'll use dependency injection to keep our components loosely coupled.
✅ Architecture decisions made!
Layered architecture consisting primarily of UI and data layers.
Unidirectional Data Flow (UDF) and Reactive programming to shape how data flows through the architecture.
Let's now examine the key components within each layer and define their responsibilities.
Data layer
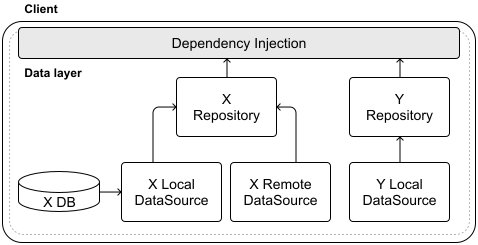
When designing the data layer, we need to consider the types of application data the app handles. For each type of application data, we typically include:
A Repository that acts as the main interface for that data type, exposing it to the rest of the app and handling related business logic.
Data Sources that manage specific data operations. We might have zero to many data sources, depending on where we need to fetch or store data.
💡 Pro tip!
The data layer is crucial as it contains both the client-side business logic and application data. In most system designs, it's worth dedicating more time to this layer as that demonstrates to your interviewer that you understand the importance of robust data management and business logic in mobile app architecture.
In our news feed app, the main type of application data is Posts. To handle this data effectively, we set up these key components in our data layer:
The Posts Repository is the central component that exposes the news feed and individual posts to the app, managing the core business logic.
The Posts Remote Data Source handles network communication with the backend for fetching and sending post data.
The Posts Local Data Source manages local storage of posts, enabling offline functionality.
Additionally, we include a User Repository to handle user-related information, such as the currently logged-in user's details and authentication token.
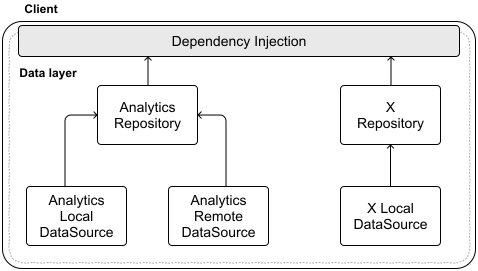
By structuring our data layer this way, we create a clean separation of concerns. Each component has a clear responsibility, making our system more modular and easier to maintain. This approach also allows us to easily add support for other types of data in the future, such as user profile data or analytics, following the same pattern.
💡 Pro tip!
When creating and discussing the high-level architecture diagram during your interview, focus on the most critical aspects rather than covering every detail. Your interviewer will likely assume you have a solid grasp of the fundamentals. Prioritize explaining your key design decisions and trade-offs. If the interviewer wants more information on a particular point, they'll ask follow-up questions.
For example, you wouldn't need to explain basic concepts like what UI and data layers are. Instead, concentrate on how you've applied these concepts to solve the specific problem at hand. This demonstrates your ability to focus on what's important and communicate effectively under time constraints, both valuable skills in real-world mobile development.
UI layer
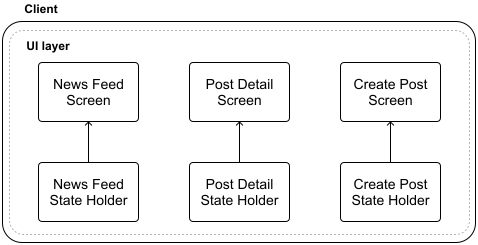
With our data layer components in place, let's move on to the UI layer, which handles how we present information to users. To keep things simple, we'll create high-level UI components for each screen we identified in our requirements gathering phase. Our system includes three main screens: News Feed, Post Detail, and Create Post.
💡 Pro tip!
Don't aim for perfection in Step 3: High-level client architecture. We're creating a basic skeleton of our mobile app's architecture, not a complete blueprint. We'll have chances to refine and improve the design throughout the interview. We should keep an eye on the clock and avoid getting caught up in details, the goal is to create a solid foundation that we can build upon later.
Each screen has a corresponding State Holder component (think of a ViewModel on Android) that serves two key functions:
It manages the UI state, determining what data should be displayed on the screen.
It handles the screen's logic, which might involve processing user interactions, transforming data for display, and coordinating with the data layer to fetch and modify application state.
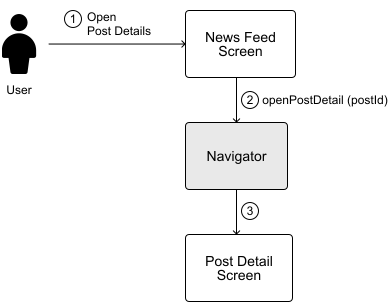
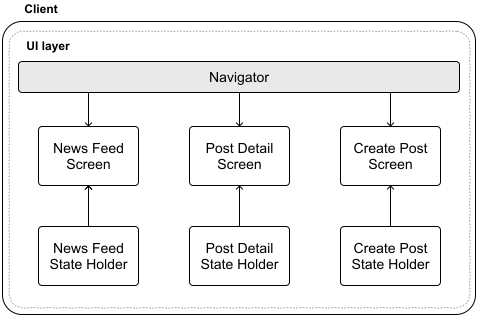
Tying these screens together is a Navigation component that manages how users move between screens and passes along any necessary information, such as a postId when opening the Post Detail screen.
Use case: News Feed
Let's use the News Feed screen to illustrate how the UI layer works in practice. While we won't cover every screen, this example represents the general approach for all screens in the app.
The News Feed State Holder automatically subscribes to the Posts Repository in the data layer. This subscription retrieves relevant post data to display to the user. The state holder exposes this data to the UI through a NewsFeedUiState stream, implemented as an observable data holder. Besides post data, the UI state may include other important information such as error messages, loading indicators, or other UI-specific states.
Kotlin
Swift
data class NewsFeedUiState feed: List<PostPreviewUiModel> isLoading: Boolean errorMessage: String?
📝 Note:! The NewsFeedUiState uses a PostPreviewUiModel instead of the previously defined PostPreview. This is intentional! It's a best practice to separate domain or data models from UI models. The UI layer often requires only a subset of the full data, sometimes even reshaped or pre-processed to efficiently render the screen. This approach keeps the UI lean, minimizes unnecessary memory usage, and allows the data presentation to evolve independently of backend or storage changes. The closer the model is to the UI, the more it should reflect what the UI needs, not how the data is stored or retrieved.
For navigation events, the UI component handles user interactions directly. When a user taps on a post in the feed, the News Feed Screen notifies the Navigation component about which screen to display next, passing along the relevant postId (Figure 5). This approach is common in event-based navigation libraries.
The News Feed State Holder also manages user interactions such as liking or sharing a post. When a user likes a post, the state holder delegates this action to the Posts Repository, which handles changes to the application data. If the system uses optimistic writes, the state holder immediately updates the UI state to reflect the like action, providing instant feedback to the user.
Common components in the UI layer
We introduce a Media Loader component to handle post media attachments including image loading, which are typically represented as string URLs in our data models. This component efficiently downloads and manages static images and other media, typically served from our CDN.
This approach centralizes media handling, ensuring consistency across the app and providing optimized caching, loading, and error handling for all visual content. The Media Loader can also implement features such as progressive loading or placeholders to enhance the user experience even further.
Data flow across app layers
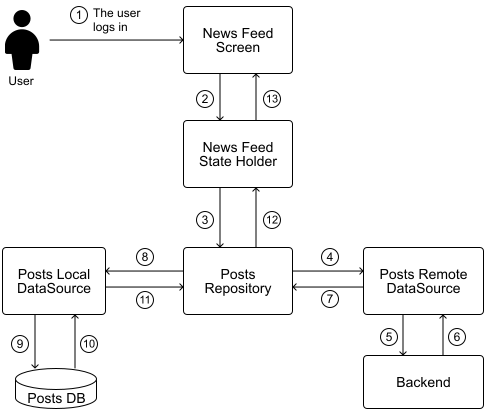
To illustrate how data flows through the app hierarchy, Figure 6 shows what happens when a user logs in to the app for the first time. As soon as login completes, the News Feed state holder subscribes to the Posts Repository's data stream. Since the local data source is empty at this point, the repository reaches out to the backend to fetch the user's news feed (step 4).
Once the network data source receives the backend response, the Posts Repository updates the local database through the local data source (step 8). This update triggers a chain reaction: the local data source emits the updated database state into the posts data stream, which propagates up to the UI, refreshing the screen with the user's news feed (step 13).
💡 Pro tip! Before moving on, pause to check that the functional and
non-functional requirements outlined earlier are covered. It's much easier to
address any missing use cases now rather than later when you're deep in
technical discussions. Think of it as double-checking your foundation. You
want it solid before building on top of it.
Step 4: Design deep dive
Now that we've sketched out the high-level client architecture, it's time to dig into the details. In a mobile system design interview, the areas you explore in depth often depend on your interviewer's interests and the unique challenges of the system you're designing. For our news feed app, we'll focus on these key areas:
Local storage and offline mode support.
Optimistic writes and offline interactions.
Displaying rich post content.
Troubleshooting janky news feed scrolling.
Local storage and offline mode support
A core requirement of our news feed app is the ability to function effectively without an internet connection. To deliver this experience, we need a robust local storage strategy that balances performance, resource usage, and user experience.
To maintain optimal performance, we need to implement thoughtful data management strategies for both our database content and media assets. Let's examine these topics: storage and eviction policies, offline mode user experience, and caching strategy for media content.
Choosing the right storage solution
Local storage in our app serves several critical purposes:
Offline browsing and resilience against poor connectivity: When there's no internet connection or in areas with spotty coverage, users can still scroll through previously cached posts, ensuring users always have something to engage with.
Improved performance: Opening a cached post details happens instantly, as data loads from local storage rather than making a network request.
When selecting a storage solution for our news feed, we need to consider the structure and access patterns of our data. Let's compare the main options in Table 3:
Relational Database
Non-relational Database
Key-value stores
Posts content is a well-structured data model that requires complex data relationships and advanced querying needs such as filtering, sorting, and potentially searching through posts. Relational databases can provide data integrity and consistency and are designed to scale efficiently.
Posts data is a well-structured data model, so we won't benefit from the advantages of non-relational databases. We need support for complex queries and cannot allow inconsistencies in our local storage.
Key-value stores aren't designed for handling large amounts of data or complex data structures. The lack of relational structure could lead to data redundancy. Storing too much data can lead to performance degradation. They don't support relationships, advanced querying, or transactional operations out of the box.
Table 3: Trade-offs for storing posts data locally on the device
Given these considerations, we'll implement a relational database for our news feed app. This solution provides the best combination of structured data storage, query capabilities, and transactional support needed for our offline functionality.
💡 Pro tip!
For most mobile apps, a relational database is the go-to choice for storing application data. It offers built-in scalability, robust platform support, and mature tooling that handles common data access patterns effectively. While other storage options exist, it's safe to consider a relational database the default starting point unless specific requirements suggest otherwise.
Database eviction policy
Our news feed app serves a large user base with a constant stream of new content. Storing every post indefinitely on the client would be inefficient and wasteful of device resources. Instead, we need an intelligent eviction policy that keeps our local database lean and relevant.
We can design a hybrid approach combining three complementary policies:
Least Recently Used (LRU): Prioritizes keeping posts the user has recently viewed, as these are most likely to be accessed again.
Time-to-Live (TTL): Sets expiration times for each post, ensuring our cache doesn't contain stale content.
Custom Minimum Threshold: Guarantees that a baseline number of posts always remains available for offline viewing.
This combined approach offers an optimal balance, prioritizing content that's both fresh and relevant to the user while efficiently managing device storage. When determining optimal cache settings, we'll start with these defaults:
Maximum cache size: 100-200MB, adjustable based on usage patterns.
Default TTL: 15 days for regular posts.
Minimum threshold: 50 posts or equivalent to fill 2-3 screens.
These parameters should be configurable from the backend, allowing us to fine-tune based on real-world analytics data.
Offline mode user experience
When a user has no internet connection and opens the app, they'll see posts previously cached in the database. This provides a seamless experience even without connectivity. To make this work, we follow the Single Source of Truth (SSOT) pattern and store posts in a local database on the device as soon as we receive them from the backend. For security reasons, we scope the database to the current user, clearing it when they log out to protect their data.
The Posts Repository consistently exposes a stream of post data from the local data source, regardless of internet connectivity. This approach establishes the local data source as the single source of truth for post data in the client, ensuring users always have access to content they've previously seen.
📌 Remember the Single Source of Truth (SSOT) pattern.
A fundamental principle in our architecture to support offline mode is establishing the local database as the single source of truth for post data within the client. This means:
All UI components retrieve data exclusively from the local database, never directly from the network.
Network responses update the local database, which then propagates changes to the UI.
User interactions are recorded in the local database before being sent to the server.
This pattern creates a consistent flow of data regardless of network status: Backend → Local Storage → UI.
If the user attempts to refresh their feed while offline:
The Posts Repository tries to fetch data from the remote data source.
This attempt fails due to the connection issue.
The failure propagates to the state holder, which updates the UI state.
The UI displays an appropriate message about connectivity issues.
Previously cached content continues to be displayed.
This offline-first approach ensures our app remains useful and engaging even in challenging connectivity scenarios, significantly improving the user experience in regions with unstable networks or for users who frequently transition between connected and disconnected states.
🔍 Industry insights:
Early versions of Facebook's iOS app used Apple's Core Data to cache feed stories locally. This became slow at their scale and they replaced it with a lightweight, denormalized disk cache using object serialization, seeing significant performance improvements [7].
Instagram's mobile app also caches feed content on disk to enable offline usage. It maintains a response store for feed JSON and an image/video cache so that content can be delivered from disk as if from the network when offline [8].
Reddit chose to use Android's internal storage for video caching after external storage proved unreliable on some devices [9].
Optimistic writes and offline interactions
Optimistic writes and offline interaction capabilities are crucial for delivering a top-notch user experience at scale, especially for boosting engagement and retention. These features allow users to interact smoothly with the app, even on low-end devices or in areas with poor network connectivity.
Optimistic writes are a design strategy that immediately updates the app's UI in response to user actions, without waiting for backend confirmation. This approach creates a more responsive and fluid experience by giving users the impression that their actions take effect instantly.
When handling a UI event that calls for optimistic writes, such as liking a post, the state holder performs two parallel actions:
It immediately updates the UI state to reflect the change, as if the data layer had already confirmed it. This is the essence of an optimistic write.
It calls the Posts repository to update the application state and notifies the backend via a network request.
Once the backend syncs the optimistic write, the UI remains unchanged even if the underlying application data updates. This is because the UI was proactively updated during the initial optimistic write.
Supporting optimistic writes and offline interactions effectively requires careful implementation. We'll explain how to approach this from four angles:
Data layer updates.
Error-handling strategies.
Common challenges and how to avoid them.
A walkthrough of an optimistic write data flow example.
Data layer updates
Optimistic writes work well for some events, but it's important to go a step further. We should store all user interactions locally until the backend confirms them. This approach supports offline functionality and ensures we don't lose any data during offline periods or poor network conditions.
To make this work, we use the local database as a queue, keeping track of user interactions in the order they happen. If there are user interactions to process when the device is offline, the repository will go through the queue in the background when the device regains connectivity.
To maintain the order of records, we use an AUTO INCREMENT field as the id in a new UserInteraction data model. This model also includes:
postId and userId to identify the relevant post and user.
action field for interaction types (e.g. LIKED, UNLIKED, SHARED, BOOKMARKED).
status field to track the interaction's state (PENDING, FAILED or CANCELED).
updated_at timestamp to record the last sync attempt.
failureCount to track unsuccessful sync attempts.
Kotlin
Swift
data class UserInteraction id: Long postId: Long userId: Long action: UserInteractionAction status: UserInteractionStatus createdAt: String updatedAt: String failureCount: Int
enum class UserInteractionAction LIKED, UNLIKED, SHARED, BOOKMARKED
enum UserInteractionAction case liked, unliked case shared, bookmarked
enum class UserInteractionStatus PENDING, FAILED, CANCELED
enum UserInteractionStatus case pending, failed, canceled
It's important to sync all user interactions with the server, even if multiple interactions occur on the same post. This data can provide valuable insights for analysis. To handle potential conflicts, we can employ the "last write wins" strategy.
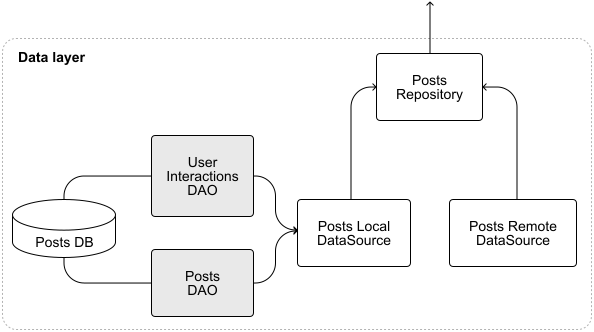
In our local database, we add a new UserInteractions table to store all user interactions. Once an interaction successfully syncs with the server, the Posts Repository removes it from the UserInteractions table, and updates the corresponding entry in the Posts table.
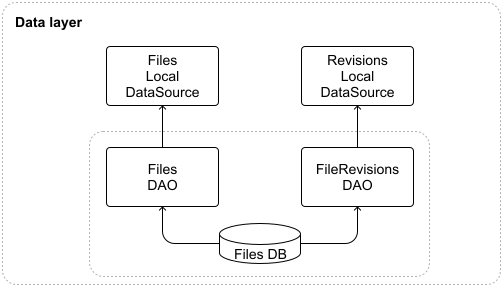
We represent the database tables in the data layer design (Figure 7) as Data Access Objects (DAO) components.
Error handling strategies
When user interactions fail to sync with the server, we need a robust error handling approach. Let's implement a retry mechanism with exponential backoff:
If a network request fails, we mark the interaction status as FAILED.
The system then attempts to retry the sync after a progressively longer delay.
This process continues until we reach a maximum number of attempts.
What happens if we hit that maximum? It depends on how critical the interaction is. For less critical actions, we might simply update the status to CANCELED and roll back any UI changes. For more important interactions, we could notify the user. For instance, if a post submission fails, we might send a push notification asking the user to retry manually.
But what about cases where the backend state has changed since our optimistic write? This is where conflict resolution comes into play. We have a few options: discard the local interaction, attempt to merge the changes, or notify the user about the conflict and let them decide. The best approach often depends on the specific use case and the nature of the data involved.
Common challenges
While optimistic writes and allowing offline interactions can greatly enhance user experience, they come with their own set of challenges. Let's explore some common ones and how we address them in our system:
The big challenge is maintaining data consistency between the client and backend.
To overcome this, we treat the backend as the single source of truth. Whenever we receive data from the backend, we update our local Posts database to match, ensuring alignment.
User interactions could potentially be applied out of order.
To mitigate this, we include timestamps for both creation and last modification of each interaction. Furthermore, we send these interactions to the backend in order, ensuring sequential processing.
Users might experience confusing UI behavior or anomalies if optimistic updates are rolled back or if conflict resolution isn't clear.
For critical scenarios, we notify the user of what happened and guide them on next steps.
Optimistic writes can put additional strain on the backend due to retries and conflict resolution.
We mitigate this by implementing an exponential backoff strategy for retries. We could also batch user interactions if needed.
Optimistic write data flow
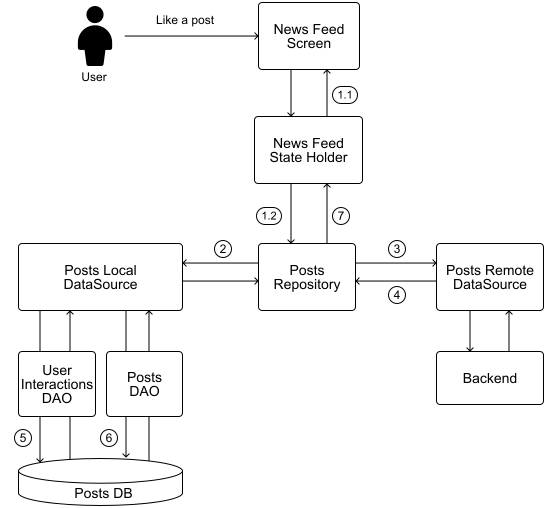
When the state holder receives the UI event, it performs two actions in parallel:
Updates its UI state to reflect the change (step 1.1), providing instant feedback to the user.
Notifies the repository about the interaction (step 1.2), which persists locally (step 2) and syncs with the backend (step 3).
After the interaction is successfully synced (step 4), the local data source first removes the user interaction from the database (step 5) and updates the Post (step 6).
Subsequent updates to the local database after the optimistic write don't cause new UI state emissions from the state holder (step 7). This is because the UI state doesn't change, we updated the UI state optimistically in step 1.1.
By implementing optimistic writes and robust offline capabilities, we create an app that feels responsive and reliable under all network conditions. This approach significantly enhances user experience and effectively manages the complexities of distributed systems.
🔍 Industry insights:
Instagram developed a Direct's Mutation Manager in their mobile apps to
manage potential issues such as network failures or data inconsistencies for
optimistic writes [10].
Displaying rich Post content
Our system requirements include allowing users to add rich text to their posts. While the Post's content is stored as a simple String, displaying it as plain text wouldn't meet user expectations. Modern social networks offer features such as links, mentions, and text styling. Our application goes a step further by supporting rich editing, including elements such as headers, bold text, and italics.
To handle this rich content effectively, we have two main options: create our own markup language or use an existing one like HTML or Markdown. Let's examine the trade-offs of each approach.
Developing a custom markup language can be expensive and requires ongoing maintenance. Facebook's past attempt at this, the Facebook Markup Language (FBML), was eventually deprecated [11] in favor of standard HTML and JavaScript, primarily using React. X (formerly Twitter), on the other hand, still uses a custom approach with their own text library [12]. Some companies opt for existing solutions, such as Reddit, which uses a specialized version of Markdown [13].
Given our current needs, creating a custom markup language or parsing method isn't the best use of our resources. Instead, let's consider which standard markup language would best suit our system in Table 4:
Option
Advantages
Disadvantages
HTML
Supports rich formatting needed for news feed posts. Allows custom elements for future features such as text highlighting in posts or user mentions. Consistent rendering across platforms.
Complexity could impact user post creation for non-technical users. Requires sanitization to prevent XSS attacks. Rendering HTML content can be resource-intensive and it may affect scrolling performance on low-end devices.
Markdown
Simpler for users to create formatted posts with basic features. Can be converted to HTML for rendering, giving us flexibility in how we process and display content.
Limited formatting options for our rich content needs and might be insufficient for complex post layouts. Markdown still has its own syntax that users need to learn.
Table 4: Trade-offs for encoding posts content
Given our requirements for a modern, rich, and interactive news feed with diverse formatting options, we've decided to use HTML for encoding post content. This choice allows us to leverage HTML's versatility while addressing its potential drawbacks:
To manage HTML's complexity, we'll establish best practices that define a consistent way to implement each app feature. This approach will help prevent multiple HTML methods from being used for the same functionality.
Since our backend sends post content and summaries as HTML-encoded strings, we need to prioritize content validation and sanitization. This step is crucial in preventing security vulnerabilities such as XSS attacks.
🛠️ Platform implementation details
To validate and sanitize HTML-encoded Strings, we can use the OWASP Java HTML Sanitizer or the jsoup libraries on Android. For iOS, we can use the HTMLKit or Purifier libraries.
By implementing these strategies, we can harness HTML's power while mitigating its potential issues, ensuring a robust and secure content handling system for our news feed.
Rendering HTML-encoded content
When it comes to displaying HTML-encoded content on the screen, we have two primary options to consider: using a WebView to render the HTML directly, or parsing the HTML and displaying it using native UI components. Table 5 takes a closer look at these approaches and weighs their pros and cons.
Option
Advantages
Disadvantages
WebView
Renders complex post formatting with minimal effort and supports all HTML features in a single component. Ensures consistent appearance across all platforms, as WebViews use the same rendering engine as mobile browsers.
Higher memory usage may impact feed scrolling. Interactions feel less native in the scrolling feed and it's more difficult to integrate seamlessly with feed animations.
Native UI components
Better scrolling performance in the feed. Consistent with platform design language that provides smoother integration with other gestures.
Requires custom HTML to native UI parser implementation. More development effort to maintain.
Table 5: Trade-offs for rendering HTML post content on the screen
For simpler HTML content such as formatted text with links and images, parsing HTML into native components strikes the right balance between performance and visual quality. And since we can establish HTML best practices when creating post content, we opt to parse the HTML and render it using native UI components. This choice enhances app performance and delivers a more polished user experience.
✅ Decisions made!
HTML for encoding post content to support rich text.
Native UI components to render HTML-encoded content on the screen.
Updates to the high-level architecture diagram
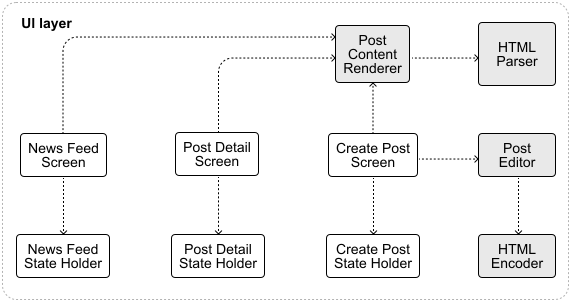
To enhance our high-level architecture diagram, we add a Post Content Renderer component. This component renders posts on the screen using native components, assisted by the HTML Parser. All screens in our diagram will depend on the Post Content Renderer, improving code readability, testability, and allowing reuse of logic across screens.
Similarly, we introduce a Post Editor for the Create Post Screen. This editor lets users type rich content, which is then encoded to a String using the HTML Encoder component. Figure 9 illustrates these new dependencies within the UI layer.
This approach ensures a consistent, high-quality rendering experience across all screens where post content appears, while maximizing performance and maintaining the native feel of our application.
🔍 Industry insights:
Back in 2012, the Facebook iOS app switched from HTML5 to native iOS code to optimize performance [7].
Reddit reported that moving to Server-Driven UI and stripping unneeded data from responses reduced home feed latency by 12% [14].
Janky news feed scrolling
During mobile system design interviews, the interviewer might pose hypothetical scenarios to test your troubleshooting skills and technical depth. A common question might be: "What could be causing janky, slow scrolling in the news feed? If this were happening, how would you fix it?"
This type of question evaluates your understanding of mobile performance optimization and your ability to diagnose complex issues. Let's explore the potential causes and solutions.
Inefficient rendering
Several potential issues could lead to janky scrolling in a news feed. Let's examine the most common culprits.
View recycling inefficiencies are a primary concern. The main goal of item recycling is to reuse views that are no longer visible instead of creating new ones for each item that scrolls into view. This reduces the number of view creation and layout operations, which significantly improves performance and reduces memory usage.
When a new view comes into the visible area, the system should check a recycling pool for an available reusable view with the matching identifier and reconfigure it with new data. Because views are recycled rather than constantly created and destroyed, the main thread has more bandwidth to handle user interactions and animations, resulting in smoother scrolling.
🛠️ Platform implementation details
Both platforms provide native APIs that support efficient view recycling:
On Android, use RecyclerView in the View system, or lazy lists such as LazyRow and LazyColumn in Jetpack Compose.
On iOS, use UITableView or UICollectionView, or the List API in SwiftUI.
Asynchronous content loading is another critical aspect built into our news feed design. As we've covered, heavy objects such as images and attachments in the post data model come as URL strings rather than actual content. When rendering a post item on screen, these objects can be loaded asynchronously, freeing the main thread from expensive operations that could cause stuttering.
Other UI inefficiencies related to rendering that affect performance and overall user experience might include:
Main thread blocking: Heavy computations, synchronous network calls, or file I/O operations on the main thread can freeze the UI. To address this, move all resource-intensive operations to background threads.
Complex layouts: Deeply nested view hierarchies are costly for the rendering engine. Flatten layouts where possible, reduce hierarchy depth, and eliminate redundant or overlapping views.
Inefficient state management: Unnecessary re-renders caused by poorly managed state can severely impact performance. Implement debouncing for state updates to limit their frequency, and introduce caching and memoization to avoid redundant operations.
Unoptimized images: Loading and displaying large images without proper optimization is often a major performance bottleneck. Ensure your media loading library is performant, and consider resizing images to the required dimensions before display if the server doesn't provide optimized versions.
Dynamic image and video quality
The user experience in our app, particularly during news feed scrolling, is directly influenced by device performance. A high-end device is more likely to deliver a smooth experience compared to a low-end one with limited resources. CPU and memory usage, GPU performance, network conditions, and battery level all affect overall performance.
For devices with limited capabilities, we can implement a dynamic strategy that adapts image and video quality based on current conditions. This approach helps:
Reduce load times and make the app more responsive.
Maintain a steady frame rate during scrolling.
Use device resources efficiently.
Make the app more resilient across diverse devices and conditions.
To implement this feature, we first define multiple quality settings for images and videos. Depending on device performance and network conditions, the app adjusts quality dynamically based on thresholds:
Images: Low (480x320 or lower), Medium (720x480), High (1080x720 or higher)
Videos: Low (360p), Medium (720p), High (1080p or higher)
Our backend should be capable of delivering different quality versions of the same media based on the client's request. For each image or video, it needs to store several pre-processed versions at different quality levels or dynamically generate the requested quality variant on demand.
🛠️ Platform implementation details
To improve scroll smoothness on Android, Facebook developed Litho, an open source UI rendering framework which moves much of the UI work off the main thread. Facebook saw up to 20% faster scrolling performance in News Feed after the Litho-powered video component and in some list subviews as high as 42% scroll performance improvement [15].
Pinterest's teams discovered that video startup delay was hurting engagement on their feed. They optimized their Adaptive Bitrate (ABR) streaming pipeline to speed this up. Their startup latency dropped ~36% [16] [17].
Reddit cancels video prefetch downloads if the user scrolls too fast to defer non-essential work during scroll [9].
Step 5: Wrap-up
In this chapter, we've designed a comprehensive news feed system that enables users to create, view, and interact with rich content posts. Our approach leveraged HTTP with REST APIs for client-initiated requests and JSON for data encoding in network communications. We established well-structured backend endpoints following REST principles to support our core functionality.
We designed a client architecture with offline support, diving deep into key areas such as selecting the right local storage, implementing optimistic writes and seamless offline interactions, rendering rich Post content, and addressing janky scrolling in the news feed.
If you find yourself with extra time during your interview or want to challenge yourself with additional features, consider exploring these extensions:
Comment functionality: Enable users to comment on posts and respond to other comments [18].
Push notifications and live updates: Notify users of interactions with their posts and implement real-time updates for metrics like counts and new comments [19].
Search capabilities: Implement search for both online and offline posts. For local database searching, explore Full-Text Search (FTS) [20].
Post editing: Develop a strategy for handling updates to posts that have already been synced with clients.
Scheduled posts: Allow users to create posts that publish at a future time. Android [21] and iOS [22] links.
Intelligent pre-fetching: Download posts when the device is in ideal conditions [23].
Multi-language support: Design the system to handle posts in various languages. Android [24] and iOS [25] links.
In this chapter, we'll tackle the design of a chat app. Chat apps are so common that designing one has become a very common question in mobile system design interviews. Figure 1 showcases some of the most popular chat applications currently in the market.
Chat apps have evolved to meet a wide range of communication needs. They serve as platforms to host one-on-one conversations, help friend groups stay connected, allow families to share life updates and photos, and even enable gamers to strategize during online matches. With such a diversity of potential functions, it's crucial to define clearly the specific requirements for the chat app we're designing.
Step 1: Understand the problem and establish design scope
When tackling the design of a chat app, it's essential to first get on the same page as your interviewer. Here's how that conversation might play out:
Interviewer: Welcome to today's session! We'll be designing the mobile client app architecture and backend communication for a chat application.
Candidate: Thanks, I'm looking forward to this! Before we dive in, I'd like to clarify a few points about the app's functionality. Typically, chat apps allow users to send and receive messages in real time, view their conversation list, and access chat history offline. Are we focusing on one-on-one chats, group chats, or both? This could significantly impact our design approach. Interviewer: Let's keep it simple and focus solely on one-on-one conversations. We'll leave group chats out of scope for now.
Candidate: Understood. Now, about the backend's role, some chat systems, such as WhatsApp [1], use the backend as a temporary message relay, holding messages until they're delivered to clients, without permanent storage. Is this the approach we're taking? Interviewer: Yes, that's exactly the approach we'll use for this design.
Candidate: I see. Are we supporting only text messages, or should we consider attachments and reactions, as well? Interviewer: Let's keep it simple and focus on text messages only for now.
Candidate: Alright. What about common chat features such as push notifications for new messages, typing indicators, and online status updates? Should we include these in our design? Interviewer: Yes, let's incorporate those features.
Candidate: Great. Now, can you give me an idea of the app's scale? Are we designing for a startup or a large-scale, global application? Interviewer: We're thinking big here. We're looking at about 30 million daily active users worldwide.
Candidate: That's a significant user base. For user registration and authentication, can we assume users are already authenticated when they access these features, and that their contact lists are pre-loaded when they open the app? Interviewer: Yes, those are safe assumptions.
Candidate: Got it. And lastly, about security, we'll obviously secure the client–backend connection, but should we also consider encrypting messages stored on the device to protect against potential security breaches? Interviewer: For now, let's keep message encryption on the device out of scope.
This back-and-forth helps us build a comprehensive picture of our design requirements. Let's take a moment to summarize what we've established so far.
💡 Pro tip!
When addressing a familiar interview question, take the lead by proposing both functional and non-functional requirements upfront. This proactive approach not only showcases your leadership skills but also helps your interview stand out.
Requirements
Based on our discussions, we're designing a chat system with the following functional requirements:
Users can view their recent conversations, organized by the timestamp of the latest message.
Users can chat in real time, including both sending and receiving text messages.
During conversations, users can monitor their contacts' online status, typing indicators, message delivery status, and read receipts.
Users can browse their chat history without an internet connection. The conversation history loads efficiently through pagination.
The app supports push notifications to alert users of new messages.
For our non-functional requirements, we need to build a system that ensures:
Scalability: Our system must handle 30 million daily active users worldwide and deliver reliable performance across various network conditions.
Data integrity: The app should maintain consistency during offline use, especially when storing messages that will be delivered once connectivity returns.
Durability: Client-side data must remain reliable since it serves as the source of truth for messages.
💡 Pro tip!
When asking about Daily Active Users (DAU), you're doing more than just getting a number. The scale and geographic distribution of users directly influence your technical decisions. High DAU numbers often signal a need to focus more on topics such as performance optimization, resource efficiency, scalable architecture patterns, and the right network protocol choice.
Always connect scale requirements to your technical choices during the interview. This demonstrates thoughtful system design and shows you understand how business requirements shape architecture decisions.
To keep our design focused, we'll consider the following features out of scope:
User authentication and registration.
Group chats and media file sharing.
Message encryption.
As we move forward, it's important to remember that the scale of our system will significantly influence our design decisions. We'll need to consider carefully how each choice affects our ability to efficiently manage a large user base and high message volume.
UI sketch
Figure 2 shows the basic layout of our chat app. On the left, the Chat List screen displays recent conversations and a button to start a new chat. Tapping a conversation opens the Conversation screen, which shows recent messages, the other user's online and typing statuses, and a text field to send new messages.
Step 2: API design
Now that we've established our requirements, let's dive into the API design. This step is crucial for understanding how the client and backend will communicate. In this section, we'll look at:
Client and backend expectations.
Server-initiated connections.
Network protocols in the chat app.
Endpoints and data models.
Client and backend expectations
In a chat system, clients don't communicate directly with each other. Instead, they connect to a backend that acts as a mediator. When a client sends a message, it goes to the backend. The backend then identifies the intended recipient and forwards the message. If the recipient isn't online, the backend holds on to the message until they connect.
Figure 3 illustrates the interactions between clients and the chat backend service, showing how messages flow through the system.
Let's examine how our client app and backend need to communicate. There are two distinct types of interactions we need to handle:
When clients initiate contact with the backend, such as sending messages or syncing pending ones, HTTP works well for these scenarios since these client-initiated requests follow a simple request-response pattern.
When the backend needs to reach clients for real-time features, such as message delivery or online status updates, the recipient's app needs to know about these events immediately, but HTTP only allows clients to make requests, not the other way around.
While push notifications can help inform users about new messages or events when the app isn't active, they aren't enough for an active chat session. Real-time features like message delivery, read receipts, and online status updates require something more immediate and reliable than push notifications, which can be slow and inconsistent. Given how sensitive chat apps are to latency, we need a more robust solution that can deliver a seamless, real-time experience.
Server-initiated connections
Over time, developers have created several techniques to support server-initiated connections. These include polling, long polling, Server-Sent Events (SSE), WebSockets, and other solutions built on top of HTTP/2 such as gRPC.
These approaches frequently come up in mobile system design interviews, so it's important to understand them. Let's explore the key methods that have shaped how mobile apps communicate with servers.
Polling
Polling (or short polling) is a basic technique whereby the client repeatedly asks the server, "Do you have any new messages for me?". As shown in Figure 4, the process works like this: The client asks for new data; the server responds with or without new information; the client waits briefly, then asks again.
While easy to implement, polling can be wasteful. It often leads to many unnecessary requests, especially when there's no new data to report. This constant back-and-forth can burden both the client and the server, consuming extra network resources and processing power.
Long polling
Long polling emerged as an improvement by addressing some of the inefficiencies of traditional polling. Let's take a closer look at how it works in Figure 5.
With HTTP long polling, the client asks the server for updates and waits. Unlike short polling, the server holds the connection open until there's new data or a timeout occurs. Once the client gets a response, it immediately asks again.
While better than short polling, long polling has some issues too:
It's still inefficient for infrequent chatters, as most requests will just time out.
In multi-server setups, the server with the new message might not be the one connected to the recipient.
Servers can't easily tell if a client has disconnected.
Server-Sent Events
Server-Sent Events (SSE) offer a way for servers to push updates to clients over a single HTTP connection. This approach, illustrated in Figure 6, differs from traditional request–response models.
At its core, SSE maintains an open HTTP connection between the client and server. To prevent the connection from timing out due to inactivity, the server may periodically send a colon-prefixed comment line. This simple technique keeps the connection alive, even when there's no actual data to transmit.
📝 Note! This is how SSE works under the hood:
The client sends an HTTP GET request to the SSE server endpoint, setting the Accept header to text/event-stream.
The server replies with a 200 OK status and sets the Content-Type to text/event-stream. It then keeps the connection open, ready to push updates.
The server sends events in a simple text format, continuously updating the client.
If the connection drops, the client typically reconnects automatically. To avoid missing events, it can include a Last-Event-ID header in its reconnection request, allowing the server to send only the events that occurred since the last received event.
SSE is far more efficient than polling methods. By establishing a single, persistent connection and pushing updates only when necessary, SSE significantly reduces network traffic and server load. This makes it a more resource-friendly option for real-time communication.
In the context of our chat app, we could leverage SSE for server-initiated events while using standard HTTP requests for client-initiated actions. This hybrid approach would allow us to receive messages and other events through the SSE connection, while sending user messages via separate HTTP requests.
Although SSE presents a viable solution, there's another alternative to consider: WebSockets.
WebSocket protocol
The WebSocket (WS) protocol has one of the most common solutions for real-time, bidirectional communication between clients and servers. Figure 7 shows how it works.
WebSocket connections begin their life as standard HTTP connections that are then "upgraded" to WebSocket connections through a well-defined protocol. This approach allows WebSockets to operate seamlessly even in the presence of firewalls, as they utilize the same ports (80 and 443) as HTTP and HTTPS traffic.
Once established, this two-way channel enables both client and server to freely exchange messages. WebSockets don't impose restrictions on data formats; they accommodate everything from plain text to binary data. This flexibility has contributed to their widespread adoption.
Messaging protocols used in real-world apps
WebSockets are built on top of TCP (Transmission Control Protocol) and provide a reliable connection for data transfer. TCP establishes and maintains a connection throughout the session, ensuring data packets are delivered in order and without errors. It handles error-checking, acknowledges received packets, and resends lost ones.
In contrast, UDP (User Datagram Protocol) doesn't establish a connection first before sending data. It sends each packet independently, which means it can't guarantee delivery, order, or error-free transmission. While this approach lacks TCP's reliability, it has less overhead, making it faster for certain applications.
Over the years, developers have created various real-time messaging protocols designed for specific use cases. These protocols are typically built on either TCP or UDP, depending on their needs. Some notable examples include:
WebSocket: This full-duplex protocol enables communication over a single TCP connection.
Slack uses WebSockets for real-time communication [2] [3], and Uber used it as well in the past [4] [5].
XMPP (Extensible Messaging and Presence Protocol): An XML-based protocol supporting real-time messaging and presence information.
WhatsApp historically used XMPP as the backbone of its messaging system [6], and Kik Messenger also used it [7] .
MQTT (Message Queuing Telemetry Transport): A lightweight publish/subscribe messaging protocol that operates over TCP.
Facebook Messenger's initial implementation used MQTT [8].
WebRTC (Web Real-Time Communication): This protocol primarily uses UDP (with TCP fallback) to support peer-to-peer audio, video, and data streams.
Discord [9] uses WebRTC for voice and video functionalities.
IRC (Internet Relay Chat): Operating on TCP, IRC is used mainly for group communication in channels, but it also supports private messaging.
Mozilla used IRC as the primary tool for community communication [10].
Network protocols in the chat app
In summary, Table 1 compares the network protocols that can be used for server-initiated connections to meet the system's real-time requirements.
Option
Advantages
Disadvantages
Short polling
Simple implementation. Works with standard HTTP infrastructure and wide compatibility across platforms.
Inefficient with excessive requests. High bandwidth usage occurs when many requests return no new data
Long polling
Near real-time updates with fewer requests than short polling. Good for non-critical updates.
Complex timeout handling. Doesn't scale well with many clients as it's resource-intensive on servers.
Server-Sent Events (SSE)
Single open HTTP connection for server-to-client messages. Built-in reconnection support and works well over HTTP/2.
Unidirectional (server to client only) so it requires a separate mechanism for client-to-server communication. Resource-intensive with many connections.
WebSocket
True bidirectional communication. Low-latency message delivery and reduced overhead without repeated request/response cycles.
More complex to implement as it requires more infrastructure support (e.g., load balancers). Scaling persistent connections is challenging.
Table 1: Trade-offs for choosing the network protocol for real-time features
After evaluating the different options, we chose a hybrid approach for the chat app:
HTTP with REST APIs for client-initiated operations such as sending messages.
WebSocket for receiving real-time messages from the server.
While implementing two protocols adds some complexity, this creates a more maintainable system as the app grows. By using WebSocket only for real-time features rather than all communication, including sending messages, we avoid common scaling issues that typically emerge in production environments.
⚠️ Careful!
Scaling WebSocket services in production requires careful consideration. Some key challenges include:
Managing persistent connections consumes significant server resources.
Load balancing WebSocket connections is more complex than standard HTTP traffic.
Connection recovery and state management need thorough handling.
Monitoring and debugging WebSocket services require specialized tooling.
By limiting WebSocket usage to just real-time features rather than all communication, we can better manage these scaling challenges.
We chose WebSockets over SSE for our chat application primarily because they offer better performance in chat scenarios. WebSockets provide lower latency and reduced header overhead, which is crucial when sending frequent small messages such as typing indicators and read receipts. While SSE could handle one-way server updates, WebSockets have more consistent support across mobile platforms and come with mature tooling for managing connections. This includes built-in capabilities for reconnection strategies and keep-alive mechanisms.
This hybrid approach, which combines HTTP and WebSockets, has been widely adopted in the industry. For example, Slack uses HTTP for most write operations through their Web API [11], while leveraging WebSocket for real-time events through their Real-Time Messaging (RTM) API [12]. Discord follows a similar pattern [13], demonstrating how well this architecture works at scale.
The client establishes the WebSocket connection for real-time updates when the app starts, and it remains active until either the client or server terminates it. Figure 8 demonstrates how clients and servers would interact with HTTP for client-initiated requests and WebSockets for real-time updates in our system.
✅ Decisions made!
HTTP with REST APIs for sending messages and other client-initiated operations.
WebSocket for real-time features, where the server needs to push updates to clients.
Careful scope limitation of WebSocket usage to manage scaling complexity.
Endpoints and data models
Now that we've chosen our communication protocol and data format, let's dive into the specific endpoints and data models we'll need.
Client-initiated requests
For sending messages, we can define the following endpoint:
Code
Authentication: Bearer <token>
POST /v1/messages
  Body: NewMessageRequest
  Response: 201 Created. Payload of type NewMessageResponse
Kotlin
Swift
data class NewMessageRequest requestId: Long toUserId: Long content: String createdAt: String
The requestId field in NewMessageRequest acts as an idempotency key to allow the backend to de-duplicate requests when the same request is accidentally sent multiple times, and the optional fromMessageRequestId field in NewMessageResponse helps match a Message with the corresponding NewMessageRequest.
We could also define another endpoint for syncing new messages when the app initializes:
Code
Authentication: Bearer <token>
GET /v1/messages?lastSyncedMessage=`{messageId}`&limit=`{limit}`
  Body: empty
  Response: 200 OK. Payload of type SyncMessagesResponse
Data models
The main application data model in our system is the Message. Here's what it looks like:
Kotlin
Swift
data class Message messageId: Long fromUserId: Long toUserId: Long content: String status: MessageStatus createdAt: String
enum class MessageStatus PENDING, SYNCED, DELIVERED, READ
enum MessageStatus case pending, synced, delivered, read
The status field drives what message indicator the UI displays on the screen and contains the following values:
PENDING: The backend hasn't received the message yet.
SYNCED: The backend has received the message.
DELIVERED: The backend has delivered the message to the recipient.
READ: The recipient has read the message.
Another key data model is the ConversationPreview, which represents what users see in the Chat list screen. It's worth noting that the following data models related to client app screens are private to the client. The backend doesn't concern itself with how the client displays messages.
Kotlin
Swift
data class ConversationPreview contact: User lastMessageSummary: String lastMessageTimestamp: String unreadCount: Int
struct ConversationPreview contact: User lastMessageSummary: String lastMessageTimestamp: String unreadCount: Int
data class User id: Long name: String avatarUrl: String lastConnectedAt: String
struct User id: Int64 name: String avatarUrl: String lastConnectedAt: String
The ConversationPreview is a lightweight model containing just enough information to display a conversation in the Chats list. When a user taps on one of these items, it opens the Conversation screen with that user. Since we can only have one conversation per user, the User's id serves as a unique identifier for each conversation.
When the user opens the Conversation screen, the app loads the full Conversation data type, which contains more detailed information about the chat:
Kotlin
Swift
data class Conversation contact: User contactInfo: ContactInfo? unreadCount: Int messages: List<Message>
struct Conversation contact: User contactInfo: ContactInfo? unreadCount: Int messages: [Message]
data class ContactInfo onlineStatus: String typing: Boolean
For the real-time features powered by WebSocket, we use a Uniform Resource Identifier (URI) format similar to HTTP URLs. While HTTP URLs begin with http:// or https://, WebSocket URIs start with ws:// for standard connections or wss:// for secure, encrypted ones. For our chat backend service, we'll use the following URI: wss://my-api.chat.com/v1/socket/updates.
📌 Remember!
We include versions in our API endpoints for good reasons. This practice gives us the flexibility to introduce breaking changes or major new features in newer versions while keeping older versions stable. It also allows us to deprecate outdated APIs in a controlled manner. For a deeper dive into API versioning, refer back to Chapter 10: Mobile System Design Building Blocks.
When sending data over the Websocket, we use JSON in the following format:
Code
{
  "type": "message_type",
  "payload": {}
}
Each event consists of two main parts: a type field that specifies the event type (as defined earlier), and a payload field containing the actual event data as a JSON object. The content of the payload varies depending on the message type.
Once the WebSocket connection is established, the backend can send real-time updates like the following:
new_message: New message for the client.
message_read: A message has been read by the recipient.
contact_status_update: Update on the contact's status, including online status, typing indicators, or other relevant information.
Step 3: High-level client architecture
Now that we've established the API design, let's explore the high-level client architecture. We'll focus on:
External server-side components.
Client architecture components for UI and data layers.
Data storage.
Figure 9 shows the high-level architecture of the chat system.
📝 Note: The components identified in the chat system don't differ much from those identified in the previous chapter when designing a News Feed. Thus, we'll go through this section quickly. If you have questions, revisit Chapter 3: Design a News Feed App.
External server-side components
Our system relies on the Backend, CDN, and the Push Notifications Provider components.
The third-party Push Notifications Provider allows us to reach users even when they're not actively using the app, handling the complex infrastructure needed for reliable notification delivery. We'll explore push notifications in more depth during our deep dive section.
Client architecture
Building on the foundation laid in previous chapters, we choose a layered architecture that follows Unidirectional Data Flow (UDF), reactive programming, and other key principles, such as separation of concerns, to ensure our app is robust, performant, and scalable.
Data layer
The Message is the central type of application data in the chat app. To handle this effectively, we've incorporated various data layer components, with the Messages Repository at the core, managing all read and write operations. Similarly, we've included a Users Repository to handle user-related information such as names and profile images.
The Messages Repository works with both local and remote data sources. While client-initiated requests flow through traditional HTTP endpoints via the Messages Local DataSource component, the dedicated Real time updates Remote DataSource component maintains a persistent WebSocket connection to receive real-time updates from the backend. This dual approach ensures that the system stays responsive to both user actions and server events.
The Push Notifications Client component serves as a listener for notifications from the external provider.
UI layer
The UI layer is built around the app's main screens: the Chat List and Conversation. To optimize performance, we have centralized image loading into a single Image Loader component, which fetches data from the content delivery network (CDN).
The Message List is a key component. It displays all messages of a conversation in chronological order, including those that failed to send or are still pending. Failed messages are indicated on the UI, and a resend option is provided for each message.
Data storage
Let's explore the best way to store messages in the chat app. While mobile platforms offer simple storage options such as SharedPreferences on Android and UserDefaults on iOS, these key-value stores aren't the right fit for our needs. They work well for small pieces of data such as user preferences, but they weren't designed to handle growing message histories or the complex relationships between messages, conversations, and users. As message volume increases, these simple storage solutions would slow down and make it difficult to search through conversations effectively.
A relational database is a good choice for our chat app. Messages are naturally structured data: each message belongs to a conversation, has an author, and follows a clear format.
📝 Note: For a deeper dive into comparing different storage alternatives, refer to the Data Storage section in Chapter 10: Mobile System Design Building Blocks.
Relational databases excel at managing these relationships while providing three crucial benefits:
They handle complex queries efficiently. When users search their message history or filter conversations, the database can quickly find and return the right messages, even as the history grows large.
They ensure data consistency and provide ACID properties (Atomicity, Consistency, Isolation, and Durability). When multiple messages are being sent and received simultaneously, the database maintains data integrity and prevents conflicts. This reliability is essential for a chat application.
They support future growth. As we add features such as message reactions or thread replies, we can extend our database schema without disrupting existing messages. This flexibility lets our app evolve while keeping all message history intact.
These capabilities make relational databases ideal for handling the complex, growing, and interconnected nature of chat message data. While they may require more initial setup than simpler solutions, they provide the robust foundation we need for a reliable chat application.
Eviction policy
Managing local storage is crucial for our chat app since all conversations are stored on the device. While we could automatically manage storage through eviction policies or time-based deletion, putting users in control often provides a better experience. Popular messaging apps take different approaches: WhatsApp alerts users when storage runs low and guides them through freeing up space [14], while Slack automatically removes messages older than 90 days or a year for their free tier[15].
Similarly, we could implement one of the following options:
Implement eviction policies that remove messages and files based on specific criteria such as message date or attachment size.
Set up automatic deletion after a defined time period.
Let users manage their own storage by showing them usage stats and cleanup options.
💡 Pro tip!
When designing mobile systems, certain decisions, such as how to handle message storage under memory constraints, often involve product teams. While you can propose different approaches and analyze their trade-offs during the interview, it's wise to first check with you interviewer on whether these product-level decisions are within scope before diving into implementation details.
For our chat app, we can suggest a user-centric storage management strategy if the interviewer is okay with that decision. Our strategy works as follows:
Monitor available device storage through periodic checks.
Proactively alert users when space runs low, offering clear options to delete older messages, remove entire conversations, or clean up other app data.
By giving users visibility and control over storage management, we help them make informed decisions about their chat history while preventing the app from consuming too much space.
✅ Decisions made!
We choose a relational database to persist message data on disk.
We alert users when storage runs low.
Step 4: Design deep dive
Now that we've established the client-backend communication protocol and outlined the client architecture, it's time to dive deeper into some key areas. We'll concentrate on the following five critical areas:
Message ordering on the screen.
Sending messages.
DB implementation details.
Push notifications.
Message ordering on the screen
Message ordering is fundamental to chat apps. It's what makes conversations feel natural and easy to follow. When messages appear in the wrong order, users can quickly become confused and frustrated. What seems like a simple requirement, showing messages in chronological order, actually involves several challenging edge cases on mobile devices:
Network delays can cause messages to arrive out of sequence.
Offline messages need to be integrated once users reconnect.
Different devices may have mismatched system clocks.
Both past messages and new updates must maintain consistent ordering.
Message lifecycle
Let's explore how messages flow through our system to make a better decision on screen message ordering. Figure 10 illustrates this process:
The Messages repository immediately creates and stores new messages, and the UI displays them on screen right away to provide instant feedback.
Behind the scenes, the repository forwards this message to the Messages remote data source, which packages it as a NewMessageRequest and sends it to the backend via HTTP.
The backend processes this request, generating a unique messageId for the message.
The backend then takes two parallel actions: (step 4.1) sends a 201 response back to the sender with a NewMessageResponse object, and (step 4.2) notifies the recipient, either through a WebSocket if they are active, or a push notification if they are inactive.
Once the sender's client receives the HTTP response, it updates the message in local storage with the new messageId. Lastly, the UI refreshes to show successful delivery.
Message ordering
In steps 1 and 5 of Figure 10, the client needs to display the message on the screen. To implement reliable message ordering in our client app, we need to make a key design decision: what field should we use to sort messages on the conversation screen?
The Message data model provides two potential fields for ordering: the messageId assigned by the server when the message is processed and the createdAt timestamp set by the client when the message is created. Table 2 explores trade-offs between different approaches.
Trade-offs for ordering messages in the client
Order by
Advantages
Disadvantages
messageId
A server-generated ID ensures consistent ordering across clients. Backend remains the source of truth.
The client doesn't have the messageId until the backend generates it. Doesn't support offline messaging effectively.
createdAt timestamp
Low latency. Immediate message display without waiting for the backend. Supports offline messaging.
Vulnerable to inconsistencies from device clock differences. Susceptible to client-side manipulation.
createdAt timestamp with client-backend clock synchronization
Combines timestamp benefits with improved reliability. Reduces ordering issues through synchronization, for example, via WebSocket events or Meta's Simple Precision Time Protocol [16].
Clock drift between devices can still cause problems. Complex to implement accurately across diverse networks.
Table 2: Trade-offs for ordering messages in the client
While synchronizing client and backend clocks could work, it would add significant complexity and cost to our system. Instead, we can mitigate the downsides of messageId and createdAt approaches by combining them:
Messages that have been successfully sent to and acknowledged by the server are ordered by messageId.
Messages that are still waiting to be sent or are in the process of being sent are ordered by createdAt timestamp and always appear at the end of the message list.
Most popular chat apps use a server-assigned ID to sort messages on the client side. While some apps publish detailed documentation about it, such as Discord's Snowflake [17] id approach [18], others, such as WhatsApp with its id field [19], Facebook Messenger with mid [20] or Slack with ts [21], are more opaque about their specifics. How to order pending messages is a product decision, and apps might decide to implement it in different ways.
✅ Decisions made!
The Conversation screen uses a hybrid approach to order messages on the screen:
Messages that have been successfully sent to and acknowledged by the server are ordered based on a server-generated messageId.
Messages that are still waiting to be sent or are in progress are ordered based on the client-generated createdAt timestamp and always appear at the end of the message list.
messageId responsibilities
In our system, the messageId plays a crucial role in maintaining the correct order of messages. They're designed to be sortable by time, ensuring that newer messages always have higher IDs than older ones. The backend is the source of truth for generating these IDs to ensure data integrity, reliable delivery, and consistent message ordering.
While this might seem straightforward, creating these IDs correctly can be tricky, especially for a large-scale system. That's why we typically delegate this responsibility to the backend. Servers are better suited to quickly and accurately generate unique, time-ordered IDs for millions of messages.
Sending messages
Sending messages reliably in a mobile app isn't always straightforward. Network issues can prevent messages from reaching their destination. To handle this challenge, we need a way of tracking different message states: messages not yet sent, messages in transit, and messages that failed to send.
The data layer can model those states with the following MessageRequest data model. Just before sending the message, the remote data source maps this into a NewMessageRequest object. This approach helps us handle various message scenarios and implement retry mechanisms if needed.
Kotlin
Swift
data class MessageRequest requestId: Long toUserId: Long content: String status: MessageRequestStatus lastModifiedAt: String lastSentAt: String? failCount: Int?
enum class MessageRequestStatus DRAFT, PENDING, SENT, FAILED
enum MessageRequestStatus case draft, pending, sent, failed
The status field tracks the message's current state:
DRAFT: The message is created but not yet sent by the client.
PENDING: The message is queued and ready to be sent to the backend.
SENT: The client has delivered the message to the backend via a send_messages event, but it hasn't received a delivery acknowledgment as part of the messages event.
FAILED: Either the server reported a failure for this message or the request timed out.
📝 Note: You might notice there's no SUCCEEDED status in our MessageRequest model. This is by design. When the server acknowledges a message's delivery, we don't simply update the status. Instead, we remove the MessageRequest entirely and create a new Message object with a RECEIVED status. The NewMessageResponse model contains the information we need for this conversion, including the backend-generated messageId and the fromMessageRequestId.
Similarly, you'll never see a Message with a PENDING status in our local data source. The PENDING state is exclusive to message requests. When displaying messages in the UI, we combine both message requests and processed messages.
Sending messages data flow
Let's explore how data flows through the system when a message is sent successfully. We already saw Figure 10 with the high-level process; Figure 11 illustrates the detailed data flow when the backend confirms message delivery:
The Messages Remote DataSource gets a success response from the backend.
The Remote DataSource passes this information to the Messages Repository.
The Messages Repository then performs two database operations:
Removes the temporary message request from storage.
Creates a new Message entry with the confirmed ID from the backend.
These database changes automatically trigger updates that flow through the app, showing the user their message was delivered successfully (steps 4-7).
The process works similarly for read receipts. When someone reads a message:
The backend sends a read_messages event through the WebSocket connection.
The client's Real-time Updates Remote DataSource receives the event.
It notifies the Messages Repository about the read status change.
The Repository updates the message status in the local database.
This change then flows through to the UI, updating the read status indicators.
Message delivery failures
While our previous example showed a successful message delivery, real-world scenarios aren't always smooth. Sometimes, we might never receive a response for a particular NewMessageRequest. This can happen due to unstable network connections or other unforeseen issues.
When a request fails or times out, we don't give up immediately. Instead, we update the MessageRequest status to FAILED and increment its failCount. This tracking allows us to decide whether to keep retrying with exponential backoff or stop retrying completely after a certain number of failed attempts.
📌 Remember!
Exponential backoff is a retry strategy whereby the delay between attempts is progressively increased. For instance, if we start with a one-second delay, the next retry might wait two seconds, then four seconds, and so on. This approach avoids overwhelming our system with rapid-fire retries and gives the network a chance to recover.
We don't want to retry forever, so we set a maximum retry limit. If a message fails too many times, we automatically stop trying, mark it as permanently failed, and notify the user, offering them options to retry manually or delete the message.
✅ Decision made! We use an exponential backoff algorithm to retry failed messages.
Data layer design update
The new functionality we've introduced to handle failures, reconnections, and message requests has significantly impacted our client architecture. Figure 12 illustrates these changes in the updated data layer.
To streamline the Messages remote data source and prevent it from becoming overburdened, we've introduced several new components, each with specific responsibilities:
The Messages Scheduler component orchestrates message sending from a background thread. It batches messages when appropriate and manages retries for failed messages, working in tandem with the Messages Timeout Controller.
The Message Timeout Controller component monitors timeouts for messages awaiting backend confirmation.
The Pending Messages Provider component retrieves message requests that are either pending or failed to send from the local data source. Following dependency injection best practices, the actual implementation would rely on the Messages Local Data Source.
By introducing more components and reducing the complexity of the Messages Remote Data Source, we enhance the overall readability and maintainability of the system.
🔍 Industry insights:
Airbnb developed a message synchronization mechanism to reduce network requests and data inconsistencies, resulting in faster inbox loading and an improved user experience, particularly in areas with slow network connections [22].
Facebook Messenger's clients handle offline messaging through an orchestrated sync service. In the Messenger “Lightspeed” rebuild, Facebook introduced a module called MSYS (Messenger SYnc System) to manage local data and tasks [23].
DB implementation details
When it comes to implementing our database, SQLite stands out as an excellent choice for mobile devices. It's a lightweight yet powerful relational database system that can be easily embedded into mobile operating systems. SQLite's support for complex queries and transactions makes it well-suited for our chat application's needs.
🛠️ Platform implementation details
Apple's CoreData can use SQLite as its underlying storage mechanism. You might also want to consider other open source alternatives such as SQLite.swift [24] or FMDB [25]. On Android, the most popular choices are Google's Jetpack Room [26] and Square's SQLDelight [27].
To maximize performance, we'll need to carefully structure our data models. This means optimizing our entity-relationship models to better align with how SQLite operates. We'll store regular messages in the Messages table and unsynced message requests in the MessageRequests table. This separation is important because unsynced requests don't have a Message id yet.
SQLite statements
Here are the instructions to define the tables in SQLite:
Code
CREATE TABLE Users (
  id INTEGER PRIMARY KEY,
  name TEXT NOT NULL,
  avatar_url TEXT,
  last_connected_at TEXT,
)
Code
CREATE TABLE Messages (
  id INTEGER PRIMARY KEY,
  from_user_id INTEGER NOT NULL,
  to_user_id INTEGER NOT NULL,
  content TEXT NOT NULL,
  status TEXT NOT NULL,
  created_at TEXT NOT NULL,
  FOREIGN KEY (from_user_id) REFERENCES Users(id),
  FOREIGN KEY (to_user_id) REFERENCES Users(id)
);
Code
CREATE TABLE MessageRequests (
  request_id INTEGER PRIMARY KEY,
  to_user_id INTEGER NOT NULL,
  content TEXT NOT NULL,
  status TEXT NOT NULL,
  last_modified_at TEXT NOT NULL,
  last_sent_at TEXT,
  fail_count INTEGER,
  FOREIGN KEY (to_user_id) REFERENCES Users(id)
)
📝 Note: For the data model's IDs, we use an INTEGER in the SQLite statement even if that's represented as a Long in Kotlin or Int64 in Swift.
SQLite uses a dynamic type system based on type affinity, which means it associates storage classes with columns based on the declared data type. INTEGER is a type representing a signed integer, stored in 1, 2, 3, 4, 6, or 8 bytes. Any type name that contains the string "INT" (e.g., INT, INTEGER, BIGINT, SMALLINT) will have an INTEGER affinity.
Data layer updates
Figure 13 illustrates the updates to our data layer design. We've represented the three newly created tables as distinct Data Access Object (DAO) components. To separate concerns, we split the different types of application data (messages and user information) into their own repositories.
and local data sources-related components
It's important to note that while we've split our message storage across different tables, this shouldn't impact the overall data flow of the application. We hide the fact that messages are split across two tables behind the data layer. The repository merges data from Messages and MessageRequests, so higher layers of the app see a unified conversation list and don’t need to know about the split.
Challenges
Storing messages locally on a device for a chat application sounds straightforward, but it comes with its own set of hurdles. Let's explore these challenges and discuss practical solutions:
Managing table dependencies and schema initialization
When working with multiple SQL statements, whether they're included in the same or different SQL script files, the execution order matters. The Users table must be created before other tables since they depend on it. Keeping all these CREATE TABLE statements in a single SQL script file helps prevent execution order issues and makes the database setup more reliable.
For simplicity, consistency, and data integrity, we've chosen to consolidate all three tables (Users, Messages, and MessageRequests) within a single SQLite database file named chats.db.
While separating Users into its own database may promote modularity or support future cross-app reuse, this approach introduces several complications:
Foreign key constraints across separate database files are not enforceable, so referential integrity must be maintained manually in the application layer.
Managing multiple databases in the same app requires careful orchestration, especially when setting up the database in different environments (development, testing, production).
Separate databases increase the likelihood of incorrect execution order, which can result in schema setup failures. Debugging these issues can be time-consuming and frustrating.
By keeping all tables in a single chats.db database file, we've opted for simplicity and reliability in our current scenario. This choice allows us to focus on other aspects of the system design without introducing unnecessary complexity in our database setup.
✅ Decisions made!
The Users, Messages, and MessageRequests tables are kept in the same chats.db database.
CREATE TABLE statements are part of the same SQL script file.
Size and performance
As your chat app grows, the database can become large and slow down app performance. Both Android and iOS have limits on efficient data storage and access.
To address these performance challenges, we could:
Split large tables into smaller ones. For example, divide the Messages and MessageRequests table by user IDs, where each logged-in user's messages are stored in their own database file (e.g., chats-currentUserId.db). This helps manage database size and improve query performance for the current user's data.
Add indexes to frequently searched columns, such as to_user_id. But be careful, while indexing speeds up searches, it can slow down adding new data.
Batch transactions by grouping multiple database writes into a single transaction instead of performing them individually. This reduces disk I/O operations and enhances throughput.
Set up proper error handling with retry mechanisms for temporary failures, especially during high load periods.
Use a connection pool to manage concurrent database access efficiently in case multiple threads access the database simultaneously. This prevents bottlenecks and ensures efficient resource usage.
📌 Remember! Mobile clients should perform all database operations on a background thread to prevent blocking the UI thread and ensure a responsive user experience.
Push notifications
Our design requirements include implementing push notifications to alert users about new messages when they are offline. We've already outlined the key components for push notifications in our high-level architecture diagram. Figure 14 illustrates the various elements involved in the push notification system. Let's dive deeper into how these components interact and explore the platform-specific approaches for Android and iOS.
Sending push notifications from the backend
The backend triggers a push notification when a message is sent to an inactive user, that is, one without an active WebSocket connection to our servers. To deliver these notifications, the backend sends HTTPS requests to an external Push Notifications Provider. This provider is Firebase Cloud Messaging (FCM) for Android devices and Apple Push Notification Service (APNs) for iOS.
To correctly route notifications, the backend maintains a mapping between users and their devices. This mapping is created during the app installation process, where each device registers for push notifications in the background. The backend then stores a unique token for each user's device, allowing for targeted notification delivery.
📌 Remember!
There are many types of push notifications you can send from the backend, for example, alert notifications that immediately alert users; silent notifications that are processed in the background without letting the user know; and rich media notifications that can include images, videos, or other media.
In our case, we send alert notifications to keep the user informed regarding how many unread messages they have and the message content.
Receiving push notifications
Android and iOS devices maintain a low-power, persistent TLS-encrypted TCP connection to FCM and APNS servers, respectively. This approach eliminates the need for individual apps to manage their own connections, which would be resource-intensive. When a notification arrives, the device either wakes up the relevant app or displays the notification if the app isn't running.
🛠️ Platform implementation details
On Android and iOS, the system maintains a persistent connection to handle push notifications efficiently. Android uses Google Play Services for this purpose, while iOS relies on a background service called the push notification daemon.
For Android developers, implementing push notifications involves creating a service that extends FirebaseMessagingService. iOS developers, on the other hand, work with the UNUserNotificationCenterDelegate protocol, typically integrating it into the app's UIApplicationDelegate.
The handling of notifications differs based on the app's state:
If the app is in the foreground, the Push Notifications Client processes the notification directly and calls the Messages Repository to sync messages.
If the app is in the background or terminated, the device shows the notification in the system tray. When the user taps on it, the system brings the app to the foreground, allowing the Push Notifications Client to access the notification payload.
Challenges with push notifications
While push notifications are a powerful feature, they come with several challenges that developers need to navigate:
FCM, APNs, or even the device itself might throttle notifications, especially in power-saving modes where the system may delay delivery, limit network access, or batch requests to conserve battery.
Apps must obtain user consent to send notifications. If users decline or later opt out through device or app settings, your app loses this communication channel.
Android and iOS use distinct APIs and workflows for push notifications. This necessitates platform-specific code and can result in inconsistent user experiences due to varying feature support and behaviors.
Push notifications often need to direct users to specific screens within the app. This requires implementing URL schemes or universal links. Restoring the appropriate app state based on these deep links can be tricky, particularly if the app wasn't already running.
Ensuring compatibility across various devices and OS versions is crucial but challenging. The asynchronous nature of push notifications can make debugging delivery issues particularly complex.
Given these potential pitfalls in message delivery, order, and overall complexity, our chat app uses push notifications primarily as a lightweight alert mechanism to notify users of new messages.
🔍 Industry insights:
Slack's server-side infrastructure decides when and what to push. Every message posted in Slack goes through Slack's event pipeline, and a background job is enqueued to handle potential notifications. Slack's job queue system processes over a billion jobs per day, including the fan-out of push notifications [28].
Step 5: Wrap-up
In this chapter, we've designed a chat system. We used HTTP for client-initiated requests and WebSockets for real-time updates, including read receipts and users' online statuses.
We outlined the client architecture, defined the backend HTTP and WebSocket endpoints, and created the necessary data models. We also took a closer look at message ordering on the screen, how the client sends messages, the database implementation, and push notifications.
If you have extra time in your interview or want to challenge yourself with different requirements, consider these additional topics:
Online status or Presence information [29]: How WebSocket disconnections affect the user's online status and what role TCP half-open state [30] plays in this.
Group chat functionality: Design message creation and delivery for group settings. Think about implementing role-based permissions for group management [31] and adding user mention capabilities within group conversations.
Enhanced security: Implement database encryption to protect conversations from unauthorized access. You could also explore end-to-end encryption to ensure only senders and recipients can read messages [32].
Rich media support: Extend conversations with attachments such as images, videos, and location data. Address the challenges of larger file sizes through compression techniques and implement thumbnail generation for efficient media previews.
Message management: Design systems for editing and deleting messages. Consider how to track and display edit history for transparency, and implement selective message deletion (for sender only or all participants).
Search capabilities: Develop search functionality within individual conversations and create a global search feature across all chats [33].
Stock trading apps tackle some unique technical challenges. They're not just another app. They're fast-moving platforms where timing is everything, and getting accurate, real-time information to users immediately can make a huge difference in their financial decisions. Figure 1 shows some of the most popular stock trading apps in the industry.
The core challenge lies in managing high-frequency data streams. Every price change and market shift needs to reach users with minimal delay, as even a few seconds of latency could mean missed opportunities.
And it's not just about being fast. These apps handle real money and sensitive financial information, so security and reliability must be robust. We need to build in strong security, dependable APIs, and make sure we're following financial regulations to keep things running smoothly and safely.
Step 1: Understand the problem and establish design scope
To figure out what we're building, let's picture a quick conversation with an interviewer. This back-and-forth helps us define the app's main features and set some clear boundaries.
Candidate: Before we dive in, I'd like to understand the scope of the trading functionality we're building. What's our stock trading app focusing on? Just stocks, or are we considering other instruments, such as options and futures too? Interviewer: Let's keep it straightforward for now and focus on stocks.
Candidate: Sounds good. I'm thinking of key features such as placing and canceling orders, viewing portfolio details, showing real-time prices, and historical data. Does that cover it? Interviewer: Pretty much! Let's also add a simple chart for historical stock trends. It'll give users a better sense of what's happening.
Candidate: How about push notifications for price alerts? And what kind of scale are we looking at? Big user base across multiple markets? Interviewer: Definitely add notifications. For scale, we're looking at around 500k daily active users across different markets. The app needs to handle market data for thousands of stocks with real-time price updates.
Candidate: Given the focus on security and compliance, I propose minimizing sensitive data storage on the device and implementing robust security measures. Should we include authentication in the scope? Interviewer: Good call. Let's assume users are already authenticated. Tech-wise, consider this a greenfield project.
Requirements
Based on that discussion, here's what our stock trading app needs to deliver:
Users can see their portfolio with live prices of stocks.
Users can buy and sell stocks by placing and canceling orders.
Users can see historical stock data in charts.
The system sends price alert notifications.
As for non-functional requirements, we need to build a system that ensures:
Real-time data: Our system must push market updates to users with minimal delay, ensuring they have the most current information when making trading decisions.
Performance: The UI must remain smooth even while handling streaming data and complex visualizations, and trades need to execute quickly and reliably.
Security: Financial data must be protected at all times, with strong authentication mechanisms and full compliance with financial regulatory standards.
Features that are out of scope for this exercise:
Options and futures trading.
User registration.
UI sketch
Let's think about how the app will look. Figure 2 lays out the main screens:
The Home screen (left) shows users their financial snapshot, portfolio, and recent orders at a glance.
The Stock Detail screen (center) digs into a specific stock, with historical data and trading options.
The Place Order modal (right) provides a streamlined experience for users to buy or sell.
Step 2: API design
Now we'll establish how our client and backend will communicate. We'll focus on the communication protocol, client-backend interactions, and core data models.
Choosing the right communication protocol
The stock trading app requires two primary forms of interaction: standard client-server exchanges, such as submitting orders or retrieving portfolio details, and real-time updates, such as live stock price feeds. To meet these demands efficiently, we adopt a hybrid protocol strategy:
HTTP with REST APIs is ideal for client-initiated actions, such as placing orders, querying accounts, and retrieving historical data. REST offers a robust, scalable framework widely utilized in mobile development due to its structured request-response model.
WebSockets are a great option for delivering real-time data, including stock price changes and order status notifications. By maintaining a persistent, bidirectional connection, WebSockets enable the server to push updates to the client instantly, ensuring low-latency delivery of time-sensitive market information.
This combination provides a good balance between standard request-response patterns and continuous data streaming. Many trading platforms such as TradeRepublic [1] use this tech stack, confirming its effectiveness at scale.
Endpoints and data models
With the communication protocols established, let's dive into the specific endpoints and data models we'll need.
Stocks
These endpoints provide access to stock information and historical trends:
GET /v1/stocks/{symbol}
retrieves detailed data for a specified stock, including current price, daily high/low, and percentage change.
GET /v1/stocks/{symbol}/history ?interval={interval}&period={period}
supplies historical price data, with parameters allowing customization of time intervals (e.g., 1m for one minute, 1d for one day) and periods (e.g., 1wk for one week, 3mo for three months).
The corresponding data model is:
Kotlin
Swift
data class Stock id: String symbol: String name: String currentPrice: BigDecimal changePercent: BigDecimal highPrice: BigDecimal ...
For financial apps such as stock trading platforms, always use BigDecimal in Kotlin or Decimal in Swift instead of Float or Double types.
Floating-point types (Float/Double) can introduce subtle rounding errors that are unacceptable in financial contexts. BigDecimal provides exact decimal representation and precise arithmetic operations. While those operations are somewhat slower than primitive types, the guaranteed precision is essential for maintaining data integrity.
Portfolio and orders
These endpoints facilitate portfolio management and trading:
GET /v1/portfolio
provides the user's current portfolio, detailing owned stocks and quantities.
GET /v1/orders?status={status}&page={page}&limit={limit}
returns a paginated list of orders, filterable by status (e.g., open, executed, canceled).
POST /v1/orders
creates a new buy or sell order.
DELETE /v1/orders/{orderId}
cancels an existing order.
For order history, we implement offset pagination. This approach works well for this use case because:
Orders rarely change after creation.
Users typically focus on recent trading activity, and offset pagination provides efficient access to recent orders.
The data models are defined as:
Kotlin
Swift
data class Portfolio stocks: List<PortfolioStock>
struct Portfolio stocks: [PortfolioStock]
data class PortfolioStock stock: Stock quantity: BigDecimal averagePrice: BigDecimal
With our API design in place, let's develop the high-level mobile architecture. Figure 3 illustrates this architecture, with arrows showing the flow of data through the system.
Let's see how the key components of our architecture interact with each other.
External server-side components
Before we get into the client itself, let's look at the external pieces it relies on:
The Backend talks to the client through REST APIs and WebSockets, managing requests and keeping data consistent.
The CDN speeds up access to static content such as historical data or chart assets by caching it near users.
The Push Notifications Provider keeps users informed with timely alerts for price changes or order updates even when the app's in the background.
The API Gateway is the gatekeeper that handles authentication and traffic, shielding the backend from overload or bad actors.
API Gateway
In our stock trading app, security is non-negotiable. We need robust authentication, careful request monitoring, and strict policy enforcement—all while maintaining a seamless user experience. This is where the API Gateway [2] plays a crucial role.
Serving as our system's front door, the API Gateway validates and routes all incoming client requests to the appropriate backend services. It blocks any suspicious or unauthorized requests before they can reach our core systems.
The API Gateway handles several key responsibilities:
Security: It manages user authentication and authorization, implements rate limiting, and detects suspicious clients to protect our system.
Traffic management: It balances load across services and controls request volumes to prevent system overload during peak trading hours.
Request processing: It validates all incoming requests, transforms data formats when needed, and manages request/response headers to ensure proper communication.
Monitoring: It tracks API usage, performance metrics, and error rates to maintain system health and identify potential issues early.
Simplification: It provides a clean, unified API that shields mobile clients from the complexity of our backend architecture.
Client architecture
Our app follows a clean layered architecture that separates concerns between the UI and data layers, creating a more maintainable and testable codebase.
The UI layer consists of three primary screens, each backed by its own state holder to manage presentation logic:
The Home screen serves as the app's central hub, displaying the user's portfolio overview and recent trading activity.
The Stock Detail screen provides comprehensive information about individual stocks, including price charts and key metrics.
The Place Order modal offers a streamlined interface for executing buy and sell transactions.
Behind the scenes, three specialized repositories handle the core business data in the data layer:
The Portfolio repository serves as the single source of truth for the user's holdings, continuously synchronizing with real-time updates.
The Stocks repository manages market data, ensuring users always see current pricing information.
The Orders repository handles the creation, tracking, and execution status of all trading transactions.
Complementing these components, the Push Notifications Client component listens for important alerts from our backend, ensuring users receive timely updates about price movements, order completions, and other critical events.
Data storage
In our stock trading app, data freshness requirements vary across different types of application data:
For real-time market data, we'll implement in-memory caching only, avoiding disk storage. This approach:
Ensures users see the most current pricing for trading decisions.
Maintains the data integrity expected in financial applications.
For less time-sensitive information, such as historical charts and user preferences, we'll apply appropriate disk caching with clear expiration policies, balancing performance with accuracy.
This architecture provides a solid foundation for our stock trading app. Now let's dive deeper into some of the more complex aspects of our system.
Step 4: Deep dives
There are some unique aspects of our app that deserve special attention. Let's take a closer look at creating historical stock price charts and real-time stock data.
Creating historical stock price charts
Visualizing historical price data is essential in any stock trading app. Historical stock data typically comes in various time frame options such as daily, weekly, monthly, yearly, and max views; each offering different insights to traders as shown in Figure 4.
from the eToro Android app
Data density considerations
Each time frame presents unique data handling challenges. For instance, a 1-day chart might require 390 individual data points (one per minute during a 6.5-hour trading day), while a 5-year chart could theoretically contain over 1,250 daily data points or more than 260 weekly points.
One key challenge when implementing historical charts is managing data density appropriately. More data points provide greater detail but come with performance costs:
High-density data (e.g., minute-by-minute prices over a month) can create rendering performance issues and excessive memory usage.
Too few data points might miss important price movements and lead to misleading visualizations.
🔍 Industry insights:
Different stock trading apps provide different user experiences. Many of these product decisions influence how the charts are designed and displayed. If you're interested in this topic, here's more information on how charts work in the Robinhood app [3] and in eTrade [4].
Implementing the chart
Rendering historical stock charts on mobile devices presents unique challenges due to the combination of large datasets and limited screen space. Let's evaluate the different approaches available to us in Table 1:
Option
Description
Advantages
Disadvantages
Native graphics rendering
Using platform graphics APIs (e.g., Android Canvas, iOS Core Graphics) to draw chart UI elements manually.
Full control over visuals and performance. Smallest memory footprint. Direct hardware acceleration.
Complex implementation requiring platform-specific expertise. Significant development time. Duplicate code across platforms.
Third-party libraries
Using established mobile charting libraries (e.g., MPAndroidChart [5] or ChartsOrg/Charts [6]) that provide ready-made components.
Quick implementation with built-in features like zooming and gestures. Well-documented and maintained.
Performance overhead compared to native solutions. Potential integration challenges with native components.
WebView-based rendering
Embedding web tools (e.g., D3.js, Chart.js) or professional offerings (e.g., TradingView [7]) in a WebView.
Rich feature set from the web charting ecosystem. Consistent implementation across platforms.
Performance overhead and higher memory usage. WebView/native integration challenges and less native feel.
Server-side rendering with Image API
Generating charts server-side and delivering images to the client.
Minimal client-side processing requirements. Works consistently across all devices.
Limited interactivity. Network dependent. Higher server costs and bandwidth usage.
Table 1: Trade-offs for presenting historical stock price charts on the client
Given our business context with multiple clients sharing the backend, we'll implement charts using WebView-based rendering. This approach allows us to maintain consistent visualization across platforms while leveraging powerful web-based charting libraries optimized for financial data visualization.
Implementing charts through WebViews presents several important challenges we need to address.
Performance impact
While WebViews offer flexibility, using complex JavaScript charting libraries such as D3.js or ECharts can strain device resources. We can mitigate this by:
Isolating charts from high-priority flows, such as order execution.
Pre-processing data server-side to reduce client strain.
Streamlining updates to avoid redundant redraws.
Performing delta updates on the charts after the initial full load.
The historical stock data density also presents unique challenges. We should implement the following strategies:
Pre-process historical data before passing it to the WebView to reduce JavaScript processing time, especially for longer time frames with more data points.
Implement a phased loading approach for extended time periods, where lower-resolution data loads first, followed by higher-resolution details as needed.
Interaction and responsiveness
WebView-rendered charts may not match the smooth interactions of native implementations, particularly with complex user interactions. To ensure good performance, we:
Offload computations to the backend or background threads where feasible.
Validate performance across diverse devices.
Visual Integration
WebView components can sometimes feel disconnected from the native UI. To create a cohesive experience, we'll bridge this gap by:
Aligning chart styles with the app's design system.
Tuning WebView properties for a cohesive look.
Adhering to platform UI best practices for familiarity.
Platform-Specific Challenges
Each OS presents unique hurdles:
Android:
WebView updates independently from the app.
Behavior may vary across devices and Android versions.
Requires testing across different WebView implementations.
iOS:
WKWebView has specific performance characteristics.
Local storage persistence needs careful handling.
Memory management requires special attention.
By carefully considering these challenges during implementation, we can create chart experiences that balance functionality with performance while maintaining a native feel.
🔍 Industry insights:
eToro opted to integrate the web-based TradingView [7] charting toolkit into their platform, delivering advanced interactive charts via a web component in their app.
Robinhood uses native drawing APIs to maximize performance and control on Android. They open sourced a custom Android library called Spark [8] for their sparkline charts.
Real-time stock data
Stock prices fluctuate rapidly during trading hours, often changing multiple times per second. To display these dynamic changes, stock trading apps typically use intraday charts such as the one shown in Figure 5.
from the Trade Republic Android app
To ensure consistency across our app, we'll use the same WebView-based approach for both historical and intraday real-time data visualization. This provides a unified visual experience while simplifying maintenance, as we only need to maintain expertise in one charting technology stack.
Design options for real-time chart updates
To integrate real-time data into our WebView chart implementation, we need a strategy for updating the chart efficiently. Each approach has different implications for device resources such as battery life, processing power, and memory usage. Table 2 shows multiple options with their trade-offs:
Option
Description
Advantages
Disadvantages
Direct UI updates
Update the UI instantly with every new data point received from the WebSocket.
Simplest implementation. Ensures users see the most current data. Minimal latency between data receipt and display.
Can cause UI jank if updates are too frequent. High battery consumption. May overwhelm the main thread with excessive updates.
Buffered updates
Collect data changes in a buffer and update the UI at fixed intervals.
Reduces UI update frequency. More efficient for battery life. Smooths out frequent changes.
Introduces a small delay in displaying the latest data. May miss intermediate price points. Requires careful tuning of update intervals.
Priority-based updates
Assign different update priorities to different UI elements.
Focuses resources on the most important data. Allows critical information to update more frequently. Better overall user experience.
More complex implementation. Requires careful tuning of priorities. May cause user confusion if related data elements update at different rates.
Table 2: Trade-offs for displaying real-time UI updates
For our stock trading app's intraday chart, we'll implement the buffered updates approach. This strategy provides the best balance between responsiveness and resource efficiency for a single chart element.
📝 Note: This decision assumes we're displaying just one intraday chart with real-time updates at a time. If product requirements change to display multiple charts simultaneously, we would need to reconsider our strategy and implement a hybrid solution with priority-based updates.
Implementation strategy
Our buffered update implementation for the WebView-based intraday chart consists of several key components:
The Stocks repository contains data buffering logic that collects price updates from the WebSocket connection and maintains them in a queue.
A scheduled updater runs at fixed intervals (e.g., every 1-2 seconds) to transfer the buffered price data to the WebView chart.
A JavaScript bridge between the native code and WebView that efficiently transfers market data updates.
Understanding the JavaScript bridge
The stock chart runs as JavaScript within a WebView. Since the chart rendering happens in this JavaScript environment, we need a way to send our processed data from the native app to the WebView. This is where the JavaScript bridge comes in.
The JavaScript bridge creates a communication channel between our native app code and the WebView chart. When real-time stock data arrives, it first comes to our native code through the WebSocket connection, not directly to the WebView. This approach has several benefits:
Native code handles network connections and data processing more efficiently.
We can format the data correctly before sending it for visualization.
We can implement better buffering strategies at the native level.
This setup creates a clear separation of duties:
Native code handles: Managing the WebSocket connection, receiving and validating incoming data, buffering updates to reduce processing overhead, pre-processing data for display, and determining when to send updates to the chart.
WebView code handles: Rendering the chart visualization, managing user interactions (zoom, pan, tap), and handling chart animations and transitions.
The JavaScript bridge allows data to flow both ways:
Native to WebView: Sending stock updates, configuration changes, and user preferences.
WebView to Native: Communicating user interactions such as zooms, taps on data points, or feature toggles.
🛠️ Platform implementation details
Buffered updates require efficient data stream management that needs to be sent through the JavaScript bridge to update the WebView.
On Android, we can leverage:
The JavascriptInterface mechanism to establish reliable communication between native code and WebView charts.
Kotlin Flows with appropriate dispatchers to handle buffering and throttling off the main thread.
On iOS, we can leverage:
WKUserContentController and WKScriptMessageHandler enable native-to-JavaScript communication.
Combine framework's throttle and debounce operators to control update frequency.
Real-time chart update data flow
Figure 6 maps the data journey when a user opens a stock's intraday chart, updating at real time:
The Stocks remote data source fetches the current day's historical data via a REST API call to establish the baseline chart data.
Simultaneously, the remote data source establishes a WebSocket connection for receiving real-time price updates.
The Stocks repository combines these two sources and implements the buffered updates strategy:
The repository creates the data stream and emits the current day's historical data as the initial value.
As WebSocket updates arrive, they're collected in a buffer within the repository.
The repository doesn't send each update immediately to subscribers. Instead, it batches these updates and emits them at regular intervals.
The Stock detail state holder subscribes to this buffered data stream and is responsible for communicating with the JavaScript bridge to update the chart as new data arrives.
The WebView chart renders these updates, creating the appearance of smooth, real-time data visualization.
Common bottlenecks and optimizations
Several common issues can still affect real-time UI performance:
WebView-related bottlenecks. Frequent updates to the WebView can trigger expensive rendering operations. To minimize this impact, we:
Configure the charting library to use partial redraws, which update only the changed elements.
Disable animations during high-frequency updates to reduce rendering overhead.
Data processing bottlenecks. Processing incoming market data can sometimes become a bottleneck, especially when it involves complex calculations. To minimize this impact, we:
Move all data transformations to native code and execute them in a background thread before passing the data to the WebView.
Pre-compute derived values rather than calculating them in JavaScript.
Implement caching for computed values to prevent redundant calculations.
Bridge communication overhead. Every call between native code and WebView has a cost. We optimize this by:
Batching multiple price updates into a single bridge communication.
Using compact data formats to reduce serialization/deserialization costs.
Maintaining a consistent update interval that balances freshness with performance.
Intermittent connectivity. Mobile networks are inherently unreliable. When connectivity issues occur:
Clearly indicate when the data is stale due to connection loss.
Implement exponential backoff for reconnection attempts.
Battery impact. Real-time updates can significantly impact device battery life. We should:
Stop real-time updates when the app is in the background.
Implement adaptive throttling based on battery level.
As our app grows in complexity and user base, our real-time update system needs to scale accordingly. Several aspects of our design ensure this scalability:
WebSocket message filtering: We implement server-side filtering to ensure clients only receive the specific data they need, reducing client-side processing as the app adds features.
Buffer size: Our buffer needs to be large enough to accommodate all price updates between refresh intervals, even during periods of high market volatility. For most stocks, a buffer capacity of 10-20 price points should be sufficient.
Adaptive scheduling: We can implement adaptive scheduling that adjusts update frequency based on market conditions, device state, and user engagement when the user is actively looking at their data and the app is in the foreground:
Increase frequency during market hours with high volatility.
Allow users to adjust the frequency based on battery level and device performance.
🔍 Industry insights:
Institutions such as J.P. Morgan or Commerzbank, and trading platforms like Binomo, use SciChart's [9] native engine to power real-time stock dashboards [10].
Coinbase's exchange platform exposes a WebSocket feed to broadcast live market data for orders and trades [11].
Step 5: Wrap-up
In this chapter, we've designed a mobile stock trading app that delivers core functionality for investment management. Our system supports viewing real-time stock prices, executing trades through placing and canceling orders, analyzing historical price data through charts, and receiving timely price alerts.
The architecture combines REST APIs for standard operations with WebSockets for real-time updates. We've implemented a layered client architecture that separates UI and data concerns, making the codebase both maintainable and testable. We also covered creating both historical and real-time intraday stock value charts.
For those preparing to discuss this in a Mobile System Design interview, consider exploring these extensions to deepen the conversation:
Offline functionality: Designing a system for caching and local operation when network connectivity is limited.
Cross-platform considerations: Discussing how the architecture would adapt to support web and other platforms
Regulatory Compliance: Address the specific compliance requirements and regulations that govern stock trading in different regions.
Personalized UI: Offer customizable dashboards or watchlists, enhancing engagement through tailored experiences.
Efficiently managing large datasets is a cornerstone of mobile app performance. Pagination ensures that users experience seamless interactions, even with extensive content. While earlier chapters addressed pagination within specific applications, we now shift our focus to a broader challenge: crafting a reusable pagination library.
A well-designed pagination library offers substantial benefits as organizations grow. It promotes consistency across applications, reduces code duplication, and consolidates performance optimizations in one place. Building such a library requires careful attention to API design and implementation, striking a balance between flexibility and practicality.
💡 Pro tip!
Designing a library differs fundamentally from designing an app. Apps serve end users through interfaces and screens, whereas libraries serve developers through code. Our design must prioritize how developers integrate and interact with the library, solving their challenges while enhancing their workflow.
When creating a library, our focus shifts from user-facing experiences to developer-centric APIs. The "user experience" transforms into the ease with which developers adopt our solution, integrate it into their projects, and address their pagination needs.
Like all system design challenges, the specific requirements will shape our technical decisions. Before diving into implementation details, we need to understand clearly what our library should accomplish and how other developers will use it. Let's begin by defining these requirements and exploring the key decisions that will influence our design.
Step 1: Understand the problem and establish design scope
Before considering design decisions, it is crucial to first understand what we're building and why. Let's walk through how this conversation typically unfolds in an interview setting.
📝 Note: This chapter assumes familiarity with pagination techniques such
as offset-based and cursor-based pagination. For a detailed refresher, refer
to the Pagination section in Chapter 10: Mobile System Design Building Blocks.
Candidate: To begin, I'd like to confirm the core requirements for the pagination library. I'm thinking we'll need a flexible solution that supports common pagination patterns such as offset and cursor-based approaches, while allowing pagination from both local and remote data sources. Does this align with your vision? Interviewer: Yes, that captures the library's intended flexibility and scope. And it should be able to handle any type of application data.
Candidate: Understood. Should the library include user interface components for rendering paginated data, or should it focus exclusively on the pagination logic and data management? Interviewer: Let's keep our scope focused on the business logic, excluding UI components for now.
Candidate: Makes sense. To optimize performance, I think we should implement a caching system that stores previously fetched pages. We could use in-memory caching by default for quick access to recent pages, and optionally allow disk-based caching for persisting data between app sessions. What do you think? Interviewer: Yes, that sounds perfect!
Candidate: I'd also propose adding a prefetching capability that anticipates user navigation patterns. For example, when a user views page 5, the library can automatically load pages 6 and 7 in the background, ensuring a seamless browsing experience as they continue scrolling. This would significantly reduce perceived loading times. Should we also support fast-scrolling scenarios where users jump quickly through large datasets? Interviewer: Let's include prefetching, but exclude fast scrolling, as we're not handling UI components.
Candidate: Noted. Lastly, will this library be open-sourced? This consideration could impact our API design, documentation standards, and versioning strategy. Interviewer: Yes, we're planning to open-source it.
Requirements
From these considerations, we're designing a pagination library with the following functional requirements:
The library supports various application data types and multiple pagination techniques.
Users can paginate through different local and remote data sources.
The library provides business logic functionality. It doesn't provide UI support.
The library provides in-memory caching and configurable disk caching.
Users can prefetch specific pages.
As for non-functional requirements, we need to build a system that ensures:
Performance: The library must deliver efficient pagination with optimized resource usage and minimal overhead, operating safely in a multi-threaded environment.
Reliability: The library should address network failures and interruptions gracefully, ensuring consistent behavior regardless of device type or OS version.
Usability: We need to offer an intuitive API with comprehensive documentation and clear learning resources that help developers implement pagination effectively.
Features that are out of scope for this exercise:
Pagination support in the UI.
Support for fast scrolling.
Now that we've established our requirements, we can begin designing the pagination library's API. This foundation will shape how developers interact with our library.
Step 2: API design
Having established our pagination library's requirements, we now shift our focus to designing its public API. This interface must be intuitive, adaptable, and robust enough to meet the varied demands of mobile developers.
📌 Remember!
Think of a library's API as its public face—it's everything
developers can directly interact with, including its functions, classes,
methods, and properties. Just like a well-designed user interface makes an app
intuitive for its users, a well-crafted API surface makes a library
approachable for developers.
A good public API helps developers use the
library effectively without needing to know how it works internally. To
achieve this, it requires three key qualities: clear documentation that helps
developers understand how to use each component, stability so developers can
rely on consistent behavior, and an intuitive design that follows platform
conventions and patterns.
Central to this design is the Paginator interface, which acts as the cornerstone for users interacting with the library.
💡 Pro tip!
When designing a library's API, focus first on defining its core elements: the key interfaces, classes, and data models that developers will interact with most frequently. These form the foundation of your API surface and will shape how developers use your library.
Paginator
Mobile apps frequently handle varied datasets such as social media feeds, chat histories, or product catalogs. To support any data type, we define Paginator<T> using generics. This decision offers immediate benefits:
Flexibility: A single Paginator can handle any data type, reducing repetitive code and satisfying the requirement for multiple data types.
Isolation: Independent instances coexist without conflict, each managing an independent cache and pagination flow.
Optimization: Memory usage stays lean, as each instance tracks only its relevant data.
Reliability: Generics enforce type safety at compile time, catching errors early.
📌 Remember!
Using generics with Paginator<T> means we can handle any data type without creating separate implementations. Instead of writing separate Paginator classes for posts, messages, or other content types, the generic <T> parameter allows us to write a single, flexible implementation. This not only reduces code duplication but also makes the library much more versatile and maintainable.
The Paginator<T> interface needs core methods that align with our requirements:
Fetching individual pages, allowing users to request specific pages of data from a data source.
Fetching surrounding pages, enabling prefetch of pages around a specific page.
Cache management, providing the ability to clear specific pages from the cache.
These translate into three methods: fetch, fetchAround, and clear. The public API definition looks like the following:
Kotlin
Code
  interface Paginator<T> {
    fun fetch(key: String, pageSize: Int)

    fun fetchAround(
      key: String, pageSize: Int,
      depthLevel: Int, direction: PageFetchDirection
    )

    fun clear(key: String)
  }
enum class PageFetchDirection
ALL, FORWARD, BACKWARD
enum PageFetchDirection
case all, forward, backward
The Paginator's methods are idempotent, ensuring that repeated calls with identical inputs yield the same results.
💡 Pro tip!
By defining Paginator as an interface/protocol, we're not just creating an entry point to our library; we're also making it easier to test. This approach allows developers to create test double [1] versions that simulate different scenarios.
Supporting diverse pagination techniques
A key strength of this API is its agnosticism toward pagination techniques. The key parameter is intentionally flexible, adapting to the underlying method:
Offset-based pagination: key might be an integer (e.g., "1" for page 1, "2" for page 2).
Cursor-based pagination: the key could be a token (e.g., "cursor123") that points to the next dataset.
This adaptability ensures that developers can use the same Paginator interface regardless of their data source's pagination strategy.
Data propagation
Next, we consider how the library communicates results and errors to its users. To keep it lightweight and dependency-free, we opt for native callbacks. This decision preserves flexibility, allowing developers to integrate the library without adopting a prescribed async framework.
We can also make each method return a PaginatorExecution object, empowering users to cancel operations as needed.
📝 Note!
Since we're designing an open-source library that can be used across multiple apps, we need to be thoughtful about our dependencies. Any third-party libraries we include will become required dependencies for apps using our library. To keep things lightweight and flexible, we'll use native language constructs for core functionality while making the library extensible enough to work well with popular libraries. We'll explore this design approach in more detail in the deep dives section.
Here's how the improved Paginator interface looks, with new API additions in bold and existing definitions in gray:
Internally, each Paginator instance maintains a thread-safe cache, typically a Map that associates page keys with their data. This setup accelerates access to recently loaded pages, an aspect we'll explore in more detail in the following sections.
Data models
Let's look at the core data models that power the pagination library. At the heart of the design is the PaginatorPage model, which encapsulates everything needed to represent a single page of data:
Kotlin
Swift
public class PaginatorPage<T> content: List<T> key: String expirationTime: String? prevKey: String? nextKey: String?
public class PaginatorPage<T> content: [T] key: String expirationTime: String? prevKey: String? nextKey: String?
The PaginatorPage model serves as a container for both the paginated content and the metadata needed for navigation between pages: the current key, the previous and next keys, if available. The optional expirationTime field enables smart caching decisions, letting the library determine when cached data needs refreshing.
💡 Pro tip!
You might notice that we're using public classes for our data models here, rather than the data classes and structs we used in previous chapters. This change is intentional and is essential for library development.
In Kotlin, data classes automatically generate several methods such as copy, componentN, equals, and hashCode. While convenient for application development, these generated methods can cause binary compatibility issues in libraries. When you modify properties in a data class, the generated methods also change, potentially breaking compatibility for library consumers [2].
Similarly, in Swift, structs are value types whose memory layout is part of their binary interface. Changes to stored properties can affect this layout, which in turn impacts the library's ABI stability [3] [4].
By using classes instead, we maintain better control over our library's public interface and ensure compatibility across versions.
How apps implement the Paginator interface
When developers integrate the pagination library into their apps, they need to implement and integrate the Paginator interface within their architecture properly. Let's explore how the Paginator interface is typically used in application code.
Apps that consume our pagination library generally implement it within repositories or UI state holders that:
Create a configured Paginator instance with appropriate data sources using the CallbackPaginator implementation (more about this in the next section).
Trigger Paginator's methods in response to specific user actions such as scrolling.
Combine PaginatorPage objects into a unified list.
Monitor pagination state to determine when additional data should be loaded.
Handle various states, including loading, errors, and empty results.
For linear pagination scenarios such as scrolling through content, apps primarily use the fetch method to load pages sequentially. For non-linear scenarios, the fetchAround method enables apps to prefetch content surrounding the target page, ensuring a smooth navigation experience.
This separation of responsibilities ensures that the Paginator focuses exclusively on efficient data retrieval and caching, while the application host code handles the presentation logic and user interactions.
Creating configurable Paginator instances
As we've seen, host applications need to instantiate a properly configured Paginator to handle pagination effectively. Let's explore how the library provides this flexibility through implementation classes and configuration options.
While the Paginator interface defines the contract for pagination functionality, apps need concrete implementations they can configure for their specific use cases. With our library, we include the CallbackPaginator<T> class, a fully-featured implementation of the Paginator<T> interface that can be customized through dependency injection.
CallbackPaginator serves as the primary implementation that apps will instantiate, configured with components that define its behavior:
PaginatorDataSource<T> handles the actual data fetching for each page, whether from a remote API, local database, or a mix of both. By separating data retrieval into its own component, CallbackPaginator stays focused on orchestrating the process.
PageValidator<T> ensures cached pages are still valid, checking factors such as expiration timestamps or data integrity. If a page fails validation, CallbackPaginator triggers a fresh fetch to keep data up-to-date.
(Optional) PaginatorStore<T> enables on-disk storage of fetched pages for offline usage. It cuts down on redundant network calls and boosts performance by keeping data locally accessible.
PaginatorConfig controls aspects such as concurrency handling, cache eviction policies, and other settings.
Let's look at the definition of the CallbackPaginator<T> class that embraces dependency injection to allow consumers to provide their own specialized implementations tailored to their specific use cases:
📝 Note: While some libraries use static configuration methods such as
Paginator.init(...), this approach isn't ideal for our pagination library.
Since each Paginator instance needs independent configuration and high
customizability, we opted for instance-level configuration instead. This gives
users more flexibility to configure each instance according to their specific
needs.
The library comes with several built-in common eviction policies such as LRU (Least Recently Used), FIFO (First In, First Out), and LIFO (Last In, First Out). Beyond these standard options, developers can also define custom policies based on their specific needs, whether that's time-based expiration (TTL), memory size limits, or maximum page count. This flexibility ensures the library can adapt to various caching requirements and resource constraints.
Step 3: High-level client architecture
With the API design established, we now shift our focus to crafting a high-level client architecture that powers our pagination library. This structure must prioritize modularity, scalability, and maintainability to integrate seamlessly into a variety of mobile applications.
Figure 1 provides a visual overview, detailing the core components and their interactions—solid arrows denote data flow, dotted arrows show dependencies, and arrows pointing outside the box represent external communication. In the diagram, components with a gray background represent implementation classes contributed by developers, while the remaining components are implementations provided by the library itself.
provided by developers with gray background, implementations provided by the Pagination
library with white background.
Having laid the groundwork with earlier discussions, let's introduce two critical components that enhance the Paginator's efficiency and focus:
The PaginatorScheduler takes charge of all request-related operations: queuing, ordering, and processing responses. It also manages debouncing, throttling, retry mechanisms, and concurrency, offloading these tasks from the Paginator to keep its responsibilities focused and streamlined.
The PaginatorEvictor manages cache efficiency for both in-memory and disk storage. This separation gives us the flexibility to implement different eviction strategies without impacting other parts of the system. It ensures our caches remain performant while keeping resource usage in check.
💡 Pro tip!
Breaking functionality into dedicated components serves two purposes: (1) it demonstrates your understanding of modular design principles, and (2) it clearly shows the interviewer you're addressing specific requirements such as caching and prefetching. |
This design achieves a careful balance: it offers users the flexibility to integrate custom data sources and storage solutions while entrusting the library with the intricacies of scheduling and cache management.
Step 4: Deep dives
With our high-level architecture in place, let's explore some key implementation details. While the specific areas to dive into during an interview often depend on your interviewer's interests and your system's particular challenges, we'll focus on several critical aspects:
Implementing effective caching strategies.
Priorities in API calls.
Modular API design.
Handling failures and versioning.
Implementing effective caching strategies
Caching is a pivotal element in our pagination library, directly shaping its performance and the resulting user experience. In this section, we'll explore the mechanics of our dual caching system, which integrates in-memory and disk-based approaches to streamline data retrieval.
While users can optionally use the PaginatorStore for persisting PaginatorPage objects on disk, the in-memory cache significantly improves user experience. Both caching mechanisms can be fine-tuned through eviction policies defined in PaginatorConfig when initializing a Paginator instance.
In-memory caching
At the core of this system lies the PaginatorInMemoryCache that provides fast storage for paginated data (i.e., PaginatorPage objects).
PaginatorInMemoryCache uses a Map<String, PaginatorPageResult<T>> structured as follows:
A String key as the unique identifier for each page (offset, page index, or cursor).
A PaginatorPageResult<T> value representing the current state of that page. This object reflects the page's lifecycle:
key not present in the cache: The page awaits its initial fetch.
Loading: A retrieval operation is underway.
Success(page: PaginatorPage<T>): The page is ready and validated.
Error(message: String): A fetch attempt failed, with diagnostic details provided.
Modeling these states explicitly with PaginatorPageResult brings several key advantages: type safety that helps catch errors at compile time, clear representation of a page's status at any point, easier debugging when issues arise, and better scalability as the codebase grows.
How the dual caching system works
Our caching strategy operates through a tiered structure. Let's explore how the caching components work together when a user requests a page. Figure 2 illustrates the data flow during in-memory and disk cache misses.
When a user calls fetch on a Paginator instance (step 0), the system implements the following caching strategy:
In-memory cache check: The Paginator begins by querying the in-memory cache to see if an existing PaginatorPage already exists. If a valid page is found, it's returned immediately for a low-latency response.
Disk cache check (optional): If the in-memory cache misses and a PaginatorStore is configured, the system consults the disk cache. A valid page found here is promoted to memory for future use and promptly returned.
Data source fetch: If both caches fail to provide the requested page, the PaginatorScheduler triggers a fetch call on the PaginatorDataSource.
Validator check: Once the new page is retrieved, the PageValidator verifies the data's validity, checking for proper formatting or expiration.
Cache update: Once validated, the fresh page is cached in both the in-memory cache and in the disk store if configured.
Then, the fresh page is returned to the caller.
This layered design strikes a balance between speed and durability: in-memory caching ensures rapid access, while disk caching offers a dependable fallback. The PaginatorEvictor plays a key role by enforcing eviction policies, keeping both caches lean, and preventing resource overload.
Benefits and considerations
Our dual caching approach offers several advantages:
Better performance through reduced latency by avoiding network calls.
Lower network usage through intelligent request management.
Smoother user experience with faster data retrieval.
While powerful, this caching system requires careful attention to several implementation details:
The system assumes that cache keys map directly to network requests. For cases where this assumption doesn't hold, we may need to implement custom key generation logic.
Since the Paginator engine operates in a multithreaded environment, we must ensure thread-safe cache access and atomic operations to prevent race conditions or data corruption.
To support fine-tuning, we can configure the library with analytics and logger providers to capture cache hits, misses, and evictions. These insights equip developers to optimize performance for their unique needs.
🔍 Industry insights:
The Store5 library [5] for Kotlin MultiPlatform and
the Hyperoslo Cache library [6] for iOS can be configured to write to both in-memory
and disk storage, giving fast in-memory reads with persistent disk backup.
Google's Jetpack Paging library [7] encourages a network + database hybrid: using a local
database as the single source of truth for paged content, and a RemoteMediator
that fetches new pages into the DB only when the app runs out of local data.
Priorities in API calls
Users expect rapid responses, yet the library must juggle multiple tasks, often under constraints such as limited device resources or fluctuating network conditions. Prioritizing API calls becomes vital when:
Concurrent requests compete for bandwidth or processing power.
Background operations, such as prefetching, overlap with user-initiated actions.
Device limitations, such as low battery or weak connectivity, demand optimized performance.
Consider a user scrolling to load new content: this request must outrank background prefetching to ensure immediate feedback. Likewise, in fetchAround scenarios, the explicitly requested page should load before its neighbors. To achieve this, we can enhance our public APIs with priority controls, allowing developers to dictate the execution order effectively.
Here's how the improved Paginator interface looks like, with new API additions in bold and existing definitions in gray:
Each fetch operation accepts a priority parameter that signals its relative importance to the library. For the fetchAround call, we introduce two distinct priority levels: keyPriority for the main requested page, and aroundPriority for the surrounding pages. This granular control allows us to optimize how the library processes different types of requests.
Now, let's explore how to implement this prioritization system in our library.
Priority-based task scheduling
Effective priority handling demands a robust scheduling strategy. Table 1 evaluates several approaches, each balancing simplicity, scalability, and concurrency in different ways.
Option
Description
Advantages
Disadvantages
Separate queues for each priority level
Dedicated queues per priority, processed sequentially by importance.
Simple to implement and understand, and clear separation of priorities. Direct control over task execution order.
Performance degrades with more priority levels and complex workload balancing across queues. Higher memory overhead.
Priority Queue
Single queue that automatically maintains tasks in priority order through heap structure. Reorders on enqueue/dequeue.
Efficient priority-based ordering and simpler architecture with a single queue. Lower memory footprint.
Potential overhead from heap reordering. No fairness guarantee, lower-priority tasks may starve.
ThreadPools with priority levels
Separate thread pools per priority, with more resources for higher levels.
True concurrency with hardware parallelism, and better resource utilization. Natural handling of priority levels.
Complex thread pool management. Higher resource demands.
Weighted Round-Robin scheduling
Cyclic processing with higher-priority tasks receiving greater execution time.
Guaranteed processing for all priorities, and predictable task execution. Good fairness properties.
Complex weight tuning needed. Higher-priority tasks may face delays.
Table 1: Trade-offs for implementing priority-based task scheduling
The Priority Queue pattern [8] stands out as a strong choice for our library. It delivers efficient ordering, ensures high-priority tasks are executed first, and simplifies the implementation. This balance is well-suited for our mobile constraints.
🔍 Industry insights:
Google's Volley networking library lets developers tag
requests with a Priority so that an "immediate" request jumps ahead in the queue
[9].
Modular API design
Two important considerations for designing a pagination library are handling async operations well and making testing easy. First, we'll look at managing asynchronous tasks across different setups. Then, we'll cover testing approaches that keep it reliable and simple to use.
Async framework compatibility layers
When designing a mobile library, we face a critical decision: how to manage async operations effectively. Frameworks such as Kotlin Coroutines or Swift's Combine offer robust solutions for async programming, and it might be tempting to build our entire library and public APIs around one of these powerful tools. However, mandating such dependencies could burden users whose projects rely on different tools. Imagine an RxJava-based app forced to adopt Coroutines solely to integrate our library. To avoid this, we should craft an API that works well with various async approaches.
🛠️ Platform implementation details
Both the Android and iOS platforms provide several approaches for handling asynchronous operations:
Android's ecosystem offers multiple async solutions, including traditional callbacks, Kotlin Coroutines and Flow, RxJava, LiveData, and CompletableFuture from Java.
iOS developers can choose from options such as closure-based completion handlers (callbacks), the Combine framework, async/await syntax, the delegate pattern, and Grand Central Dispatch (GCD) for low-level concurrency control.
Our solution is a modular design that anchors the core API in native callbacks, free of external dependencies, and complements it with optional extension modules for popular frameworks. This gives developers maximum flexibility:
paginator-core delivers the essential functionality with no external dependencies.
paginator-coroutines, paginator-combine, or paginator-rx provide optimized support for specific async solutions.
This strategy offers multiple benefits:
Flexibility: Developers can adopt only the extensions that suit their project's tech stack.
Lightweight core: The base module remains unburdened by external frameworks, enhancing its portability.
Native integration: Each extension aligns with its framework's conventions, ensuring an intuitive developer experience.
🛠️ Platform implementation details
Android and iOS handle library distribution differently.
Android's build system, typically Gradle, provides built-in support for creating multiple library artifacts from a single codebase. This means you can publish each async integration as a separate artifact, giving developers the flexibility to include only what they need.
iOS traditionally distributes libraries as single frameworks, but it offers several approaches to achieve modularity:
Use conditional compilation to selectively include code.
Create extension files for different async patterns that developers can optionally add.
Leverage Swift Package Manager to define separate products or targets for different integrations.
This modular approach not only keeps the library adaptable for current users but also prepares it for emerging async paradigms without disrupting existing implementations.
Let's see this adaptability in action. Here are examples of how our API transforms when used with Kotlin coroutines and Swift's async/await syntax, with new API additions in bold and existing definitions in gray:
Kotlin using coroutines and flows
Code
  interface Paginator<T> {

    suspend fun fetch(key: String, pageSize: Int): PaginatorPage<T>

    fun fetchAround(
      key: String, pageSize: Int,
      depthLevel: Int, direction: PageFetchDirection
    ): Flow<PaginatorPageT>>

    suspend fun clear(key: String)
  }
While async flexibility is crucial for adoption, equally important is comprehensive testing support. Our design's foundation of interfaces and protocols naturally facilitates testing, but we can elevate the library's value by offering a dedicated testing-only artifact, complete with pre-built test doubles and utility tools tailored for developer convenience.
This testing artifact equips developers with a practical toolkit, including:
Pre-built test doubles: These emulate core components such as PaginatorDataSource, PaginatorStore, and PageValidator, enabling developers to simulate diverse scenarios without crafting bespoke mocks.
Helper functions: Tools for generating sample paginated data or mimicking network latency simplify the process of setting up meaningful test cases.
Error simulation capabilities: Features that let developers test how their code handles failures or edge cases, ensuring robust error handling and recovery logic.
By providing these resources in a standalone artifact, we empower developers to adopt our library with confidence, knowing they have the means to achieve thorough test coverage. This offers several benefits to developers:
Eliminate the need to create and maintain custom test implementations.
Ensure test doubles stay in sync with library updates automatically.
Promote higher test coverage by simplifying the testing of edge cases.
Demonstrate our commitment to testing best practices.
📌 Remember!
A dedicated testing-only artifact complements our modular
design while keeping the core library lightweight. This separation allows us
to refine the testing tools independently, having them aligned with evolving
testing frameworks and methodologies. Additionally, developers get powerful
testing capabilities without bloating their production builds.
🔍 Industry insights:
Google's Jetpack Paging 3 [7] takes a similar approach:
it exposes a common PagingData stream which can be emitted as a LiveData, RxJava
Flowable, or Kotlin Flow depending on what the app wants to use.
The Moya networking
library [10] in iOS, for example, was built with testing in mind. It lets you
provide stubbed responses or use a sampleData property for each API endpoint, so
that unit tests can run without real network calls [11].
Handling failures and versioning
Now let's address potential failure points and versioning strategies for the pagination library. These topics often come up during interviews and demonstrate your thorough understanding of library development beyond just the core functionality.
Handling failure points
A pagination library operates at the intersection of data sources, network, and device constraints, making it susceptible to a variety of failures. Identifying and mitigating these points of failure is essential to ensure reliability and a seamless user experience. Here are the key points specific to pagination and how our design addresses them.
Network failures
Fetching remote data is a common task, but network issues such as timeouts, dropped connections, or server errors can disrupt pagination.
Mitigation: The library uses retry mechanisms with exponential backoff to handle transient failures gracefully. If a fetch fails, callbacks transmit the detailed errors, enabling developers to fallback to cached data or display user-friendly messages, preventing app crashes.
Database errors
When paginating from a local data source, data storage query failures or data corruption can halt operations.
Mitigation: Robust error handling within PaginatorDataSource ensures that issues are caught and reported via callbacks. Developers can configure fallbacks, such as loading stale cache data, to maintain functionality when fresh data isn't available.
Cache inconsistencies
Stale or corrupted cache entries can lead to outdated or incorrect page displays, a critical concern in pagination where continuity matters.
Mitigation: The PageValidator checks page validity using expiration times or checksums. Invalid pages trigger cache invalidation and a fresh fetch, ensuring users see accurate content. This is paired with configurable eviction strategies in PaginatorConfig to keep the cache lean and reliable.
Concurrency issues
Multi-threaded environments, common in mobile apps, risk race conditions when multiple threads access the cache or fetch data simultaneously.
Mitigation: Thread-safe data structures (e.g., concurrent maps) and synchronization mechanisms safeguard the in-memory cache and PaginatorStore. This ensures a consistent state across threads, vital for smooth pagination during rapid user interactions.
Invalid page keys
In cursor-based or keyset pagination, users might request pages with expired or malformed keys, especially after data updates.
Mitigation: The library validates keys before processing, rejecting invalid requests with clear error messages via callbacks. This guides developers to handle such cases, perhaps by resetting to a known starting point.
Last notes
These mitigations prioritize user experience, ensuring that failures don't derail the app but instead degrade gracefully. Adding analytics and logging options in PaginatorConfig further empowers developers to monitor and troubleshoot issues, enhancing reliability in production.
Versioning
As an open-source library, maintaining a clear versioning strategy is vital for developer trust and long-term adoption. It ensures that updates, whether new features, bug fixes, or breaking changes, are predictable and manageable.
For our library, we adopt Semantic Versioning (SemVer) [12] with its MAJOR.MINOR.PATCH format, tailoring it to the pagination library's evolution:
The MAJOR version (X.y.z) signals breaking changes that require code updates.
In our pagination library, this would be the case if we modify the Paginator interface or alter the default caching behavior.
The MINOR version (x.Y.z) adds new features while maintaining compatibility.
In our pagination library, this would be the case if we enhanced the PaginatorConfig's functionality without disrupting existing integrations.
The PATCH version (x.y.Z) addresses bugs and small fixes without changing behavior.
🛠️ Platform implementation details
Both iOS and Android ecosystems strongly favor SemVer for their dependency management.
SemVer integration is particularly important for iOS because the Swift Package Manager (SPM) uses it as the foundation for dependency resolution [13]. Using alternative versioning schemes could lead to compatibility issues and make it harder for SPM to properly manage your library's dependencies.
Similarly, on Android, build tools such as Gradle and Maven are designed to work seamlessly with SemVer. Following SemVer ensures these tools can automatically resolve version conflicts and manage dependencies effectively.
Without SemVer, you would lose access to much of the sophisticated dependency management these tools provide.
Other versioning strategies
While SemVer is widely adopted, including by our pagination library, for its clear and structured approach to versioning, other strategies such as Calendar Versioning (CalVer) are also used in certain ecosystems to meet specific needs.
A prominent example is Jetpack Compose [14], which combines CalVer with elements of SemVer to manage its rapidly evolving UI toolkit and guarantee compatibility across its suite of libraries. Here's how it works:
Individual Compose libraries (compose-ui, compose-material, compose-foundation, etc.) strictly use SemVer.
Compose also provides a Bill of Materials (BOM) artifact, which uses Calendar Versioning (CalVer). Jetpack Compose's BOM artifacts are formatted as YYYY.MM.PATCH (e.g., 2025.02.00), where the year (YYYY) and month (MM) tie releases to a specific date.
The Compose BOM simplifies dependency management by specifying a single, calendar-based version that corresponds to a specific set of compatible libraries. The BOM maps a specific CalVer release (e.g., 2025.02.00) to a group of compatible library versions (e.g., compose.animation:1.7.8, compose.material3:1.3.1, etc.). This guarantees compatibility across all included libraries.
Step 5: Wrap-up
In this chapter, we designed a flexible pagination library that works with:
Any kind of application data.
Different pagination techniques, such as offset-based or cursor-based pagination.
Both local and remote data sources.
We defined a public API, designed a robust, scalable, and extensible architecture, and covered key aspects such as caching, prioritization of API calls, points of failure, testing, and versioning.
If you have extra time in your interview or want to push yourself with more advanced requirements, here are a few additional areas you could explore:
Pagination support in the UI layer: consider integrating with common UI elements such as table views, collection views, or scrolling widgets.
Fast scrolling support: enable users to navigate quickly through large datasets, similar to how long lists often allow the skipping of entire sections.
Background services: implement prefetching of pages while the app is idle or running in the background, thus ensuring a smooth user experience without interruptions.
Custom error handling: provide a way for users to define custom error handling strategies for failed fetches, for example, retries, fallbacks to cached data, or user alerts.
Partial page loading: optimize performance by supporting partial page loads when resources are limited or users need only a subset of the data.
In this chapter, we will design a hotel reservation system that empowers users to search, compare, and book hotels. Platforms like Booking.com and Hotels.com have transformed travel planning by integrating robust search capabilities and instant booking features into mobile applications. These systems must manage real-time room availability, prevent double bookings, and deliver accurate pricing.
The architectural patterns we explore here are applicable to other booking systems as well, such as property rentals, flight reservations, or event ticketing.
Step 1: Understand the problem and establish design scope
Before diving into the design, we must first define its requirements and boundaries. Imagine we are discussing this with an interviewer to clarify the system's focus:
Candidate: I'd like to understand the scope first. Are we focusing on a single hotel chain, or is this an aggregator platform, like Booking.com, that pulls together options from multiple providers? Interviewer: We're aiming for an aggregator model, where users can browse and book hotels from various sources.
Candidate: That gives us a solid starting point. For the core features, I'd suggest users should be able to search for hotels by location or destination, view details such as room types and pricing, and finalize bookings within the app. Should we also consider real-time updates to reflect room availability as others book during a user's search? Interviewer: Those features work well as a foundation, but let's hold off on real-time updates for simplicity. While searching for hotels, we should include autocomplete suggestions. Another key requirement, though, is setting a time limit for users to complete their booking once they start entering payment details.
Candidate: Great. That helps clarify the booking flow. Building on that, let's explore the feature set further. Will users need options such as canceling reservations or checking in through the app? And should we plan for authentication flows or push notifications, such as reminders for upcoming trips? Interviewer: Let's keep it focused. Assume users are already logged in, so no authentication flows. We'll also exclude cancellations and check-ins. For payments, include support for credit cards and third-party options such as PayPal. Push notifications aren't needed either.
Candidate: Got it. To guide our technical choices, could you share the system's expected scale? What's the monthly active user base we're designing for? Interviewer: We're currently at around 5 million monthly active users worldwide, but the system should handle growth beyond that over time.
The conversation can continue, covering other topics we might consider interesting and relevant to the app. Let's summarize what we're building in this chapter.
Requirements
Based on our discussions, we're designing a hotel reservation app with the following functional requirements:
Users can search for hotels by location or specific destination.
The app provides autocomplete suggestions during searches.
Users can view detailed hotel information and available room types.
Users can complete room reservations within the app.
Users can process payments through multiple providers (e.g., credit cards, PayPal).
Users can access confirmed reservations even when offline.
The system enforces a time limit for completing reservations.
As for non-functional requirements, we need to build a system that ensures:
High availability: The app must remain accessible and reliable, even during peak loads, such as holiday seasons when user traffic increases significantly.
Low latency: Booking confirmations should process within a few seconds to maintain a responsive user experience and minimize wait times during critical transactions.
Data consistency: The system must prevent concurrent bookings of the same room for overlapping time periods, ensuring reservation data remains accurate across all users.
UI Sketch
To visualize how users will interact with the system, Figure 2 presents the core screens of our hotel reservation app:
The Hotel List screen (left) serves as the entry point, allowing users to search for hotels and displaying featured options initially. After a search, the screen shows the search results (middle) that update the list of available hotels.
The Hotel Details screen (right) offers comprehensive information about a selected hotel, including available rooms. Users can initiate the reservation process by tapping the "Book" button.
Step 2: API design
With a clear understanding of the requirements and user interface in place, let's transition to designing the API that will facilitate communication between the mobile client and the backend server.
Network protocol
Since the system does not require real-time updates or push notifications, most interactions will be client-initiated. We will adopt HTTP with REST APIs for client-backend communication, using JSON as the data format.
API endpoints and data models
Let's examine the RESTful endpoints our backend will expose. We'll focus on the most important endpoints and data models. Others can be explored in more detail if the interviewer requests.
💡 Pro tip! During the interview, concentrate on defining endpoints and data models for the most critical requirements that typically align with the main user flows in the app.
While you should acknowledge that other functionality exists, you can describe it at a high level to show awareness without going into implementation details. This demonstrates you're considering the full scope while consciously prioritizing the most important aspects.
Hotel endpoints
Hotels are the cornerstone of the app, and users need intuitive ways to find and explore them. Here are the primary endpoints to enable this:
GET /v1/hotels/search?page={page}&limit={limit}&latitude={x}&longitude={y}&other_query_parameters
allows users to search hotels by location and travel dates Response: 200 OK with HotelSearchResponse Other query parameters:
check_in_date (Date): Desired arrival date
check_out_date (Date): Planned departure date
guests (Integer): Number of guests staying
Kotlin
Swift
data class HotelSearchResponse hotels: List<HotelPreview> paging: PaginationMetadata
Throughout this book, we present API responses as Kotlin and Swift data models rather than raw JSON. In practice, these JSON payloads get converted to platform-specific data structures within the network layer (specifically in the network data sources shown in our architecture diagrams).
On Android, developers often rely on libraries such as kotlinx.serialization, or Moshi for JSON serialization and deserialization.
On iOS, Swift's built-in Codable protocol handles this elegantly, mapping JSON fields to Swift struct properties.
GET /v1/hotels/{id}?query_parameters
fetches details for a specific hotel Response: 200 OK with HotelDetailsResponse
Kotlin
Swift
data class HotelDetailsResponse hotel: HotelDetails
struct HotelDetailsResponse hotel: HotelDetails
data class HotelDetails id: String name: String location: String imagesUrls: List<String> amenities: List<Amenity> curatedRooms: List<RoomSummary> price: BigDecimal ...
data class RoomSummary id: String name: String description: String? imageUrl: String maxOccupancy: Int ...
data class RoomSummary id: String name: String description: String? imageUrl: String maxOccupancy: Int ...
Reservations endpoints
Booking a hotel is the natural next step, and we need endpoints to handle this process efficiently:
POST /v1/reservations
initiates a reservation by securing a room Body: ReservationRequest Response: 201 Created with ReservationResponse Endpoint-specific errors:
400 Bad Request if conditions such as HotelNotAvailable, RoomNotAvailable, TooManyGuests, or InvalidDates exceptions
Kotlin
Swift
data class ReservationRequest requestId: String hotelId: String roomIds: List<String> checkInDate: String checkOutDate: String guests: Int
The ReservationRequest model includes the requestId field, which acts as an idempotency key. This prevents accidental duplicate bookings if network issues cause the same request to be sent multiple times.
When the backend processes a reservation request, it responds with a ReservationResponse model. This response contains all the original request information, plus several additional fields:
A backend-generated reservationId that serves as the definitive identifier for tracking and updating the reservation.
A status field indicating whether the reservation is pending, has failed, or has succeeded.
📌 Remember: Adding idempotency keys to POST requests helps the backend de-duplicate client requests.
In the hotel booking system, this is critical. The requestId field in ReservationRequest prevents double-booking rooms.
GET /v1/reservations/{id}
returns the details of a reservation and its status
PUT /v1/reservations/{id}
updates an existing reservation with personal details, payment details, etc. Endpoint-specific errors:
PaymentError, PaymentProviderNotAvailable, PriceMismatch, UserInfoIncomplete, or CurrencyNotSupported exceptions
Step 3: High-level client architecture
With the API design in place, let's shift our attention to the client-side architecture. Figure 3 sketches out the architecture of our hotel reservation app.
Let's explore how the key components of our architecture work together.
External server-side components
Our system relies on several external services:
The Backend serves as our primary communication point, handling client interactions through HTTP.
A CDN improves performance by efficiently delivering static content.
The API Gateway manages authentication and controls system access.
External Payment Providers process and validate payment transactions.
Client architecture
The client architecture follows a similar layered approach to our previous designs, with distinct UI and data layers working together to create a seamless hotel booking experience.
In the UI layer, we have three main screens: Hotel List, Hotel Detail, and Reservation, each with its own dedicated state holder that manages the screen's logic and data presentation. We've also introduced a Make Payment Screen component to handle payments flexibly, supporting both direct credit card processing and integration with third-party payment providers.
The Data layer orchestrates the core business logic through specialized repositories that manage our primary data types: hotels and reservations. Each repository works with both local and remote data sources to ensure efficient data handling. All network communications flow through a central Network Dispatcher component, which coordinates backend interactions and manages access control.
This architecture provides a solid foundation for our hotel booking system. Let's explore some of its key aspects in more detail.
Step 4: Design deep dive
With the high-level architecture in place, let's examine some key aspects of our system in more detail.
Implementing reservation holds.
Enhancing search with autocomplete suggestions.
Processing payments.
Implementing reservation holds
In designing our hotel reservation app, we face the critical task of managing how long users can hold a room before finalizing their booking. This mechanism, often termed "reservation holds" in the industry, ensures that our system balances user convenience with the need to keep room inventory available for others.
Let's break down how this feature should work.
Requirements
Our reservation hold feature revolves around several key behaviors:
Fixed booking window: When a user starts a booking process, the backend temporarily holds the requested room for a fixed time window (typically 15 minutes). This countdown begins when the server acknowledges the initial reservation request via the POST /v1/reservations endpoint. The backend acts as the source of truth, providing an authoritative expiration timestamp.
Automatic release: If a user fails to complete the reservation within this timeframe, the system automatically releases the hold, returning the room to the available inventory. The released room is then instantly bookable by other users.
Visible countdown: Throughout the reservation process, the app provides clear, real-time feedback about the remaining reservation hold time, visually highlighting urgency.
Expiration cleanup: Upon expiration, any unpaid reservations are automatically canceled. This keeps our inventory accurate, preventing stale holds from cluttering the system and ensuring that availability reflects the actual state of our resources.
This combination of user-facing transparency and system-driven management maintains an equitable booking process while preserving the platform's responsiveness and accuracy.
Managing reservation hold timers
Ensuring that the client and backend remain synchronized in tracking reservation time is a pivotal challenge. Mobile devices complicate timer management because:
Unreliable device time: Users can manually set their device's clock, throwing off local timers.
Network delays: Latency between the client and server can skew when the hold appears to start or end.
App suspension: When the app is minimized or the phone locks, the timer must stay accurate without breaking.
Relying on the device's clock alone won't work. We need a better approach that has the backend as the source of truth. Thus, the backend communicates the reservation expiration UTC timestamp to the client.
To display the most accurate representation of the remaining reservation time to the user on the client, regardless of device or network conditions, we use the device uptime.
The device's uptime ensures that timers remain accurate during app suspension (e.g., when the app is minimized or the phone locks) and is immune to user clock changes, unlike standard wall clock time, which can be manipulated.
🛠️ Platform implementation details
Both iOS and Android provide native APIs to handle time tracking and countdowns:
On iOS, use ProcessInfo.processInfo.systemUptime to get system uptime, and create timers using the Timer class.
On Android, get system uptime via SystemClock.elapsedRealtime(), and implement countdowns with CountDownTimer.
This choice ensures precision from the server while accommodating mobile-specific interruptions.
✅ Decisions made!
Backend timestamps serve as the single source of truth for tracking reservation holds.
Client displays the countdown by combining the backend's expiration timestamp with local device uptime measurements.
Architecture changes in the diagram
A Reservation Timing Controller in the data layer to handle the core reservation timing logic we discussed.
A Reservation Timer in the UI layer to display the countdown to users.
The addition of separate components in different layers of the Architecture follows the Separation of Concerns principle (Figure 4). It creates clear responsibility boundaries, making the system more maintainable and testable. These components work together to keep users informed of their remaining reservation time.
🔍 Industry insights:
Expedia's API explicitly supports a two-step booking: a client can put a room “on hold” (no charge) and then confirm the booking within a given time window [1].
To explore how to design the backend system, check out the "Hotel Reservation System" chapter of the System Design Interview Volume 2 book [2].
Enhancing search with autocomplete suggestions
Autocomplete is a popular feature in mobile design interviews, especially for hotel booking apps. It helps users quickly find cities, destinations, or hotels as they type, but implementing it on mobile comes with technical challenges.
While autocomplete can get complex with advanced algorithms, personalization, and scalability, we'll keep it simple by focusing on efficiently loading autocomplete data.
Understanding the search experience
Currently, our app relies on a basic search mechanism: users enter a query, press "Search," and the client retrieves results via a GET /v1/hotels/search request to the backend. While this approach works, it lacks the dynamic interactivity that modern mobile users expect.
Autocomplete makes things easier by showing suggestions as people type. However, to achieve this effectively, we must address several performance considerations:
Network latency and bandwidth: Autocomplete responses must be nearly instantaneous to feel responsive. Querying a server for every keystroke risks slow responses and excessive data usage, frustrating users on slow connections.
Offline expectations: Users expect functionality even without a network. Autocomplete must offer meaningful suggestions offline, especially for frequent travelers in remote areas.
Resource constraints: Mobile apps must minimize battery, CPU, and memory usage. Overly complex logic or frequent network calls can degrade performance.
Input dynamics: Mobile keyboards lead to slower typing and more errors, making fast, forgiving autocomplete critical.
With these considerations in mind, let's explore how we can effectively implement autocomplete within our app.
Implementing autocomplete search
To deliver meaningful autocomplete suggestions, our app must anticipate user intent, offering relevant matches for countries, cities, and hotels as queries take shape. Table 1 explores multiple strategies for sourcing this data, each with its own merits and drawbacks:
Option
Description
Advantages
Disadvantages
Local static dataset
Embed all autocomplete data within the app.
Works offline. Eliminates network delays. Ensures stable performance.
Expands app size. Demands updates for freshness. Impractical for evolving data.
Real-time remote API fetching
Retrieve suggestions from the backend with each keystroke.
Provides current data. Requires no local storage. Highly adaptable.
Latency can disrupt UX. Increases data usage. Needs strong error handling.
Third-party services
Leverage external APIs (e.g., Google Places) for suggestions.
Access to rich, curated datasets. Reduces maintenance burden.
May incur costs. Raises privacy concerns over data sharing. Ties us to external providers.
Pre-fetch popular data
Load common search terms (e.g., top cities, hotels) in advance.
Speeds up frequent queries. Optimizes network use.
Risks of storing unused data. Requires periodic refreshes.
On-demand data loading
Retrieve suggestions from the backend after users complete their search.
Offers limited initial suggestions. It may feel sparse for new searches.
Table 1: Trade-offs for providing autocomplete data
As you can see, each approach has its pros and cons. For this exercise, we'll go with a hybrid solution: pre-fetching popular data combined with on-demand loading for user-specific searches. This method finds a middle ground, and here's why it works well:
Keeping the app lean and avoiding a bulky embedded dataset helps preserve a manageable installation size.
Minimizing network load, such as pre-fetching common terms at startup, reduces real-time requests.
Personalizing the experience with on-demand fetches that adapt to users’ search patterns over time, delivering tailored suggestions based on their history.
This strategy assumes that users often search within popular regions, starting with broad suggestions that become more personalized over time. By preloading commonly searched terms and incrementally updating the cache based on user interaction, we achieve immediate responsiveness while maintaining flexibility and relevance.
Search autocomplete data flow
Our autocomplete system operates through a three-step process:
Initial data loading. When our app launches, it checks the current version of the cached autocomplete data. If the server indicates newer data exists, the app downloads and updates the local cache accordingly. For this process, we can implement patterns such as the ChangeList pattern or timestamp-based synchronization.
Local query processing. As the user types, the app queries the local autocomplete dataset. To avoid overwhelming the system with rapid-fire database requests, we introduce a brief input debounce delay (typically 200–300 ms). This means the app waits briefly after the user pauses typing before performing the search, balancing responsiveness and performance.
Network-based refinement. When users select a suggestion or finalize a search, the app fetches additional data for that region in the background. This newer data is cached locally with a shorter time-to-live (TTL), ensuring freshness without excessive network load.
Next, let's consider how to store this data effectively.
Storage solution
For autocomplete to shine, we need a storage system optimized for rapid text retrieval. Given our focus on names and locations, Full-Text Search (FTS) [3] proves ideal, offering:
The system uses fast prefix matching to find terms that begin with the user's input, which is great for providing autocomplete suggestions.
Smart text tokenization that improves search accuracy.
Built-in result ranking based on relevance.
Fuzzy search capability that handles common mobile typing mistakes.
While FTS demands extra storage for indexes and adds some complexity, its benefits to the user experience might justify the investment. SQLite with FTS extensions emerges as our choice, leveraging its strengths across platforms.
🛠️ Platform implementation details
Both Android and iOS can implement Full-text search (FTS) through SQLite.
On Android, the Jetpack Room persistence library provides built-in FTS support [4], making implementation straightforward. Room handles the complexity of FTS configuration and query optimization, allowing you to focus on your search functionality.
iOS developers have a few options, as Core Data doesn't natively support FTS. You can either work directly with SQLite to implement FTS capabilities or use wrapper libraries such as GRDB [5] that simplify SQLite integration while maintaining full FTS functionality.
Potential challenges and considerations
While autocomplete significantly enhances usability, it also introduces complexities we must carefully address:
Data synchronization: Efficient updates via ChangeList or similar methods require careful versioning to avoid conflicts. Fetching only deltas since the last sync optimizes bandwidth.
Throttle tuning: A 200–300ms delay suits most users, but we might refine this dynamically based on typing speed or device capability to enhance responsiveness.
Data freshness: For volatile data such as hotel availability, shorter expiration times maintain accuracy without excessive network calls.
Request optimization: On-demand loading could strain the server during peak use. Background syncing over Wi-Fi or predictive pre-fetching can mitigate this.
To recap, our autocomplete storage implementation leverages FTS via SQLite, offering robust performance optimized for fast queries. This setup, complemented by intelligent caching and synchronization strategies, ensures a responsive and intuitive user experience across mobile clients.
🔍 Industry insights:
If you're interested in how other companies solved this problem, you can read how:
Traveloka.com supports multiple languages and incorporates geographic location awareness to improve search relevance and reduce typos [6].
Tiket.com developed a machine learning model that improved the quality of autocomplete ranking results by 4% to 7.5% [7].
Processing payments
Handling payments securely is an essential aspect of hotel reservation apps. Designing a payment integration requires careful consideration of user experience, data security, compliance with industry regulations, and reliable interaction with external services.
Our hotel reservation app supports two primary payment methods:
Direct credit card payments, where users manually enter their card details (name, number, expiry, CVV).
Third-party payment providers, such as PayPal, Apple Pay, or Google Pay, facilitate quick and secure transactions.
In this section, we will focus on integrating these payment methods within the mobile app.
Credit card payments
When processing credit card payments, security must remain a top priority. Integrating credit card payments securely into our app involves specific considerations:
Avoid storing sensitive data on the device. Card details should reside only briefly in volatile memory during active transactions.
HTTPS communication with TLS encryption ensures secure data transmission.
Tokenization [8] securely stores credit card information by replacing sensitive details with tokens that reference the actual data safely stored by a payment processor. Tokenization enables users to reuse previously entered payment methods securely, enhancing convenience without compromising security.
With tokenization, we can maintain minimal client-side storage for saved payment methods by retaining only a unique id that references the card securely, and the last four digits of the card number to help users quickly identify saved payment methods without exposing sensitive details.
Integrating credit card payments in our design
Once the credit card information is sent to the server as part of the PUT /v1/reservations/{id} endpoint, we face two viable paths:
Direct integration with payment processors [9]. Here, our backend connects directly to services such as Worldpay, Fiserv, or Global Payments. This grants us control but requires substantial effort to meet PCI DSS compliance, a demanding and resource-heavy task.
Leveraging Payment Service Providers (PSPs) [10]. Partnering with PSPs such as Stripe or PayPal offloads compliance and security responsibilities. Their SDKs streamline integration across our backend and mobile clients, aligning with industry best practices.
⚠️ Important security note:
Directly handling credit card data and communicating with Payment Processors requires extensive security measures. This approach demands significant investment in infrastructure and ongoing maintenance to comply with PCI DSS standards [11].
For most applications, it's safer and more practical to use established Payment Service Providers that already handle these security requirements.
Recognizing the complexity of direct integration, we've chosen to collaborate with trusted PSPs. This decision simplifies our development efforts and reinforces user trust by aligning with recognized payment experts, setting a solid foundation as we explore broader integration options.
Integrating with third-party Payment Service Providers
Integrating third-party Payment Service Providers (PSPs) enables secure, user-friendly payment processing. Modern PSPs, such as Stripe or PayPal, handle not only basic card payments but also offer comprehensive solutions, including digital wallets and alternative payment methods (e.g., Klarna).
When integrating PSPs into mobile apps, one key architectural choice we must consider is whether to route payments directly from the client or channel them through our backend server. Table 2 explores different approaches that come with unique benefits and trade-offs.
Increased client complexity due to direct PSP SDK integration.
Table 2: Trade-offs for integrating with PSPs
After evaluating these trade-offs, integrating PSPs directly on the client provides users with a richer, native payment experience and access to advanced payment options, including device-specific biometric authentication methods. Although this adds complexity in client-side management, it aligns with the expectations of a high-quality, modern mobile experience.
✅ Decisions made!
The hotel reservation system processes all payment transactions from the client UI through third-party Payment Service Providers.
Architecture updates
Integrating payments into the mobile architecture (Figure 5) requires minimal adjustments to the architecture diagram:
The Make Payment State Holder component handles all payment logic, connecting third-party payment SDKs with our Reservations repository.
The PSP Payment UI components from an external SDK manage the user-facing aspects of payments, securely collecting payment details and offering convenient options.
These additions to our architecture clearly delineate payment responsibilities, improving maintainability and ensuring secure and reliable handling of sensitive user transactions.
Payment data flow
To understand how payment data travels through our system, consider the following end-to-end flow when a user books a hotel room, as illustrated in Figure 6.
After the initial reservation, when the client sends a POST /v1/reservations request with booking details and the server returns a successful response with a reservationId, the following steps take place:
Payment collection. The client calls the PSP's SDK to gather payment details, keeping sensitive data off our servers (step 1).
Submit payment confirmation for the reservation. Post-payment, the client submits a PUT request to/v1/reservations/{id} with tokenized transaction identifiers provided by the PSP (step 2).
Backend verification. The backend confirms the payment with the PSP (step 3), locks in the reservation upon success, and returns the confirmation to the client (step 4).
📝 Note:
Payment Service Providers (PSPs) typically handle transactions in two steps:
Authorization: Reserve the funds in the customer's account.
Capture: Move the money when the transaction is confirmed.
This process makes payments more reliable. If something goes wrong before the transaction is confirmed, the money is still in the customer's account, since it has only been reserved, not taken.
When using a PSP's SDK, to ensure everything stays in sync, the backend should always verify the reservation before capturing the payment.
Integrating third-party PSP SDKs in the client
Popular PSPs such as Stripe, PayPal, or Apple Pay offer extensive SDKs, making client-side integration more straightforward.
When integrating PSP SDKs into our app, we should carefully handle common mobile-specific payment implementation challenges, including:
Error handling: Implement robust handling for common payment-related exceptions, such as declined transactions, timeouts, or network issues. Clearly communicate payment status and potential actions to the user.
Transaction retries: Use exponential backoff strategies to manage retries efficiently, preventing excessive load on PSP servers in case of temporary failures.
User feedback: Consistently update users with clear, real-time feedback on their payment progress and status, ensuring transparency throughout the process.
Addressing these considerations enhances overall reliability, resulting in a secure, transparent, and user-friendly payment experience.
🔍 Industry insights:
If you're interested in how other companies solved this problem, you can read how:
Expedia migrated to a cloud-based microservices payment platform for flexibility and speed [12].
Stripe explains payment tokenisation [13] and handles fraud prevention with 3D Secure [14].
Step 5: Wrap-up
Throughout this chapter, we've designed a comprehensive hotel reservation system from the ground up. At its core, our system enables seamless hotel search, browsing, and booking. We took special care to address critical aspects such as managing booking timeouts, optimizing search performance, and ensuring smooth payment flows.
If you have extra time in your interview or want to explore more advanced features, consider these additional requirements:
Real-time availability updates: Implement live updates to room availability, ensuring users always see the current inventory.
Smart notifications: Design a system for timely push notifications about upcoming stays, check-in reminders, and booking confirmations.
Reservation management: Enable users to modify or cancel bookings, with appropriate handling of cancellation policies and refunds.
Promotional system: Design a flexible framework for handling various types of discounts, loyalty programs, and seasonal offers.
Cloud storage has become fundamental to how we work with files across devices. Services such as Google Drive, Dropbox, Microsoft OneDrive, and Apple iCloud have revolutionized file management by seamlessly integrating cloud storage into everyday workflows. In this chapter, we'll explore the design of a Google Drive mobile client.
Figure 1 illustrates the Google Drive mobile interface, showing how these complex requirements translate into a clean, user-friendly experience.
Step 1: Understand the problem and establish design scope
Here's how the conversation with the interviewer might unfold:
Candidate: Let's begin by defining the core functionality of the Google Drive mobile client. I think the essential features include uploading and downloading files, with options to cancel these operations if needed. Users should also be able to create and delete folders to organize their content. Since Google Drive handles common file types like photos, videos, and documents, we'll also need to support those formats. Does that sound like a good starting point? Interviewer: Yes, that covers the basics. Since this is a mobile app, network reliability can be an issue. Let's make uploads resumable so users can pick up where they left off if a connection drops.
Candidate: That makes sense! Resumable uploads are especially useful for larger files or unreliable networks. Speaking of file sizes, is there a maximum limit we should design for? Interviewer: Let's set it at 10 GB.
Candidate: Got it. Users might upload the same file multiple times with updates. Should we include file versioning so they can track changes and restore previous versions of files? Interviewer: Yes, file versioning is a valuable feature for cloud storage.
Candidate: Great. Next, since users often access Google Drive from multiple devices, we should ensure files sync seamlessly across them. Are we designing for a single user with multiple devices, or do we need to consider multi-user scenarios such as file sharing? Interviewer: Let's focus on a single user with multiple devices for simplicity. We'll exclude sharing and permission management for now.
Candidate: For non-functional requirements, I assume we need scalability for a large user base and data durability for reliable file access, even in poor network conditions. Does that align with your expectations? Interviewer: Exactly. For scale, plan for about 10 million daily active users.
Candidate: Noted. One last thing, Google Drive offers real-time editing and collaboration on Docs and Sheets. Should we include those features? Interviewer: For this design, treat Docs and Sheets as standard files, leaving out real-time editing and collaboration.
Requirements
Based on our discussions, let's outline the core functionality needed for our Google Drive app.
Users can upload and download files with a maximum size of 10 GB and cancel operations in progress.
Users can create and delete folders to organize content.
Users can view and restore previous versions of files.
The app supports resuming interrupted uploads.
Files sync across the user's multiple devices.
For non-functional requirements, our system must ensure:
Scalability: Our system should handle 10 million daily active users and support a growing user base, as well as large data volumes, across various network conditions and device types.
Data durability: Users need reliable access to their downloaded files, even in poor network connectivity conditions.
To keep our design focused, the following features are out of scope:
Real-time collaboration (e.g., multi-user editing on Docs and Sheets).
User collaboration features, such as file sharing and permissions.
UI sketch
Figure 2 shows the core screens of our Google Drive app:
The Files List screen (center) is the app's main hub where users view and manage their files and folders.
The Upload Modal (left) provides a simple, focused interface for uploading files.
The File Revisions screen (right) shows the version history of a specific file for review and restoration.
Step 2: API design
With the app's requirements and UI sketch defined, we now turn to designing the API that connects the mobile client to the backend.
Network protocol
The Google Drive app primarily involves client-driven actions such as uploading files, downloading content, or organizing folders. For these, HTTP with REST APIs offers a straightforward and widely adopted solution.
However, to handle real-time notifications, such as when a shared file is updated, we'll complement REST with either WebSockets or Server-Sent Events (SSE). Since these notifications primarily signal changes rather than transfer actual file content, either approach can effectively handle these lightweight updates.
📝 Note:
While we're using REST in this design, gRPC with Protocol Buffers would also be a strong choice for the Google Drive app, given our scale requirements. gRPC offers several advantages that align well with our needs:
Binary encoding for improved performance.
Strong type safety to ensure API reliability.
Efficient bidirectional streaming for real-time file updates.
If you're experienced with gRPC and Protocol Buffers, feel free to adapt the API design accordingly. The patterns we discuss remain relevant regardless of the protocol choice.
Endpoints and data models
Next, let's outline the core API endpoints and their data structures, starting with the essentials: files and folders.
Files and folders
Since folders in Google Drive behave like files with a special type, we'll unify their management under a single set of endpoints for consistency.
List files GET /v1/files?parentId={fileId}&page={page}&limit={limit}
Response: 200 OK with GetFilesResponse.
Optional query parameters:
parentId (String): ID of the parent folder. Defaults to the root if absent.
Get file details GET /v1/files/{fileId}
Response: 200 OK with File.
Download file GET {downloadUrl} (provided in the File object)
Create file or folder POST /v1/files
Body: Metadata (e.g., name, mimeType, parentId).
Delete file or folder DELETE /v1/files/{fileId}
Update file or folder metadata
PATCH /v1/files/{fileId}
Kotlin
Swift
data class GetFilesResponse files: List<File> pagination: PaginationMetadata
📝 Note: These endpoints follow standard REST conventions. All requests require:
Authentication via a JWT bearer token in the Authorization header.
JSON content type (application/json).
Like any REST API, these endpoints may return 4xx status codes for client errors such as invalid authentication, missing resources, and malformed requests, and 5xx status codes for server errors.
Having covered file management, let's shift to versioning—a key feature for tracking changes and restoring past states.
File revisions
To enable users to view and revert file history, we'll add revision-specific endpoints tied to each file.
List revisions GET /v1/files/{fileId}/revisions?page={page}&limit={limit}
Get revision details GET /v1/files/{fileId}/revisions/{revisionId}
Restore revision POST /v1/files/{fileId}/revisions/{revisionId}/restore
The FileRevision data model is defined as follows:
Kotlin
Swift
data class FileRevision revisionId: String fileId: String mimeType: String size: Long modifiedAt: String downloadUrl: String checksum: String
This configuration allows the client to easily view and revert to previous versions of the document.
Step 3: High-level client architecture
Having defined the API structure, let's shift our focus to the mobile client's architecture. The goal is to create a modular and scalable design that supports the app's features while remaining adaptable for future growth.
We'll outline the key components and their interactions, as illustrated in Figure 3, starting with the external dependencies and then diving into the client itself.
External server-side components
To set the stage, let's first consider the external services the client relies on:
The Backend is the core system handling file storage, metadata, and business logic. It provides REST APIs for operations such as uploads and deletions, as well as SSE/WebSockets for real-time updates.
The CDN boosts performance by caching static files closer to users, minimizing download times.
The API Gateway is the client's single point of entry to the backend, managing authentication, request routing, and security enforcement.
Client architecture
Now, let's explore the client side, which splits into two core layers: the UI layer and the Data layer. This separation keeps the code clean, testable, and maintainable.
The UI layer consists of three main screens: a File List Screen for browsing content, a File Upload Modal for adding new files, and a File Revisions Screen for viewing file history.
The data layer manages the core functionality through Files and Revisions repositories. They work together with the Network Dispatcher to handle HTTP communication with the backend, while the Revisions Remote Data Source listens for real-time updates through SSE or WebSockets.
This architecture provides a solid foundation for our Google Drive app. Now, let's dig deeper into some of the system's more complex aspects.
Step 4: Design deep dive
Some unique aspects of the Google Drive system deserve special attention. Let's take a closer look at data storage, resumable file uploads, version history, and data encryption.
Data storage
Efficient data management is key in a cloud storage app like Google Drive, where the mobile client must handle metadata (e.g., file names, folder hierarchies, version info) and downloaded file content. Let's break down how each is stored locally for optimal performance and security.
File metadata storage
Our app needs to efficiently handle several types of data as users interact with their files:
File and folder metadata when browsing through directories, using the File data model.
Version history and real-time updates for tracking changes, using the FileRevision data model.
This metadata requires frequent querying and updates. For managing this, a relational database proves ideal because:
Enables fast, structured queries for operations such as listing files or finding revisions.
Maintains data relationships (e.g., linking files to folders via parentId), preserving integrity.
Performs well even as metadata grows, supporting scalability.
Database design
The File and FileRevision data models map naturally to database tables since they have well-defined structures. This makes it straightforward to perform complex queries across the file hierarchy, track relationships between files and their revision history, and maintain data consistency as files change.
Figure 4 shows how we've updated our architecture to reflect this design, with separate Data Access Object (DAO) components for each database table.
Caching approach
To balance speed and storage, we'll cap the metadata database at a configurable size, such as 200MB, using an LRU (Least Recently Used) eviction policy. This keeps recently accessed metadata on-device while clearing out older entries. Since each metadata record is small, we can cache a large number of entries with minimal storage impact.
Managing downloaded files
For offline access, users can download files, which need secure and practical local storage.
The app's private internal storage, sandboxed by iOS and Android, is ideal because:
Files are protected from external access.
The app can manage files (e.g., delete or update) without affecting other apps or user directories.
Files are directly accessible within the app, with an option to export to shared storage if needed.
How it works
Files are stored in a specific folder (e.g., /data/user/0/com.google.android.apps.drive/files/downloads/<fileId> on Android), using their fileId as a unique file name to avoid conflicts.
Before downloading, the app checks available space and alerts users if it's low, ensuring smooth operation even with large files.
🔍 Industry insights:
Box Drive allows users to mark folders for offline access. When selected, content is automatically downloaded in the background and stored locally for offline use [1].
Resumable file uploads
Resumable uploads are a cornerstone of a mobile cloud storage app, especially for managing large files and coping with unreliable networks. They deliver key benefits: users can pause and resume uploads without needing to restart, recover from interruptions seamlessly, and manage uploads based on network or battery conditions, which enhances both efficiency and the user experience.
Upload types
Many popular apps use resumable uploads to efficiently handle large files. This includes cloud storage services such as Google Photos [2], X (formerly Twitter) [3], Box [4], Dropbox [5], Microsoft OneDrive [6].
Google Drive [7], for example, offers three distinct upload methods according to its documentation [8]:
"Simple upload (uploadType=media): Use this upload type to transfer a small media file (5 MB or less) without supplying metadata."
"Multipart upload (uploadType=multipart): Use this upload type to transfer a small file (5 MB or less) along with metadata that describes the file, in a single request."
"Resumable upload (uploadType=resumable): Use this upload type for large files (greater than 5 MB) and when there's a high chance of network interruption, such as when creating a file from a mobile app. Resumable uploads are also a good choice for most applications because they also work for small files at a minimal cost of one additional HTTP request per upload."
Let's explore how to implement file uploads in our Google Drive mobile client. Since simple upload is straightforward, let's focus on resumable uploads.
High-level steps
Initiate: The client requests an upload session and receives a unique upload ID and session details from the server.
Upload chunks: The file is sent in smaller chunks. If the connection is interrupted, the client resumes from the last successful chunk.
Complete: Once all chunks are uploaded, the server finalizes the file with an optional integrity check.
Companies implement these steps differently, primarily varying in how they structure the endpoints:
Single unified endpoint: Companies like X (formerly Twitter) and Google (Drive and Photos) handle everything through a single endpoint. They manage metadata either through headers or query parameters. For example, Google Photos takes the following approach with its resumable uploads endpoint:
X-Goog-Upload-Command=[start|upload, finalize]
X-Goog-Upload-Offset={bytes\_offset}
POST /files?uploadType=resumable&uploadId={uploadId}
Multiple endpoints. Companies such as Dropbox and Box split the functionality across different endpoints, with each endpoint handling a specific step of the process. For example, Dropbox exposes the following endpoints:
POST /files/upload_session/start
POST /files/upload_session/append
POST /files/upload_session/finish
Both approaches can work. In this explanation, we will look more closely at implementing multiple endpoints to handle resumable uploads.
Implementation details
Let's explore the different endpoints and data models we need to handle resumable uploads.
Initiate upload
POST /v1/upload?uploadType=resumable
Kotlin
Swift
data class UploadRequest requestId: String name: String mimeType: String parentId: String size: Long
data class UploadResponse uploadId: String totalChunks: Int chunksProcessed: Int chunkSize: Long uploadUrl: String uploadExpiresAt: String
struct UploadResponse uploadId: String totalChunks: Int chunksProcessed: Int chunkSize: Int64 uploadUrl: String uploadExpiresAt: String
The UploadResponse file guides file uploads by tracking how files are split, what has already been uploaded, and where new parts should be added. This helps the client manage uploads smoothly, whether starting new ones or resuming interrupted uploads.
Upload chunks and verify steps
Code
Content-Range: bytes start-end/total
PUT /v1/upload/`{uploadId}`/chunk
  Body: Raw binary data for a particular chunk.
  Response: 201 Created if this was the final chunk, or 308 Resume Incomplete if more chunks remain. Payload of type UploadResponse.
The Content-Range header manages the upload process by telling the backend which part of the file is being sent. When the last piece arrives, the backend assembles everything and sends a completion confirmation. The client can then verify the upload was successful based on the backend's successful response code.
Resume upload
Code
GET /v1/upload/`{uploadId}`
  Description: Returns information about an upload session.
  Body: Empty.
  Response: 200 OK. Payload of type UploadResponse.
The client can then continue uploading the remaining chunks, starting with the next chunk after chunksProcessed. If too much time has passed and the upload session has expired, the client will need to initiate a new upload from the beginning.
Cancel upload
Code
DELETE /v1/upload/`{uploadId}`
Allows clients to abort uploads and free server resources.
Mobile implementation challenges
When implementing resumable uploads in mobile apps, we need to carefully consider several platform-specific challenges. Let's explore these challenges and their solutions.
Managing background tasks
Mobile apps should handle file uploads in the background to avoid blocking the main UI thread and provide a better user experience. However, mobile operating systems may terminate background tasks at any time. To prevent losing upload progress when this happens, we need to save the pending UploadResponse objects to disk. This lets us resume uploads later when the app is running again, ensuring files still get uploaded even if they were interrupted.
During app launch, we check for partially completed uploads and resume the jobs while monitoring system conditions such as battery and network changes.
Limited storage and permissions
When handling file uploads, we need to consider two key device constraints: storage space and file access permissions.
For storage, we temporarily cache files before upload. Since mobile devices have limited space, we need a strategy for handling low storage scenarios. The app should monitor available space and provide clear options when storage runs low, such as letting users clear the upload cache, removing previously downloaded files, or showing storage usage statistics.
For file access, we can use the system file picker, which provides temporary read access to selected files or requests direct storage permissions from the user. If users deny storage permissions, the app should disable upload functionality and provide clear guidance on enabling permissions through system settings.
Error handling and recovery
While the backend handles most of the complexity around chunks, such as determining chunkSize and tracking progress, the client still needs to handle errors gracefully. Let's look at some common error scenarios and how to handle them:
When uploads fail due to connectivity problems, the client should save the current upload state, resume from the last successful chunk when connectivity returns, and show clear status messages to users such as "Connection lost, attempting to resume".
The client should restart the upload process if it detects an invalid upload state, such as an expired uploadUrl, inconsistent responses from the backend (e.g., receiving a chunksProcessed count larger than the totalChunks), or the uploadExpiresAt time being reached.
To avoid overwhelming the servers with retry attempts, implement exponential backoff, gradually increasing the delay between retry attempts. This helps manage server load while still ensuring that uploads are eventually complete.
User experience and feedback
Users should always know how their upload is progressing, even if they restart the app. To keep users informed throughout the entire upload process, clients can:
Calculate progress by comparing completed parts (chunksProcessed) against totalChunks.
Update the UI to show meaningful progress indicators.
Show system notifications when the app is in the background.
Architecture changes in the diagram
Let's update our architecture diagram to reflect the new components we've discussed. Figure 6 shows how we've enhanced both layers of our system. In the UI layer, we've added the File Picker and File Permissions Helper components to handle user interactions with the device's file system. The data layer now includes the File Splitter for breaking down large files, as well as the File Uploader Repository and File Uploader Service to manage the upload process in the background.
architecture diagram
Version history
Version history is essential for tracking file changes in cloud storage, letting users revert to earlier versions when needed. In this section, we'll cover how new file versions are uploaded and how conflicts are handled when changes overlap, striking a balance between usability and technical precision.
Uploading a new version of an existing file
When users modify a file and upload it, the app must handle the new version efficiently. Two methods dominate this process: full copy upload and block-level sync. Each approach affects storage, bandwidth, and app complexity differently.
Full copy upload
This method uploads the entire updated file every time a change is made.
Client-side: The app sends the whole file to the server, no matter how small the edit.
Backend-side: The server saves each version as a complete, standalone copy.
Advantages:
Straightforward to implement, no need to track specific changes.
Reliable, each version is fully intact for easy recovery.
Disadvantages:
Storage heavy as multiple full copies pile up, especially for big files.
Bandwidth intensive, as uploading everything uses more data.
Many cloud drive providers including Google Drive, Box, OneDrive, and iCloud use this approach [9] because of its simplicity and reliability.
Block-level sync
Block-level sync [10] takes a more sophisticated approach by uploading only the changed parts of a file, not the entire file.
Client-side: The app splits the file into blocks, detects what's different, and sends just those blocks.
Backend-side: The server keeps a block registry and rebuilds versions as required.
Advantages:
More efficient. It saves bandwidth and storage, ideal for minor edits to large files.
Disadvantages:
It's more complex as it needs advanced logic to manage and reassemble blocks.
Resource-heavy. It requires extra processing on both ends.
Dropbox pioneered this approach using their Broccoli [11] encoding system and block sync protocol. For a better comparison between these approaches, refer to the following block-level sync resource [12].
Managing file conflicts
File conflicts occur when multiple devices modify the same file concurrently, leading to inconsistencies across versions. This can happen in scenarios such as:
A user edits a file on one device while offline, and another device modifies the same file before synchronization occurs.
Two devices upload changes to the same file at nearly the same time.
Interruptions during synchronization leave files in an inconsistent state.
To handle these challenges effectively, the client and server need to work together to detect and resolve conflicts. Cloud storage systems typically approach this problem in two parts: conflict detection, which identifies when changes overlap, and conflict resolution, which determines how to handle competing versions.
Let's explore these aspects in more detail, focusing on a widely-used detection approach called optimistic concurrency control and common resolution strategies such as Last-Write-Wins (LWW) and version forking.
Conflict detection
Optimistic concurrency control [13] is a widely used technique to detect conflicts by validating changes against the current file version before committing updates. It assumes conflicts are rare and checks for them only during the update process. This approach is employed by cloud storage providers such as Box, which uses HTTP headers for version validation [14].
At a high level, it works as follows.
Process:
Each file has a version identifier (e.g., a version number or hash) tracked by both client and server.
When uploading a new version of the file, the client sends the file data along with its current version identifier (e.g., via a header such as If-Match: <version>).
The server compares this with its latest version:
If they match, the upload succeeds, and the version increments.
If they differ, the server rejects the upload with a 409 Conflict error.
On conflict detection, the client:
Retrieves the latest version using GET /v1/files/{fileId}.
Merges changes (automatically or with user input, depending on file type).
Retries the upload with the updated version.
Advantages:
Prevents lost updates by ensuring that only changes based on the latest file version are accepted.
Enables fine-grained conflict resolution, often resulting in higher data integrity.
Disadvantages:
Can introduce extra latency due to the need for conflict resolution flows, particularly over unstable mobile networks.
May frustrate users with conflict errors and require manual merging in some cases.
Conflict resolution
Cloud storage systems such as Google Drive often adopt an eventual consistency model to prioritize availability and allow updates to proceed without immediate synchronization across all devices.
In this model, conflicts are detected after updates are accepted, and resolution is handled through specific strategies. Two common resolution strategies are:
Last-Write-Wins (LWW) automatically makes the most recent version the current one.
Version forking keeps both conflicting versions, usually by adding a number to the filename (e.g., "filename.png" and "filename (1).png").
Real-world examples
The choice of conflict resolution strategy depends on your app's specific requirements. Cloud storage providers handle conflicts in different ways:
Dropbox keeps things simple by default. It automatically saves the newest version without asking the user, using the last-write-wins strategy.
Google Drive lets users decide. When it detects a conflict, it shows a dialog asking if they want to keep both files or replace the old one (see Figure 7).
whose name already exists in the folder
Dropbox's public API provides support for both strategies we discussed to give more flexibility to clients. Through two key parameters (strict_conflict and mode) in their upload API [15], they give developers precise control:
The strict_conflict parameter determines whether to enforce strict validation. When enabled, it prevents concurrent uploads by returning conflict errors.
The mode parameter controls what happens when conflicts occur:
In add mode, new uploads of existing files get automatically renamed with a unique counter.
In overwrite mode, new uploads simply replace existing files, following a "last-write-wins" strategy.
Data encryption
The interviewer may sometimes add extra requirements to the problem. For example, what if they ask you to support enterprise customers who need files stored on devices to be encrypted? What would you do?
Files and metadata encryption
Without encryption, a lost or compromised device could expose sensitive files if an attacker mounts its storage. To counter this, we'll use AES-256 [16], a strong, industry-standard encryption algorithm that balances security and performance on mobile hardware. We'd use it for:
Metadata protection: File names, folder structures, and other metadata are stored in an encrypted database.
File protection: Downloaded files are encrypted within the app's private storage.
This approach ensures that even if the device's storage is accessed, the data remains unintelligible without the decryption key.
Key management for offline access
To enable offline file access, encryption keys must be stored locally rather than relying solely on server-side solutions. We leverage platform-specific security features to store these keys securely:
On Android, the Android Keystore [17] provides hardware-backed key storage, protecting keys from extraction.
On iOS, the Keychain [18] offers similar protection, integrating with Apple's Secure Enclave where available.
For added protection, we can derive the key from the user's login credentials using PBKDF2 [19], a key derivation function, ensuring only authenticated users can unlock it. This ties the encryption tightly to user identity.
Mobile implementation considerations
While encryption provides essential security, it comes with unique challenges on mobile devices. Let's explore how to balance strong security with smooth performance.
Performance and resources
Encryption operations can be CPU-intensive, especially for large files. To maintain a responsive app, the encryption/decryption work happens on background threads to keep the UI smooth. Also, we should take into account that encrypted files take up slightly more space due to padding and metadata overhead and the app memory consumption when keeping encrypted and decrypted files in memory.
Memory management
Careful memory handling is crucial when working with decrypted data. We should consider implementing timeouts to automatically clear decrypted content and release cached decrypted data when memory runs low. Additionally, developers should watch for potential memory leaks in encryption/decryption cycles.
Error handling and recovery
A robust encryption system needs clear paths for handling issues. We must implement appropriate fallback behaviors when encryption keys become corrupted or inaccessible or when encryption/decryption operations fail. The app needs to inform the user and prompt them to take the right actions.
Backup strategy
Since encrypted files are tied to device-specific keys, they require special handling for backups. We should exclude encrypted files from system backups by default. If backups are needed, implement custom logic to re-encrypt data with backup-specific keys.
Device compatibility
Not all devices offer the same level of security features. In our logic, we must check for secure hardware availability during app initialization, and fall back gracefully to app sandbox storage on older devices. Additionally, we should inform users that we're operating with reduced security capabilities.
Step 5: Wrap-up
Throughout this chapter, we've designed a Google Drive client that addresses key challenges in cloud storage apps. Our solution enables users to securely store, access, and sync their files while maintaining a complete version history. We built the system around a robust REST API for core operations, complemented by SSE or WebSockets to deliver real-time updates when files change.
The architecture we developed tackles several complex challenges head-on. By carefully structuring our client components and defining clear backend interactions, we created a system that handles everything from basic file operations to more intricate features such as resumable uploads and file versioning.
If you have additional time during your interview or want to explore more advanced features, here are some compelling extensions to consider:
Design a selective sync system where users choose which folders and file types to store locally versus keeping in the cloud only.
Create a comprehensive file sharing system with granular permissions and access controls for secure collaboration.
Optimize data transfer and storage through compression techniques such as Google's Brotli algorithm [20], reducing bandwidth usage and storage costs.
Designing the YouTube mobile application poses a significant challenge in system architecture. With billions of hours of video streamed each day across diverse devices and network environments, delivering seamless playback on this scale requires careful planning. In this chapter, we will examine the essential components that enable the YouTube app to excel as a mobile system, guiding you through the design process step by step.
YouTube operates on an extraordinary scale, serving over 2.5 billion active users who access content in more than 80 languages [1]. Mobile devices now dominate the platform, accounting for over 70% of total watch time as of early 2024 [2]. This shift underscores the importance of optimizing the mobile experience, a priority we will address throughout our design.
Step 1: Understand the problem and establish design scope
Before diving into the design, we must first define its requirements and boundaries. Imagine we are discussing this with an interviewer to clarify the system's focus:
Candidate: To start, I would like to confirm the scope. Are we concentrating on the video consumption experience, such as browsing and playback, or should we also consider features for creators, such as video uploads or live streaming? Interviewer: Please focus on video consumption: browsing and playback. Exclude content creation and live streaming.
Candidate: Very well. For consumption, I assume users need to browse recommended videos on a home feed and play them. The player should include controls such as play, pause, and seek, plus options for quality settings (e.g., 360p, 720p), subtitles, and alternate audio tracks. Does this match your vision? Interviewer: Yes, that captures the key functionality.
Candidate: For playback, may I assume we can rely on an existing streaming solution, such as HLS or DASH, for adaptive streaming, or do we need to design that ourselves? Interviewer: You can use an existing protocol; no need to build it from scratch.
Candidate: Excellent. To improve the experience, prefetching video recommendations for the video feed might help. Should we include that? Interviewer: Yes, prefetching would be a valuable addition.
Candidate: Noted. Should we also incorporate features such as watch history for resuming videos or playlist management? What about social elements such as likes and comments? Interviewer: Let's keep those outside our scope.
Candidate: Finally, for scale, how many daily active users (DAU) should we plan for? Interviewer: Design for about 1 billion DAU worldwide.
This exchange helps us establish a clear picture of what we are building and its constraints.
Requirements
Based on this, we are creating a YouTube-like mobile app centered on video consumption, with these features:
Users can browse recommended videos in a home feed.
Users can watch videos using a feature-rich player.
The app prefetches video feed data to improve user experience.
As for non-functional requirements, we need to build a system that ensures:
Scalability: The app must handle 1 billion daily active users globally while adapting to diverse network conditions from high-speed Wi-Fi to spotty cellular connections.
Performance: Users should experience smooth scrolling and video playback with efficient delivery of media content across all device types.
Availability: The system needs to guarantee uninterrupted access to videos while supporting multiple languages and regions to serve a global audience.
UI Sketch
Consider the primary screens of our app, as shown in Figure 2. The Home screen presents tailored video recommendations, while the Video Player screen displays the selected video with its controls.
With our scope set and a simple UI outlined, we can now explore how the app communicates with the backend.
Step 2: API design
Next, we design the API that connects the client to the backend.
Network protocol
For most of our client-server interactions, we will adopt a RESTful API over HTTP with JSON as our communication framework. This approach leverages REST's simple and intuitive design, while also offering wide compatibility with mobile clients and existing tools, making it a practical and efficient solution.
At YouTube's scale, however, efficiency matters greatly. JSON can produce larger payloads, which can potentially slow down performance on mobile networks. An alternative, like gRPC with Protocol Buffers, offers compact and fast serialization, making it ideal for high-performance systems.
While gRPC is highlighted as a potential optimization, it's a more specialized technology, and not every developer is familiar with it. For simplicity, we'll opt for a RESTful API in our design. However, if you're comfortable with gRPC, feel free to use it for the API design. It's a great option too.
Endpoints
Let's define the API endpoints driving the app's core functionality.
In this chapter, we will base our design on the real YouTube Data API [3]. It follows a REST-like architecture with some interesting deviations that offer valuable insights for designing mobile systems. At its core, it provides endpoints for accessing YouTube resources such as videos, playlists, and channels.
Video browsing
The videos endpoint has an interesting design choice worth looking at. The Video resource data model [4] contains rich metadata: everything from basic details to view counts and content restrictions. But not every client needs all this information at once!
The YouTube API addresses over-fetching through a flexible part parameter in their video endpoint:
Code
GET https://youtube.googleapis.com/youtube/v3/videos?
      part=snippet,statistics,contentDetails&
      id=VIDEO_ID&
      maxResults=`{results}`&pageToken=`{cursor}`
The part parameter here is key: it lets the client specify exactly which data fields to fetch, such as snippet for titles and thumbnails or statistics for view counts. This selective approach minimizes over-fetching, a critical consideration for mobile apps where every byte counts. It's not as dynamic as GraphQL, but it offers similar benefits with less overhead, keeping our design practical and efficient.
This approach offers several benefits:
Reduces network bandwidth usage by trimming response payloads.
Improves server efficiency since it only needs to fetch the requested fields.
Gives clients fine-grained control over data retrieval.
Maintains REST's simplicity while adding field selection.
📝 Note:
Unlike GraphQL, which allows field-by-field selection, this approach lets you choose from predefined sets of fields. While not as granular as GraphQL, it offers a practical balance: giving clients some control over the data they receive without adding too much complexity.
Popular videos endpoint
When a user opens the app without signing in, we need to show trending content in their main feed. To fetch popular videos, we can use:
Code
GET /youtube/v3/videos?part=snippet&chart=mostPopular&
maxResults=20®ionCode=US
Video details endpoint
When a user taps a video, we need to fetch its full details to enrich the viewing experience. Here's how we handle it:
Code
GET /youtube/v3/videos?id=VIDEO_ID&
    part=snippet,player,contentDetails,statistics
This call retrieves everything the app needs: metadata, such as the title and description, playback information via the player, and engagement metrics from statistics.
Video playback
Unlike third-party apps, which must use YouTube’s IFrame Player API [5], we can feed streaming manifests directly to platform-specific video player APIs since we’re designing YouTube’s internal client.
To achieve that, we can create a video playback endpoint that provides all necessary streaming information:
Code
GET https://my-internal.googleapis.com/youtube/v3/videos/playback?
      codecs=supportedCodecs&
      protocols=supportedStreamingVideoProtocols&
      language=preferredLanguage&
      subtitles=preferredSubtitles
The response delivers a streaming manifest (e.g., DASH or HLS) tailored to the device's capabilities, along with metadata such as subtitle options. We'll dive deeper into these streaming protocols later, but for now, this endpoint ensures smooth, adaptive playback.
Step 3: High-level client architecture
With the API design in place, let's shift our attention to the client-side architecture. Figure 3 sketches out the architecture of our YouTube app.
Server-side components
Our system relies on several external services:
The Backend manages video data, user interactions, and serves API requests over HTTP.
CDNs speed up the delivery of static assets, such as video content, thumbnails, and metadata, by caching them near users.
The API Gateway acts as the front door for client requests, handling routing, security, authentication, and access control.
CDNs play a crucial role in video streaming for several key reasons:
User experience: Users receive content from nearby CDN servers, rather than a distant central server. This significantly reduces loading times and buffering.
Scalability: When millions of users stream popular videos simultaneously, CDNs distribute the load across multiple servers. This prevents overloading any single server and ensures smooth playback for everyone.
Cost-effective delivery: Without CDNs, every video request would have to travel all the way to the origin servers, increasing both latency and bandwidth costs. CDNs optimize these costs by reducing the burden on primary infrastructure.
Despite these benefits, CDN costs can become substantial as operations scale. This has prompted major streaming platforms to explore alternatives:
Netflix developed its own CDN solution called Open Connect [6]. This custom approach gives them greater control over delivery costs while specifically optimizing for video content.
Other companies form direct partnerships with Internet Service Providers, placing servers within ISP networks. This strategy can lower delivery costs while improving streaming quality.
Client architecture
The UI layer consists of three main screens: a Home Screen for browsing recommended videos, and a Video Player screen for seeing video details and watching them via the Video Player UI component. As with other apps, these screens have their corresponding state holder associated with them that exposes UI state and handles the business logic of the screens.
The data layer manages the core functionality through the Browsing, Video, and History repositories. All of them would have their corresponding Remote Data Source that uses the Network Dispatcher to handle HTTP communication with the backend.
Step 4: Design deep dive
Now that we've established our high-level architecture, let's explore some key aspects of our system in more detail:
Video streaming.
Prefetching video feed data.
Enhanced user experiences.
Video streaming
When designing a video streaming app like YouTube, creating a smooth viewing experience is key. Users expect videos to start fast and play without interruptions.
Modern video streaming works differently from traditional downloading. Instead of waiting for the entire file to download, streaming breaks videos into small segments that load progressively:
Playback begins after just the first few segments are downloaded.
More segments load in the background as users watch.
Video quality adjusts according to your connection speed.
Played segments get cleared to save memory.
This approach is well-suited to mobile environments. Loading only what's needed right now uses less memory and handles videos of any length. The app can also switch video quality when your connection changes, ensuring the best possible viewing experience wherever you are.
Video streaming protocols
Modern video streaming relies on several key protocols, each designed for specific scenarios:
HTTP Live Streaming (HLS) [7] is Apple's widely adopted protocol that breaks videos into small chunks delivered over standard HTTPS connections. This approach ensures smooth playback even when network conditions change. While especially strong on Apple devices, HLS works well across most platforms.
DASH (Dynamic Adaptive Streaming over HTTP) [8] follows similar principles to HLS but offers more flexibility as an open standard. Unlike HLS, DASH isn't tied to specific video codecs, giving developers more implementation freedom. This protocol has gained significant traction, especially outside the Apple ecosystem.
Common Media Application Format (CMAF) [9] bridges the gap between HLS and DASH by providing a unified container format. This standardization eliminates the need for separate content versions, simplifying deployment and reducing storage costs.
Other notable protocols include WebRTC (Web Real-Time Communication) [10], the SRT (Secure Reliable Transport) protocol [11], and two older protocols, such as Real-Time Streaming Protocol (RTSP) [12] and Real-Time Messaging Protocol (RTMP) [13].
When selecting a protocol, we need to consider the specific needs of our YouTube app, including latency (how quickly video starts playing), platform compatibility (support across Android and iOS devices and the capabilities of their ecosystem), and security needs (protecting content during transmission). For a deeper technical comparison of these protocols, several comprehensive resources are available [14] [15].
📝 Note: These protocols involve low-level technical details that you usually don't need to learn for system design interviews. What's important is understanding that different streaming protocols support different video formats and players, which influences your architecture choices.
When building video streaming apps such as YouTube, Twitch, or Netflix, HLS and DASH are the leading protocols. They both support adaptive bitrate streaming [16], automatically adjusting video quality based on network conditions and device capabilities. For applications where minimizing delay matters, low-latency versions (LL-HLS and LL-DASH) are available.
📌 Remember! Adaptive streaming protocols such as HLS and DASH typically use adaptive bitrate streaming (ABR) to adjust video quality based on network conditions.
Most major streaming platforms implement several protocols rather than just one. This ensures wide device compatibility and optimizes for different viewing scenarios. YouTube, for example, supports HLS, DASH, RTMP, and RTMPS, allowing third-party clients to choose the protocol that works best for them [17].
Adaptive bitrate streaming
Video apps need to handle changing network conditions as users move around, switch between WiFi and cellular, or experience congestion. Adaptive bitrate streaming solves this problem through:
Multiple quality versions
Videos are encoded at different quality levels (480p, 720p, 1080p).
Each version offers a different balance of quality vs. bandwidth usage.
Video segmentation
Content is split into small chunks (e.g., 2-10 seconds each).
Every chunk is available in all quality variants.
Smaller chunks allow for faster adaptation, but they increase server requests.
Real-time quality switching
The player constantly monitors network speed and device performance.
It selects the optimal quality for each upcoming segment.
Quality can shift up or down as conditions change.
The player makes smart decisions by tracking download speeds, buffer levels, CPU/GPU usage, and device capabilities. When the connection improves, quality gradually increases. When things get worse, quality quickly drops to prevent buffering. In practice, mobile players use buffer-based or hybrid (buffer + throughput) algorithms to decide the next segment's bitrate. Because each decision only affects the next segment, the system can respond immediately to changing conditions.
Video streaming on Android and iOS
For video streaming in mobile apps, the best options are the native solutions: ExoPlayer [18] on Android and AVPlayer [19] on iOS. These frameworks handle modern streaming formats such as HLS and MPEG-DASH while delivering smooth, reliable playback.
The native solutions offer two key advantages: deep platform integration for optimal performance, such as hardware decoding, and extensive control over playback features (adaptive bitrate, subtitles, etc.). While third-party players such as VLC, JWPlayer, or Brightcove provide consistent APIs, the native solutions typically might be more customizable for specific use cases.
Managing video content: Subtitles and audio
Modern video streaming services separate video, audio, and text components. This modular approach, used in protocols such as MPEG-DASH and HLS, creates a more flexible and efficient streaming experience. Let's look at how this works.
Subtitle and caption support
Both MPEG-DASH and HLS implement text elements, including subtitles and closed captions, through dedicated text tracks:
HLS uses WebVTT format text tracks referenced in the main playlist (.m3u8) file
MPEG-DASH supports multiple formats, including WebVTT and TTML (Timed Text Markup Language), defined in the manifest (.mpd) file
📌 Remember!
Separate tracks are independent streams of content, such as audio, subtitles, or closed captions, that play alongside the main video. Each track contains its own data and timing information, allowing it to stay perfectly synchronized with the video playback. This separation makes it easier to handle different types of content while keeping everything in sync.
Popular platforms like YouTube follow this approach because separating text from video offers several advantages:
Reduces overall bandwidth usage since text takes minimal space compared to video.
Enables multi-language support without duplicating video streams.
Helps meet accessibility requirements with easily updatable captions.
Allows real-time subtitle updates without re-processing video content.
Thumbnails implementation
When users scrub through a video's seek bar, like in Figure 4, the small previews you see are not actually built into standard streaming protocols, such as HLS or MPEG-DASH. Video services need to create this preview functionality separately. Let's look at two common approaches.
Sprite sheets
One popular method uses sprite sheets (also called texture atlases) [20]. This approach combines multiple thumbnail images into a single file, which reduces server requests. While this works well for web streaming, it requires maintaining separate pre-generated images alongside each video. Figure 5 shows an example of this.
Adaptive streaming
The second approach leverages adaptive streaming technology to fetch low-resolution video frames for previews. YouTube mobile apps use this method for their seek previews, and it works particularly well:
When a user moves the seek bar, the app requests that specific timestamp from the server, but at a much lower resolution (typically 144p or 240p).
The server quickly delivers these low-bitrate segments, enabling smooth previews during seeking.
Once the user selects their position, the app switches back to full-resolution video for normal playback.
This approach offers several benefits for mobile applications:
Shows actual video motion rather than static images, giving better context.
Reuses existing streaming infrastructure, eliminating the need for separate systems.
Delivers accurate, low-latency previews that match the actual content.
Adaptive streaming aligns especially well with mobile apps, providing a smooth seeking experience while efficiently using device resources.
Common video streaming challenges
Building video streaming into mobile apps presents several key challenges that directly affect the user experience. Let's explore these challenges and practical approaches to address them.
Memory management
Video playback demands significant memory, particularly challenging on mobile devices with limited resources. Mobile operating systems can terminate apps that consume excessive memory, making proper memory management critical for a reliable streaming experience.
There are effective memory management strategies we can use:
Adaptive buffer sizing by maintaining smaller buffers on memory-constrained devices while using larger buffers on high-end devices for smoother playback.
Frame recycling by reusing video frame buffers instead of continuously allocating new memory.
Degrade gracefully by reducing quality when memory pressure increases, preventing playback failures.
Handle app state transitions properly to release resources when the app moves to the background.
Memory monitoring is essential, and we should implement analytics that track memory usage patterns across different devices and playback scenarios to identify potential issues before they affect users.
Battery life optimization
Video playback is one of the most power-intensive operations on mobile devices, affecting both processor and network usage.
Some power consumption reduction techniques we can use are:
Adaptive quality selection by lowering resolution and bitrate when the battery is low or the device is not charging.
Use hardware acceleration where available to reduce CPU load.
Pause video playback and suspend network operations when the app isn't visible.
🛠️ Platform implementation details
Mobile-specific optimizations make a significant difference. For example, on Android, using the Battery Saver API to detect power-saving mode and adjust video quality accordingly, or on iOS, responding to low-power mode notifications to reduce playback quality.
Network handling
Mobile networks can be unpredictable, requiring thoughtful strategies to ensure a smooth user experience. To address these challenges, we can implement several robust network handling techniques:
Bandwidth adaptation by switching video quality based on available bandwidth using adaptive bitrate streaming.
Efficient retry logic by using exponential backoff with jitter to prevent network congestion during retries.
Allowing pre-downloading videos for offline viewing when network conditions are favorable.
Adjusting buffering strategies based on connection type (cellular vs. Wi-Fi).
Advanced streaming optimizations
Beyond the basics, several advanced techniques can significantly improve the mobile streaming experience:
Prioritize audio continuity over video during network constraints, as users are more sensitive to audio disruptions.
Predictive buffering by analyzing viewing patterns to pre-buffer content that the user is likely to watch next.
Optimize subtitle handling in mobile apps by caching text tracks for offline viewing and unreliable network conditions.
Building efficient video streaming requires carefully balancing these challenges. The key is finding the right trade-offs between smooth playback, battery life, and network resilience based on your app's specific needs and user expectations.
🔍 Industry insights:
Reddit improved Android video playback by customizing ExoPlayer specifically for short-form videos. This involved choosing efficient formats (MP4), optimizing caching and buffering strategies, and adjusting bandwidth estimation, which significantly reduced load times, playback errors, and rebuffering [22].
Netflix enhanced its 4K streaming by implementing shot-based encoding and dynamic optimization techniques, resulting in improved video quality and reduced bitrates [23]. In another resource, Netflix explains the development of a Unicode-based pipeline to process subtitles and closed captions efficiently across diverse languages and formats [24]. In this other example, see how Netflix improved audio streaming quality by introducing high-quality sound features that aim to deliver studio-quality, perceptually transparent audio to viewers [25].
Prefetching video feed data
When users open YouTube, they expect relevant content to appear instantly. To meet this expectation, mobile apps often prefetch feed data, so that content loads immediately even before the user starts interacting.
Let's explore how to implement prefetching in a way that balances these user experience benefits with efficient resource usage.
Design options
Table 1 compares the key strategies we could use for prefetching feed data.
Option
Description
Advantages
Disadvantages
Time-based prefetching
Fetch recommendations at regular intervals regardless of user activity.
Simple to implement and maintain. Predictable network usage patterns. Ensures content stays relatively fresh.
Can result in unnecessary data usage. Doesn't adapt to actual user behavior. Could miss important updates between intervals.
Event-based prefetching
Trigger prefetch based on specific events such as app background or foreground transitions.
Aligns naturally with user behavior. Reduces unnecessary network calls. More efficient resource utilization.
May miss optimal prefetching opportunities. Can lead to inconsistent content freshness. Requires more complex implementation logic.
Intelligent prefetching
Combine multiple signals (e.g., device state or use patterns) to determine optimal prefetch timing.
Optimizes both UX and resource usage. Adapts to individual usage patterns. Handles varying network conditions gracefully.
Most complex to implement. Requires careful tuning of prefetch parameters. Needs robust monitoring to ensure effectiveness.
Table 1: Trade-offs for different prefetching options
Due to the scale we're operating at and the amount of user information we have available, we're implementing intelligent prefetching. We can decide when to prefetch content from the mobile app, taking into account signals such as device state (e.g., device charging or network type), user patterns (e.g., typical app open times), content relevance scores, and resource availability (e.g., battery levels).
This data-driven approach helps us prefetch content at the optimal times, improving the user experience while being mindful of device resources.
Implementation details
To implement intelligent prefetching, the system may need to address the following considerations.
Signal collection and analysis
The key to smart prefetching starts with understanding user behavior. The client app should gather key signals about device status and how users interact with content, enabling the backend to deliver more personalized recommendations.
We can implement a remote configuration system that allows the backend to guide client behavior. The prefetch configuration defines key parameters that control when and how clients should prefetch content, such as:
The number of feed data to prefetch.
Prefetch interval.
Whether prefetching is allowed on mobile data.
Battery and charging status considerations.
Scoring recommendations
The backend uses a scoring system to prioritize recommendations for a particular user. Taking into account both the user's viewing history and how fresh and relevant the content is, we can define each recommendation with two key components:
The relevanceScore measures how well content matches a user's interests, typically rated from 0-100 by the recommendation engine.
The ttl (time-to-live) tells the client how long a recommendation remains valid.
Content relevance isn't static. As user preferences change, the backend can update recommendation scores. When this happens, the client refreshes its cached recommendations, ensuring that users always see the most current and personalized content.
Prefetch scheduler
The client uses a background scheduler to manage prefetching operations. Guided by the backend's configuration, this scheduler optimizes content prefetching while being mindful of system resources.
🛠️ Platform implementation details
Android and iOS each provide their frameworks for handling background prefetching, though the core logic remains similar across platforms.
On Android, the WorkManager API [26] handles scheduling background tasks. It provides built-in support for constraints such as Wi-Fi availability and charging status. When specific prefetch times are needed, we can incorporate them into the WorkManager's scheduling logic.
iOS uses the Background Tasks framework [27] for similar purposes. While it lets us set preferred execution times through earliestBeginDate, we'll need to implement our own checks for conditions such as network availability and battery status.
Both platforms may delay or batch background tasks to optimize system resources. Our implementation should handle these scheduling variations gracefully to ensure reliable prefetching regardless of when the system executes the task.
Adaptive optimization
The real power comes from continuous optimization. The client monitors user interactions and reports usage patterns back to the backend. This creates a feedback loop that allows dynamic prefetching:
Increase frequency during high-engagement periods.
Reduce or pause prefetching during low-usage times.
Challenges in prefetching
While prefetching enhances the user experience by delivering instant content, it also presents challenges that must be carefully addressed.
Device resource management
Prefetching operations consume device resources and can increase data usage, especially for users on metered connections. We should:
Restrict recommendation prefetching to Wi-Fi by default, with opt-in for cellular networks.
Pause prefetching when the battery is low (e.g., below 20%).
On lower-end devices, reduce prefetching frequency and volume.
Implement adaptive refresh intervals based on content type and user engagement patterns.
Memory constraints
Feed data prefetching can consume significant memory, especially when caching thumbnails:
Implement size limits for the prefetch cache based on device capabilities.
Use efficient image loading libraries that support downsampling and memory-efficient caching.
Clear older cache entries when the app receives memory pressure warnings from the OS.
Remove stale recommendations when user preferences change significantly.
Measuring prefetch effectiveness
To ensure our prefetching strategy actually improves the user experience, we should:
Track how quickly users can see recommendations when opening the app.
Measure engagement rates with prefetched recommendations vs. non-prefetched ones.
Calculate what percentage of prefetched videos are actually watched.
Track data efficiency metrics such as bytes prefetched but never viewed to understand resource waste.
Monitor battery consumption patterns to balance prefetching benefits against device power usage.
This data-driven approach helps refine our prefetching algorithms over time, creating a feedback loop that continuously improves the user experience while optimizing resource usage.
Architecture updates for pre-fetching video recommendations
Let's explore how we'll modify our architecture to support video recommendations prefetching in the YouTube app. As shown in Figure 6, we're adding several key components that work together to deliver a seamless recommendation experience.
First, we introduce a new Recommendations Repository that provides curated video suggestions to the existing Browsing Repository, utilizing both local and remote data sources. To keep recommendations up to date, we're adding a Recommendations Prefetching Service component. When triggered by the operating system, it works with our new Device Monitor to check conditions such as battery level and network status. If conditions are favorable, it initiates a backend sync through the remote data source to refresh our recommendations.
🔍 Industry insights:
Facebook's mobile app prefetches video recommendation metadata by monitoring the in-memory pool of videos as users scroll. When the pool drops below a threshold, it sends a request with user signals to fetch and rank new personalized video candidates, which are then cached for smooth playback [28].
Facebook's Feed recommendation engine utilizes AI to personalize content by analyzing user interactions and predicting engagement. It ranks posts based on relevance scores derived from various signals, ensuring users see content most pertinent to their interests [29].
Enhanced user experiences
The interviewer may sometimes add extra requirements to the problem. For example, what if they ask you to discuss how to enhance the user experience by addressing specific mobile user needs?
In this section, we'll answer this question by focusing on three key areas: gesture-based video controls, background audio playback, and Picture-in-Picture support.
Gesture-based video controls
Traditional video player controls with visible buttons and sliders can feel clunky on mobile devices with limited screen space. Implementing gesture-based controls creates a more immersive viewing experience by allowing users to interact directly with the video content. Some common controls are swipe to seek and tap-based volume and brightness control.
From a technical perspective, we need to implement the following components:
A GestureDetector component that captures and interprets touch input from the user, identifying specific patterns such as swipes, taps, and pinches.
The VideoControlHandler receives interpreted gestures from the detector and translates them into commands for the video player.
With visual feedback mechanisms, we can provide subtle on-screen indicators when gestures are recognized, helping users understand the result of their actions.
The implementation must carefully handle:
Distinguishing between similar gestures (e.g., horizontal swipe vs. diagonal swipe).
Conflict resolution when multiple gesture patterns overlap.
Accessibility considerations for users who cannot perform certain gestures.
The technical challenge lies in creating a responsive system that feels natural while properly integrating with the video player's core functionality.
Background audio playback
Many YouTube videos are valuable for their audio content, even when users aren't actively watching, such as music, podcasts, or news. Implementing background audio playback allows users to continue listening while using other apps or when their device is locked.
Mode switching logic
When users navigate away from the app or lock their device, we need seamless transitions between video and audio-only modes. We'd follow these steps:
Listen for app lifecycle events to determine when the app moves to the background.
When in audio-only mode, release video rendering resources while maintaining audio playback.
Switch to audio-only streams when in background mode to save data usage.
🛠️ Platform implementation details
To enable background audio-only playback in our apps:
On Android, we can implement a foreground service [30] with media notifications to maintain playback priority using the Jetpack Media3 APIs [31].
On iOS, we can use the AVAudioSession [32] with the appropriate category and options to continue playback when the app enters the background.
User control and preferences
To provide a great user experience, we should respect user preferences regarding background playback. We should:
Allow users to enable/disable automatic background playback.
Provide settings for audio-only mode on cellular networks to reduce data usage.
Consider different behavior for premium versus free users, as background playback is often a premium feature.
Picture-in-Picture mode
Picture-in-Picture (PiP) mode [33] allows users to continue watching videos in a small, floating window while using other apps. This feature enhances multitasking capabilities and keeps users engaged with content even when they need to switch contexts. Figure 7 shows this feature in action.
taken from YouTube Help pages.
🛠️ Platform implementation details
On iOS, PiP is supported natively starting from iOS 9 on iPads and iOS 14 on iPhones. PiP is managed through AVPictureInPictureController [34], which provides a straightforward API for enabling PiP playback with AVPlayerLayer or AVPlayerViewController instances.
On Android, starting from Android 8.0 (API level 26), you can call enterPictureInPictureMode with a configured PictureInPictureParams object on an Activity to enter PiP mode if supported by the device and system settings. For more details, refer to the Android developer documentation [35].
Optimizing the PiP experience
Beyond basic implementation, we can implement several optimizations to improve the PiP experience:
Automatically enter PiP when users press the home button or switch apps while watching a video.
In PiP mode, simplify controls to essential functions (play/pause, close) that are easily accessible in the smaller interface.
Reduce video quality in PiP mode to save bandwidth and processing power.
Pause non-essential animations and background tasks when in PiP mode.
When users tap the PiP window to return to the app, restore the exact state they left.
Coordinating enhanced user experiences
The value of gesture-based controls, background audio playback, and picture-in-picture mode lies in their integration into a unified system. Gesture functionality, for instance, should remain consistent whether the video is displayed full-screen or in PiP mode. Similarly, transitioning to background playback must preserve playback position, enabling users to resume effortlessly.
By ensuring these features interoperate harmoniously, the application delivers a coherent and adaptable experience that aligns with mobile design principles.
Step 5: Wrap-up
In this chapter, we've designed a YouTube mobile client focused on delivering high-quality video content while maintaining a responsive user experience. We built the system around a robust REST API with JSON that can handle multiple clients.
In the deep dive section, we explored how to implement adaptive streaming through protocols such as DASH and HLS, which automatically adjust video quality based on available bandwidth and device capabilities. We also developed an intelligent prefetching system that anticipates and fetches video feed data by analyzing user behavior and device resources. Finally, we explored ways to enhance the user experience through gesture controls, background audio playback, and Picture-in-Picture mode.
If time permits during the interview or if you want to showcase more advanced capabilities, here are some compelling features to explore:
Live streaming platform [36]: Design a low-latency streaming system with integrated chat features, including smart message handling and content moderation to maintain quality conversations.
Smart content management: Develop a comprehensive playlist [37] system that works offline and enables seamless sharing across platforms through deep links.
Unified device experience: Create a system that synchronizes viewing progress and queues across devices, allowing users to seamlessly switch between platforms.
Monetization integration: Incorporate an Ad service with sophisticated video preloading and video stream insertion capabilities.
This chapter covers the key building blocks that frequently appear in Mobile System Design (MSD) interviews. For each topic, we'll define the concept, explain when to use it, and explore alternative options and discuss trade-offs.
The topics covered in this section are:
Architecture: Common patterns, architecture layering, modularization, and testing.
Data management: Data storage, networking, authentication, pagination, and performance.
Feature development: Release strategy, force upgrading, feature flags, remote config, A/B testing, observability and analytics, localization, privacy, accessibility, push notifications, app size, and CI/CD.
Supporting different devices: Different form factors, and OS and SDK versions.
Architecture
A well-designed architecture serves two essential purposes in mobile development: it provides the foundation for building robust, maintainable apps, and it creates a shared language that helps developers collaborate effectively.
Mobile apps can be built using several architectural approaches. Among the most widely adopted are Clean Architecture [1] and Google's guide to app architecture [2], which emphasizes Unidirectional Data Flow [3] and the repository pattern [4]. We can also find various UI-focused architectures including familiar patterns such as MVC [5], MVVM [6], MVI, or other Redux-like patterns as well as more specialized approaches such as VIPER [7], Uber's RIBs [8], Airbnb's Mavericks [9], or Slack's Circuit [10] libraries. These UI layer architectures typically work alongside other patterns to create complete solutions.
Let's explore key architectural concepts we might encounter during interviews. We'll start with common patterns and examine how they apply to both UI and data layers, following Google's architectural guidelines. From there, we'll branch into related topics, showing how to think through and discuss architectural decisions effectively.
Common architectural patterns
While there are many ways to structure a mobile app, certain architectural principles are essential for building robust and scalable solutions. Let's explore some of the most important patterns that will strengthen our answers.
Separation of concerns
One of the fundamental principles of good architecture is keeping UI logic separate from other parts of your code [11]. Rather than cramming everything into the UI layer, each component should have a focused responsibility. UI classes should handle only what they're meant to: displaying content and responding to user interactions.
By dividing responsibilities across different components, our code becomes cleaner and more maintainable. This approach makes testing easier since we can verify each component in isolation. It also helps avoid common pitfalls related to the UI lifecycle, as the business logic lives independently from UI-specific concerns.
Unidirectional Data Flow
The Unidirectional Data Flow (UDF) pattern [3] creates a predictable way for data to move through the app by enforcing a single direction of flow. Here's how it works:
Data starts at a source (e.g., a database) and flows through the app until it reaches its final destination, typically the UI. As this data passes through different layers, each one can transform it based on business logic. When something needs to change the data, it sends events flowing through the other direction back to the source. The source exposes ways to let other parts of the app request these changes.
This one-way flow, as shown in Figure 1, brings several key benefits:
It makes data changes more predictable since they can only happen through defined paths.
It reduces bugs by limiting where and how data can be modified.
It simplifies debugging because we can trace exactly how data moves through the app.
Reactive programming
Throughout this book, we use reactive programming [12] to implement Unidirectional Data Flow. At its core, reactive programming creates a stream of data that flows from a source to consumers who "subscribe" to receive updates. This approach has gained widespread adoption in mobile development because it elegantly handles asynchronous data and helps create responsive apps.
Modern mobile platforms offer several powerful tools for reactive programming. On Android, we can use Kotlin Flows or RxJava, while iOS developers typically work with Combine or RxSwift. For simpler cases where we just need a one-off asynchronous operation, Kotlin's suspend functions and Swift's async-await provide lighter-weight alternatives.
While callbacks and event buses can work well for specific use cases, they might complicate state management. We recommend using reactive programming's stream-based approach instead, as it offers a more straightforward way to handle data flow in our apps. This makes the code easier to maintain and reason about over time.
As previously mentioned, every solution involves trade-offs. Event buses, for instance, can help reduce coupling between components in the codebase.
Immutable data structures
When building modern mobile apps, particularly those using unidirectional data flow, immutable data structures play a key role in managing state. By making data immutable (i.e., data can't be changed after creation), we reduce bugs and make our app's behavior more predictable. This is particularly valuable in mobile apps where multiple threads often need to access the same data simultaneously.
While we might occasionally need mutable data structures for performance-critical features, these cases are rare. When we do use mutable data, it's best to isolate it from the app's main state and carefully control how it can be modified. For example, we might use mutable structures in a specialized image processing module, but keep the rest of our app's data immutable.
Single source of truth (SSOT)
In modern mobile apps, each data type needs a clear owner: a Single Source of Truth (SSOT) [13]. The SSOT has exclusive authority to modify its data and follows the Unidirectional Data Flow pattern by:
Receiving events that request data changes.
Processing those changes according to business logic.
Exposing the updated state as immutable data.
Let's look at how this works in practice. A local database often serves as the SSOT for offline data, while UI state holders own their screen's display state. Figure 2 illustrates these common SSOT patterns.
for business or application data, and the State Holder is the SSOT for UI state.
By designating clear owners for each data type, we create a more maintainable system where data flows predictably and state changes are more predictable and traceable. This makes bugs easier to isolate and fix, and helps maintain consistent state even in multi-threaded scenarios.
Dependency Injection
As the app grows in complexity, different components need to work together to accomplish business goals. These relationships between components create dependencies that need careful management. While both Dependency Injection [14] and Service Locator [15] patterns can handle this management, we focus on Dependency Injection in this book.
Why choose Dependency Injection? Think of it as letting components receive what they need rather than creating it themselves. Instead of a component reaching out to create its dependencies, they're provided from the outside. This makes the code more flexible and easier to test since we can swap out dependencies as needed.
For example, imagine a component that needs to make network calls. Rather than having the component create its own network client, we can pass in (or "inject") that client through the component's constructor. This approach, known as constructor injection, makes it clear what each component needs to function and allows us to provide different implementations for testing or handle future changes more gracefully.
We specifically avoid the Service Locator pattern because it can mask dependencies and complicate testing if not implemented carefully. By being explicit about dependencies through injection, we create code that's easier to understand, maintain, and verify.
When reading the architecture diagrams in this book, it's important to understand that arrows show how data moves through the system, not component dependencies. Take Figure 3, where we can see the UI state flowing from the state holder to the UI component. While the UI depends on the state holder to access and subscribe to this data, we don't explicitly show this dependency with dotted lines in our diagrams to keep them clean and focused on data flow.
In the high-level architecture diagrams of this book, notice we represent Dependency Injection as a box between different architectural layers. This box acts as a boundary that helps keep components loosely coupled, as shown in Figure 4.
Decoupling components
Decoupling key components in our architecture lets them evolve independently, making the app more maintainable and easier to scale. This separation is particularly important in mobile apps not just for flexibility, but also for practical reasons such as improving testability and reducing build times when working with modules.
The main strategy for decoupling is to have components depend on interfaces or abstract classes instead of concrete implementations. This creates a "loose coupling" between components, where changes in one area don't ripple through the entire system.
This approach is especially valuable in several common scenarios:
When classes interact across different architectural layers.
When we want to avoid being tied to a specific third-party solution.
When we need to swap between different implementations of the same functionality.
For example, in Figure 5, MapsRepository works with a MapsProvider interface rather than any specific implementation. This flexibility allows us to use MapsTestDouble during testing, while in production we can A/B test between MapsInHouseProvider and Maps3rdPartyProvider to see which better serves our users.
using a MapsProvider in a hypothetical app
Error propagation
Error propagation is a critical aspect of ensuring that applications are robust, reliable, and user-friendly. Proper handling and propagation of errors help in diagnosing issues, preventing application crashes, and improving the overall user experience.
The UI layer should show user-friendly error messages when things go wrong, handle simple validations such as checking form inputs, and display appropriate UI elements to indicate error states.
Other layers of the hierarchy should handle business logic errors such as invalid data, manage failures from data sources such as network or database issues, and pass relevant errors up to the UI layer when users need to know about them.
Modern mobile frameworks provide built-in tools for handling errors. For example:
Kotlin coroutines use structured concurrency to propagate exceptions naturally.
RxJava and RxSwift can handle errors in their data streams using operators such as onError.
When working with platforms that don't provide these tools, we can implement a Result type that wraps return values. This pattern lets us explicitly model success and failure cases, making error handling more predictable. However, when using modern frameworks (e.g., Kotlin coroutines), this extra layer isn't necessary since error handling is already built in.
Minimal data exposure
When data flows through the app's architecture, each component should only receive the minimum data it needs to function. This principle applies both to communication between architectural layers and when fetching from data sources such as local databases or backend APIs.
Let's look at a practical example from a chat app: When showing a conversation list screen, the UI only needs basic information like contact names, latest message previews, and timestamps. It shouldn't receive the full message history for every conversation just to display these preview cards.
This "less is more" approach offers several key benefits:
Better performance
Reduces memory usage and CPU load since there's less data to process.
Minimizes network bandwidth consumption.
Improves battery life by reducing unnecessary data processing.
Easier maintenance
Simpler systems that are easier to test and debug.
More straightforward scaling as the app grows.
Clearer data flows between components.
Data transformation usually happens at the boundaries between components. For example, when the network layer receives a response from the backend, it can map that data down to just what the repository needs, stripping out unnecessary fields. This ensures each layer only handles data relevant to its responsibilities.
Architectural choices
Let's shift from the core architectural patterns we just covered to some specific implementation choices we use throughout this book. While those foundational patterns are essential for any scalable mobile architecture, the choices we'll discuss here are more flexible. You can adapt or replace them based on your experience and preferences.
This section focuses on the key details you need to understand the Architecture decisions made in this book, though I encourage you to deeply explore these topics to develop your own perspective for interviews. Let's examine these practical architectural decisions.
🔍 Industry insights:
Duolingo improved app responsiveness and developer productivity by adopting MVVM and using Android Jetpack libraries such as Dagger/Hilt for dependency injection [16].
Uber scaled its apps by enforcing module isolation through a plugin system and RIBs [17]. Each feature is developed as a plugin with well-defined integration points in the app that allows 200+ developers to build features in parallel without stepping on each other's code.
Notion's architecture emphasizes a flexible data model and unidirectional data flow, which brought power but also complexity to their mobile clients [18].
Google's guide to App Architecture
Let's explore our core architectural approach, which builds on Google's guide to app architecture [2]. While originally created for Android, its principles work remarkably well for iOS too, making it a solid foundation for both platforms.
📌 Remember!
If you have experience with a particular architecture that you've found effective for mobile apps, don't hesitate to discuss it in your interview. While this book uses Google's guide to app architecture as our reference point (since it embodies many core architectural principles), your personal experience with other approaches can be equally valuable.
At its heart, this architecture uses two primary layers: UI [19] and data [20]. Think of the UI layer as what users see and interact with, while the data layer handles all the behind-the-scenes business logic and storage. Some apps also benefit from an optional domain layer [21] that sits between UI and data, making it easier to share and reuse common interactions. Figure 6 illustrates how data flows through these layers.
by Google's Guide to app architecture
UI layer
The UI layer can also be referred to as the presentation layer. According to the documentation [19]:
"The role of the UI is to display the application data on the screen and also to serve as the primary point of user interaction. Whenever this application data changes, either due to user interaction (such as pressing a button) or external input (such as a network response), the UI should update to reflect the changes.
The UI layer is made up of two things:
UI elements that render the data on the screen.
State holders that hold data, expose it to the UI, and handle logic.
Effectively, the UI is a visual representation of the application state as retrieved from the data layer."
The UI layer relies on the data layer (or domain layer if present) as its source of data. The state holder acts as an intermediary, processing this data to create the UI state, essentially a blueprint of what should be shown on screen. As stated simply in the documentation: "if the UI is what the user sees, the UI state is what the app says users should see."
Figure 7 illustrates how this works in practice. Each screen in the app is represented as a component with its own state holder. These state holders receive their data through dependency injection from other layers of the architecture.
Building on the architectural patterns we discussed earlier, the flow of data follows a clear path: The data and domain layers expose streams of business data, which state holders transform into immutable UI states. The UI layer then subscribes to this state to display content and sends back events to request changes. These events flow through the state holder and ultimately update both the application state and UI.
We might wonder whether this architecture follows MVVM or MVI patterns. The answer is that it could be either: this architecture implements Unidirectional Data Flow, which can align with both patterns depending on how we structure the UI state streams and event handling. Rather than prescribe one approach, we believe either pattern can work well when properly implemented. While this distinction could come up during the deep dive portion of the interview, remember to keep the focus on the overall system design rather than getting too caught up in the specifics of any single component unless the interviewer asks about it.
Data layer
The data layer implements the repository pattern, providing a clean abstraction for all data access within the application. As stated in the documentation [20]:
"The data layer contains application data and business logic. The business logic is what gives value to your app—it's made of rules that determine how your app creates, stores, and changes data. The data layer is made of repositories that each can contain zero to many data sources. You should create a repository class for each different type of data you handle in your app.
Repository classes are responsible for the following tasks:
Exposing data to the rest of the app.
Centralizing changes to the data.
Resolving conflicts between multiple data sources.
Abstracting sources of data from the rest of the app.
Containing business logic.
Each data source class should have the responsibility of working with only one source of data, which can be a file, a network source, or a local database. Data source classes are the bridge between the application and the system for data operations."
Figure 8 illustrates how the data layer typically works in a mobile app. At its core are two main data sources: the remote data source that communicates with the backend, and the local data source that handles data storage on the device. As we saw in chapters covering case studies, apps often use a database for this local storage to efficiently manage and persist data on the device.
Since repositories serve as the main entry points to the data layer, it makes sense to define them as interfaces. This allows us to swap different implementations through dependency injection: we can use the real implementation when the app is running normally, and switch to test doubles during testing.
Navigation
For most MSD interviews, we take a simplified approach to navigation. Instead of diving into complex navigation patterns, we'll assume that a global Navigator, or Coordinator, handles screen transitions and dependency management.
This Navigator is responsible for:
Moving between different screens in the app.
Providing required dependencies to each screen, including static dependencies such as state holders and platform services, and dynamic data such as item IDs needed for detail screens.
The Navigator works with our dependency injection system to create and provide these dependencies correctly. When working through interview problems, we typically won't need to design complex navigation flows unless specifically asked. Most exercises focus on core functionality rather than navigation architecture. In our diagrams throughout this book, we represent navigation as shown in Figure 9.
In real-world applications, navigation becomes much more complex. As apps grow to include many screens, dialogs, and user flows, carefully managing navigation becomes critical. This complexity multiplies when adding deep linking support [22], which introduces additional entry points into our app that must be properly handled.
Modularization
Modularization is a powerful way to structure mobile apps into separate, independent building blocks. While modularization offers several benefits such as easier maintenance and better scalability, its biggest advantage is faster build times. However, modularization requires careful planning. Adding more modules can increase complexity and overhead if not managed thoughtfully.
When implemented well, modularization speeds up builds in three key ways:
Uses build resources more efficiently.
Reduces how much code needs recompiling.
Allows for parallel compilation of different modules.
While we won't dive deep into modularization in later chapters, it's worth mentioning in interviews. The mobile industry increasingly follows the "contract module" pattern where each component has at least two modules: an API module and an implementation module. This separation means that when we change how something is implemented, modules that only depend on its API don't need to rebuild.
Let's look at a concrete example in Figure 10. Here we have several types of modules:
Feature modules handle the UI for specific screens (e.g., "X feature module" in the diagram).
API modules define the interfaces that features need (e.g., "X data layer api module" in the diagram).
Implementation modules contain the actual code behind those interfaces (e.g., "X data layer impl module" in the diagram).
Test modules provide test implementations (e.g., "X data layer test module" in the diagram).
When implementation details change, feature modules don't need to rebuild because they only depend on the stable API modules. But we might wonder, "how do features know which implementation to use"? This is where the app module comes in. It sits at the top level, connecting everything together by injecting the right implementations as dependencies. Similarly, when running tests, the test module provides test implementations instead of the real ones.
For a deeper dive into modularization, check out Google's guide to app modularization [23], which expands on the architectural principles we've discussed in this chapter.
🔍 Industry insights:
Airbnb restructured its large iOS app into nearly 1,500 modules to improve team productivity [24].
Robinhood modularized its Android app to combat a “giant monolith” module that was slowing builds and entangling features. They split the app into feature-specific modules which improved build times [25].
Testing
Testing should be a key part of the interview discussion, as it demonstrates how our architecture supports quality and maintainability. While testing often comes up naturally when discussing dependency injection or modularization, we should also be prepared to outline our overall testing strategy for the system we're designing.
Mobile apps typically implement several types of automated tests, though terminology can vary across teams and organizations. When discussing testing approaches in the interview, be clear about how you define each type of test to ensure shared understanding. Here are the main categories you'll likely want to cover:
Unit tests. The foundation of the testing pyramid, unit tests verify individual components in isolation. By replacing dependencies with test doubles, we can validate specific behaviors and code paths. These tests are fast, reliable, and help catch issues early.
Component, Integration, and/or Navigation tests. These tests validate how multiple components work together by using some real implementations instead of test doubles. While they provide more comprehensive coverage than unit tests, they tend to run slower and may require more maintenance. They're particularly valuable for validating critical user flows and navigation paths.
Screenshot tests. These tests fill an important gap in UI testing that unit tests can't easily cover: visual elements such as layouts, fonts, and styling. They work by capturing a reference image of a UI component and comparing it against future changes to catch unintended visual regressions. While simple in concept, they're powerful for maintaining visual consistency.
End-to-end tests. Sitting at the top of the testing pyramid, end-to-end tests verify that the app works correctly with real backend services and dependencies. While these tests provide the most comprehensive validation, they're also the most expensive to maintain and the most likely to be flaky due to network conditions or backend state. We should have fewer of these tests, focusing on the most critical user journeys.
Beyond these categories, there are specialized tests that can be applied across different layers of the testing pyramid. These include accessibility tests to verify app usability for all users, performance tests to catch slowdowns and bottlenecks, memory management tests to identify leaks, and security tests to validate data protection measures. While these tests focus on specific quality aspects rather than functionality, they're crucial for delivering a robust and inclusive mobile app.
Testing in mobile development is well-documented, with many established patterns and best practices. Here are some key resources that can help guide the testing strategy:
Google's fundamentals of testing apps [26].
The robot pattern [27].
Faking interactions with the backend using OHHTTPStubs [28] for iOS and MockWebServer [29] for Android.
🔍 Industry insights:
Slack's Android team made UI tests a first-class part of development by focusing on “targeted and hermetic” UI tests. Read more in their testing series [30].
Bitrise shared their recommended mobile testing strategy [31], and you can read how Netflix [32] and Dropbox [33] test their mobile apps.
Data Storage
Mobile apps need effective data storage to create great user experiences. Whether it's remembering user preferences, caching network responses, or storing offline content, how we manage data directly impacts app performance and reliability. Let's explore the different storage options available and understand when to use each one.
Before diving into storage solutions, let's look at the main types of data the app might need to handle:
User data such as profile information, app settings, and user preferences that customize the experience. This includes everything from theme choices to notification settings.
User files such as photos, videos, and documents that users create or upload in the app. These files remain on the device unless synced to servers, and the app loses access if users delete them.
Business data or core application data the app shows to users such as news articles, product listings, or chat messages. If users remove this data from their device, the app can typically retrieve it again from the backend.
Sensitive information such as authentication tokens, encryption keys, and other security-critical data that requires special protection. This data often needs secure storage mechanisms to prevent unauthorized access.
Cache data, that is, temporary data stored to improve app performance, such as downloaded images or pre-computed results. This data can live in memory or on disk depending on size and how long it needs to persist.
Temporary data such as upload file chunks, form drafts, or undo history. This data can be safely discarded when no longer needed or when the app closes.
While some data needs persistent storage on disk, other data can live briefly in memory and be released when the system needs resources. The key is choosing the right storage approach based on the data's lifetime and access patterns.
Data storage options
When our app needs to persist data to disk, choosing the right storage mechanism is crucial. The best choice depends on what type of data we're storing and how we plan to use it. Let's explore the available options.
Key-value storage
Key-value storage provides a simple way to store basic data types such as strings, integers, and booleans. Think of it as a dictionary where each piece of data (the value) is accessed through a unique identifier (the key). This storage type works well for straightforward data such as user preferences, app settings, and feature toggles.
The beauty of key-value storage lies in its simplicity. The APIs are easy to implement and use, requiring minimal setup. When working with small datasets, read and write operations are fast and efficient.
However, key-value storage isn't suitable for every scenario. It struggles with large amounts of data or complex data structures, relationships between data items, advanced querying needs, data integrity enforcement, and transactional operations. Additionally, key-value stores typically offer less security than specialized secure storage solutions unless we implement extra protection measures.
🛠️ Platform implementation details
Both Android and iOS provide native key-value storage solutions:
Android offers SharedPreferences [34] and DataStore [35].
iOS offers UserDefaults [36] and Property Lists (Plists) [37].
On-device secure storage
When handling sensitive data such as user credentials, payment details, or cryptographic keys, secure on-device storage becomes essential. This specialized storage leverages hardware security features built into mobile devices to protect sensitive information from unauthorized access.
The key benefit of secure storage is its robust encrypted data protection. This helps apps meet strict data protection requirements while providing strong security guarantees. Modern platforms such as Android's Keystore system [38] and iOS's Keychain [39] services make implementing secure storage straightforward.
However, secure storage does come with some trade-offs:
Implementation is more complex than basic storage options.
Testing and debugging can be more challenging.
Encryption and decryption operations add performance overhead.
Resource usage may impact low-end devices.
Storage capacity is often limited, making it unsuitable for large datasets.
On iOS, the Keychain provides an additional benefit, integration with iCloud Keychain lets us securely sync credentials across a user's devices using end-to-end encryption.
Relational Databases
When the app needs to handle complex data efficiently, relational databases provide a robust storage solution. They excel at managing large datasets, handling complex queries, and maintaining relationships between different types of data. This makes them ideal for storing both business data and cached content that needs to persist on disk.
Key advantages of relational databases include:
Optimized data retrieval and manipulation that scales well with large datasets.
Powerful indexing capabilities to speed up search operations.
Built-in management of relationships between data entities.
Strong data integrity guarantees.
Support for schema migrations as the data model evolves.
However, relational databases also come with some trade-offs to consider:
More complex setup and maintenance compared to simpler storage options.
Schema design requires careful planning.
Higher resource consumption that can impact app performance.
Potential latency overhead, especially for complex queries.
🛠️ Platform implementation details
For mobile development, SQLite serves as the foundation, with both Android and iOS providing native support. Google officially supports the Room persistence library [40] for Android, while Apple offers Core Data for iOS [41].
Non-relational Databases
While relational databases are commonly used in mobile development due to their native platform support, non-relational databases can be a compelling alternative depending on the data needs.
For mobile apps, Realm [42] stands out as a popular non-relational option. Its focus on simplicity and speed, combined with built-in support for reactive programming and real-time sync, makes it particularly well-suited for mobile use cases. Firebase Realtime Database [43] offers another approach, providing a cloud-based NoSQL solution with offline support that automatically syncs data when connectivity returns.
The key advantage of non-relational databases is their flexibility: they don't require predefined schemas, making them ideal for storing unstructured or semi-structured data. They also excel at high-performance read and write operations.
However, this flexibility comes with trade-offs. Non-relational databases work best when the app needs simple CRUD operations rather than complex queries. They typically lack the ACID transactions and referential integrity guarantees that relational databases provide through features such as foreign keys and constraints. This can lead to potential data consistency challenges that we'll need to handle in the application logic.
Files and Directories
Sometimes the data needs don't fit neatly into databases or key-value stores. In these cases, storing data directly in files can be a good alternative. This approach works particularly well for binary data or scenarios like note-taking apps where each note is saved as a separate text file.
The main advantage of file storage is its flexibility, we're not constrained by database schemas and can create our own custom file formats. Implementation is straightforward since we're just working with basic file I/O operations. Files are also portable across different platforms and can be included in backup systems.
The trade-off is that we lose the structure and features that databases provide. We'll need to handle everything manually: ensuring data integrity, building query capabilities, managing concurrent access, and planning for scalability.
Both iOS and Android provide native APIs for file operations. On iOS, we'll work with FileManager [44], while Android offers its File APIs [45]. These let the app read and write directly to internal or external storage, which is especially useful when dealing with large files or complex data structures that don't map well to database tables.
Storage options comparison table
Table 1 provides a comprehensive comparison of the major storage options available for mobile apps. Use this as a reference when evaluating which storage mechanism best addresses the specific requirements during an interview.
Storage Mechanism
Advantages
Disadvantages
Use Cases
Examples
Key-value storage
Simple to implement and use, fast read and write operations for small data sets.
Not suitable for large amounts of data or complex data structures, lacks advanced querying, less secure.
Storing non-sensitive user data such as preferences, settings, app configuration.
Flexible schema-less data models, high performance for read/write operations.
Limited support for complex queries, potential inconsistency issues.
Handling unstructured or semi-structured data.
Android and iOS: Realm, Firebase Realtime Database, Couchbase Lite.
Files and Directories
Flexible storage formats, simple implementation, easy data sharing between platforms.
Lack of structure, requires manual management of data integrity, concurrency, and scalability.
Handling binary data, use cases like note-taking apps where data is stored as individual files.
Android: File APIs. iOS: FileManager.
Table 1: Storage options comparison
Storage selection decision tree
While the comparison table offers a detailed view of each storage option, a decision tree provides a structured approach to selecting the most appropriate storage solution based on the specific requirements.
During an interview, walking through this decision tree demonstrates a methodical approach to storage selection. Rather than simply naming a storage option, you can explain your reasoning at each decision point, showing how we've considered security needs, data complexity, relationship requirements, and access patterns.
📌 Remember!
The comparison table and decision tree offer a simplified framework to guide storage decisions during interviews, but real applications often require more nuanced approaches.
Often, mobile apps require multiple storage solutions working together. For example, a social media app might use:
Secure storage for authentication tokens.
A relational database for structured content such as user profiles and posts.
Key-value storage for app settings and preferences.
File storage for cached images and media.
🔍 Industry insights:
Netflix chose the Realm mobile database for storing video metadata on devices to support offline downloads [46].
Trello redesigned its mobile data layer to work offline by making the local database the single source of truth [47].
How mobile apps save and share data
While mobile apps have various storage options available, they all ultimately save data as files on the device's disk. What differs between these options is how they organize, manage, and provide access to this data through their respective APIs.
By default, mobile operating systems use a sandboxed storage model: each app gets its own private storage space that other apps cannot access. This internal storage provides a basic level of security and data isolation.
However, this protection has limitations. Users who jailbreak their iOS devices or root their Android devices can bypass these security measures and potentially access or modify any app's internal storage. For sensitive data that requires additional protection, secure storage solutions backed by hardware-level security features offer stronger safeguards against unauthorized access, even on compromised devices.
Accessing device-wide storage
Mobile platforms provide mechanisms for apps to interact with storage areas that exist outside their private sandbox. This enables important functionality such as saving photos to the device gallery or accessing documents from other apps.
On Android, shared storage areas allow multiple apps to access common files. This includes both the device's built-in storage (sometimes called "external storage" even though it's physically inside the device) and removable storage (such as SD cards). Apps commonly use these areas to store files meant to be shared, such as photos, videos, and documents.
iOS takes a different approach with more controlled access points. Instead of a general shared storage area, iOS offers specific directories for different purposes:
The Documents Directory stores files that users should be able to access and that get backed up to iCloud.
The Library directory holds data that apps need to share but shouldn't be directly visible to users.
Users can access shared files through iOS's Files app, and other apps can request access to them when needed. We can find a complete list of these directories in the FileManager documentation [48].
Working with media and files from other apps
Some mobile apps need to access content created by other apps, whether that's photos from
the camera app or documents downloaded from a web browser.
Both platforms provide system APIs specifically designed for this purpose:
On iOS, the PHAsset and PHImageManager APIs let apps load photos and videos from the user's media library [49], while UIDocumentPickerViewController enables users to browse and select files from anywhere on their device [50].
On Android, the MediaStore API provides access to media files such as photos and videos, while the Storage Access Framework creates a standardized way for users to browse and open documents from any compatible file provider. For the latest Android storage APIs, check out the data and file storage overview guide [51].
These APIs handle the necessary permissions and security checks, ensuring that users remain in control of which apps can access their personal content. When an app requests access to these files, the system will show a permission dialog, allowing the user to approve or deny the request.
Sharing data between your own apps
Developers creating multiple apps often need a way for those apps to share data with each other. Both Android and iOS provide secure mechanisms for this purpose.
Android uses Content Providers [52] for this scenario. By configuring specific permissions and signing requirements [53], developers can ensure that only their own apps can access specific shared data. This works by restricting access to apps signed with the same developer certificate.
iOS implements App Groups [54] for this purpose. When apps are part of the same development team, App Groups create shared containers that all member apps can access. This enables sharing various types of data, including UserDefaults settings [55] and files, between related applications.
Both approaches provide fine-grained control over data sharing while maintaining security boundaries that prevent unauthorized access from other developers' applications.
Networking and API design
Whether fetching data from servers or syncing information across devices, how we handle networking can make or break the user experience. Let's explore HTTP, the foundational protocol for client-server communication that we use multiple times throughout this book.
HTTP and REST APIs
When building mobile apps that communicate with backends, HTTP (Hypertext Transfer Protocol) is often the go-to choice. Its widespread adoption and robust feature set make it particularly well-suited for client-initiated requests.
HTTP offers several key advantages:
Universal compatibility across platforms, devices, and networks.
Stateless design that improves scalability since servers don't need to track session information between requests.
Support for persistent connections in modern versions (HTTP/1.1 and HTTP/2), allowing multiple exchanges over a single connection.
Flexibility to handle various data formats beyond just JSON, including HTML, XML, and binary data.
Built-in header system for exchanging metadata between clients and servers.
Strong security through HTTPS encryption, ensuring data remains private and authentic.
When the mobile app communicates with a server, each HTTP request has several key components:
The HTTP verb (e.g., GET or POST) that specifies what action to take.
A resource path that identifies what data we want to access or modify.
Headers containing metadata about the request, such as authentication tokens or expected response formats.
Optional request data, either in the body for operations such as creating new content, or as query parameters in the URL.
Let's look at a typical HTTP request:
Code
Accept: application/json
Authorization: Bearer \<token\>
GET https://my-backend-name.com/v1/news?after=timestamp\&limit=30
Breaking this down:
It's a secure HTTPS request to fetch news data.
The Authorization header contains the user's authentication token.
The Accept header tells the server to return JSON.
Query parameters after and limit help filter the results, asking for 30 posts after a specific timestamp.
Query parameters are especially useful with GET requests since they can't include data in their body. By adding these parameters to the URL, we can specify exactly what data we want while keeping the request safe and idempotent, meaning it won't modify any data on the server, no matter how many times it's called.
While HTTP/1.1 defines these basic methods [56] and their intended uses, most modern APIs build additional conventions on top of HTTP. This is where REST comes in, providing a standardized approach to designing backend services.
Designing REST APIs
When building backend services that need to scale, consistency is key, especially in how we define and structure our HTTP endpoints. REST (Representational State Transfer) has emerged as a popular architectural approach that provides standard conventions for making HTTP requests and handling responses. Its widespread adoption means we'll find excellent documentation and support across the development community [57].
There are many different styles of designing REST interfaces, so let's walk through the core REST practices we'll use throughout this book:
The main HTTP verbs map naturally to CRUD operations [58]:
GET to retrieve data.
POST to create new resources.
PUT to update existing ones.
DELETE to remove resources.
Each resource in our API should ideally have a unique URI that clearly identifies it. For example:
GET /users retrieves all users.
GET /users/1 gets details for the user with ID 1.
Use query parameters thoughtfully. They help filter, sort, and paginate results. For example:
GET /users?role=admin\&sort=lastname_asc\&page=2\&limit=30
Choose clear resource names.
Use nouns to represent resources
e.g., GET /posts instead of GET /query-posts.
Use plural forms consistently
e.g., GET /posts/{postId} instead of GET /post/{postId}.
Structure nested resources. For related resources, use sub-resource paths:
Good: GET /v1/posts/{postId}/attachments/{attachmentId}
Avoid: GET /v1/posts/{postId}?attachment=attachmentId
Version the API consistently. Use global versioning to keep our API structure clean:
Good: GET /v1/posts/{postId}/attachments
Avoid: GET /posts/{postId}/v1/attachments
REST also defines standard HTTP response codes that help clients understand the result of their requests. Here are the most common ones we'll encounter:
200 OK:
The request succeeded.
Typically returned for successful GET and PUT operations.
201 Created:
A new resource was successfully created.
Common response for POST requests that create items.
400 Bad request:
Client side error. The server couldn't process the request due to invalid syntax or missing data.
403 Forbidden:
Authentication succeeded but the client lacks permission for this resource.
404 Not found:
The requested resource doesn't exist on the server.
500 Internal Server Error:
Server side error. Something went wrong on the server while processing the request.
By following these standardized REST conventions, we create APIs that are intuitive, predictable, and scale well as the app grows.
Data encoding format
When transferring data over HTTP, we have flexibility in how that data is formatted. HTTP itself doesn't care about the data format, it just needs the client and server to agree on what format they're using. They establish this agreement through HTTP headers such as Content-Type and Accept.
We can choose from several common formats such as JSON (application/json), XML (application/xml or text/xml), Protocol Buffers (application/x-protobuf), and CSV (text/csv). The best choice depends on our specific needs around readability, efficiency, platform support, and how easy it is to work within the codebase.
JSON (JavaScript Object Notation) has emerged as the most popular choice for modern REST APIs, and for good reason. It's human-readable, works efficiently, and integrates smoothly with most programming languages since it closely matches how they structure data. The fact that JSON is so widely supported means we can parse it easily using standard library functions, without needing extra dependencies. Table 2 compares the different formats we could use and their use cases.
Format
Advantages
Disadvantages
Use cases
JSON
Human-readable, easy to use and parse, widely supported across platforms and languages, compact in size compared to XML.
Less efficient in terms of size and parsing speed compared to binary formats such as Protocol Buffers, no built-in schema enforcement.
Lightweight data exchange. Common for Web APIs and Mobile apps.
XML
Human-readable, supports complex data structures and metadata through attributes. It's widely supported and supports a robust schema validation with XSD.
Verbose, larger file size, slower parsing compared to JSON and Protocol Buffers, more complex to write and maintain.
Data interchange in enterprise applications, document-centric data, cases requiring extensive metadata.
Protocol Buffers
Compact and efficient binary format, faster serialization and deserialization, strict schema enforcement, backward and forward compatibility.
Less human-readable, requires defining .proto files and using code generation tools, more complex to set up.
Performance-critical applications, large-scale data transmission, systems requiring strict schema enforcement and versioning.
Table 2: Trade-offs for encoding data over the network
🔍 Industry insights:
Lyft evolved its mobile networking from ad-hoc REST+JSON to a unified IDL (Interface Definition Language) using Protocol Buffers. Lyft's system can handle both gRPC calls (for new, streaming or binary-optimized APIs) and traditional HTTPS+JSON (for backward compatibility) [59].
Reddit migrated from a monolithic backend API to GraphQL to better serve mobile clients [60], and Airbnb too [61].
Snapchat has integrated the QUIC (Quick UDP Internet Connections) protocol to enhance its networking performance, particularly in mobile environments [62].
Authentication
For mobile apps managing sensitive or personalized data, robust authentication is critical. We must ensure that users are verified as legitimate before accessing protected resources.
Token-based authentication
Token-based authentication is widely adopted in mobile apps due to its efficiency and flexibility. Unlike traditional session-based methods, it offers:
Stateless operations: No server-side session storage, enhancing scalability.
Cross-platform compatibility: Seamless use across diverse devices.
Granular access control: Tokens embed permissions and expiration details.
Reduced backend overhead: Validation occurs without frequent database queries.
The most common implementation uses JSON Web Tokens (JWT) [63], which are compact, self-contained tokens that securely transmit information between parties as a JSON object.
Authentication flow
Initial login: Clients submit user credentials (e.g., username/password) to the backend Authentication service, which validates them against registered user data.
Token generation: Upon successful verification, the backend issues two tokens:
An access token (JWT): Short-lived (e.g., 15-30 minutes), containing user identity and permissions.
A refresh token: Longer-lived, used to obtain new access tokens without requiring the user to log in again.
Secure token storage: The app securely stores both tokens using platform-specific secure storage mechanisms.
Android provides the Android Keystore system [64] to create and store cryptographic keys that never leave the device's secure hardware. Apps can encrypt tokens before storing them in SharedPreferences or DataStore.
iOS offers the Keychain Services API [65] with multiple protection classes to secure tokens, ensuring they're encrypted at rest and only accessible when the device is unlocked.
📝 Note:
To simplify the backend and minimize the complexity of key management, companies can leverage an external Identity Provider for token issuance and validation, as illustrated in Figure 12. This provider offers a JWKS (JSON Web Key Set) endpoint, enabling systems to retrieve public keys for validating JWTs securely without exposing private signing keys.
Authenticated requests and token renewal
Once authentication is complete, the app uses the tokens for secure API access.
To make authenticated requests, the app includes the access token in the Authorization header of each API request: Authorization: Bearer <access_token>. API gateways then use these public keys to authenticate incoming JWTs, ensuring requests are verified before being forwarded to backend services.
When the access token expires, the app uses the refresh token to request a new one:
The app detects an expired access token (either proactively by checking its expiration or reactively when receiving a 401 Unauthorized response).
It sends the refresh token to a token renewal endpoint.
If the refresh token is valid, the server issues a new access token (and sometimes a new refresh token too).
The app saves these new tokens and retries the original request using the new access token. If the refresh token is invalid, the backend returns an error and the user should be logged out from the app.
Enhanced security options
To further strengthen authentication, consider implementing:
Multi-factor authentication (MFA): Require additional verification beyond passwords, such as SMS codes, authenticator apps, or biometrics.
Biometric authentication: Leverage fingerprint or facial recognition for a more user-friendly yet secure experience.
Certificate pinning: Ensure that authentication requests are sent only to legitimate servers, preventing man-in-the-middle attacks.
Trusted device registry: The backend maintains a list of known devices for each user.
Device fingerprinting: We collect non-sensitive device attributes to create a unique signature.
New device alerts: Users receive notifications when their account is accessed from a new device.
Suspicious activity detection: The system flags unusual patterns, such as logging in from a new location or device in close succession.
By implementing robust token-based authentication, mobile apps can ensure that only authorized users access protected resources while maintaining a smooth, secure user experience.
🔍 Industry insights:
Uber recently rolled out passkey support in its mobile apps, embracing a passwordless login experience [66].
Many apps, such as Robinhood, mark devices as "trusted" when they have successfully completed Multi-Factor Authentication. After that, subsequent logins from the same device may be streamlined so that users can log in without providing the second authentication factor. This balances security with convenience by not asking for 2FA at every single login on the same phone [67].
Content Delivery Network (CDN)
A Content Delivery Network (CDN) distributes servers across different geographical locations to efficiently deliver static content to users. Think of it as a global network of content storage points, each serving users in its nearby area.
In mobile apps, CDNs excel at delivering content that stays relatively stable and often requires significant bandwidth, such as app icons and images, video content, HTML pages, and app assets and resources.
Why use a CDN? By storing frequently accessed content closer to users, CDNs significantly reduce the load on our main backend servers. Instead of every request going to the backend, users receive content from the nearest CDN server. This approach offers several key benefits:
Faster load times since content comes from nearby servers.
Reduced latency as there's less distance for data to travel.
Better user experience through quicker content delivery.
Lower backend costs by offloading heavy content delivery.
When should you consider adding a CDN? Let's examine the trade-offs in Table 3.
CDN Advantages
CDN Disadvantages
Better performance: Reduced latency and faster load times due to content being stored closer to users. Efficient traffic management: Handles large volumes and sudden spikes, preventing bottlenecks. Reliability and scalability: Offers redundancy and easy scaling. Reduced origin server load: Caches static content such as images, videos, and HTML pages.
Cost: Can become expensive as usage increases. Added complexity: Requires configuration, cache management, and client integration. External dependency: Your app's performance partly relies on the CDN provider's uptime and performance. Content freshness challenges: Ensuring up-to-date content requires careful cache management.
Table 3: CDN advantages and disadvantages
Despite the disadvantages, CDNs are a great solution for apps that have a worldwide user base. Figure 13 illustrates how a CDN fits into our overall system architecture.
Pagination
Pagination is a fundamental pattern we encounter frequently in MSD interviews. Any time we're working with lists of data, pagination should be one of your first considerations. Whether it's a social media feed showing posts or a messaging system handling attachments, breaking large datasets into manageable chunks is crucial for scalability.
Whenever we encounter a list in your system, we need to ask ourselves two questions:
Is there a natural limit to how many items should be displayed at once?
Would sending the entire dataset in a single response strain network or device resources?
If sending the full dataset would be resource-intensive, pagination is likely the right solution. By loading data in smaller batches, you improve both performance and scalability while reducing memory usage on mobile devices.
When implementing pagination, we'll typically choose between two main approaches: offset pagination and cursor-based pagination. Let's explore how each approach works and when to use them.
Offset pagination
Let's explore offset pagination, where we request data by specifying which page we want and how many items should be on each page.
Let's consider this example request: GET /v1/feed?page=3&limit=30.
Here, we're asking for the third page of results, with 30 items per page. The backend would skip the first 60 items (2 pages × 30 items) and return the next 30 items.
When using offset pagination, the backend typically includes metadata about the overall dataset. This helps clients understand where they are in the full list of results. Here's what a response might look like:
Offset pagination shines when working with stable, fixed-size datasets. It's straightforward to implement since it maps naturally to database queries, and it lets users jump directly to any page they want. However, it has some important limitations.
As your dataset grows larger, performance starts to suffer. The database needs to count and skip over more rows each time, which gets increasingly expensive. It's also problematic for frequently updated data, by the time a user reaches page 3, the content from pages 1 and 2 might have changed completely.
You could try to handle these issues on the client side by detecting and removing duplicates, but this creates new problems: extra processing overhead, wasted bandwidth, and the need for additional requests to fill in gaps.
This approach works well for applications with:
Moderate-sized, stable datasets.
Simple navigation needs.
Predictable content, such as educational materials or e-commerce catalogs.
Cursor-based pagination
We can think of cursor-based pagination like using a bookmark in a long book. Instead of jumping to a specific page number, you use the bookmark (cursor) to track where we left off and continue reading from there.
Here's how it works in practice. When requesting data, the client includes a cursor that points to their current position: GET /v1/feed?after=<cursor>&limit=30.
For the very first request, there's no cursor yet, so that field stays empty. The backend's response includes not just the data, but also cursors for moving forward and backward through the dataset:
To load the next set of items, the client simply uses the next_cursor value:
GET /v1/feed?after=bmV4dF9jdXJzb3IK&limit=30.
A key advantage of cursor-based pagination is its flexibility with page sizes. Unlike offset pagination, we can request different amounts of data with each call. The cursor itself typically maps to a unique identifier in the data, such as a primary key or timestamp. While sequential IDs are common, what matters most is having a consistent way to order the records.
For example, in a news feed system, we might use the postId as the cursor. These cursors are often encoded (commonly with Base64) before sending them over the network. This encoding helps standardize the format and prevents potential issues with special characters in URLs.
This approach works particularly well for frequently changing datasets such as social media feeds, event logs, and systems with continuous updates. Companies such as Meta [68] and Slack [69] use this pattern in their APIs. The main limitation compared to offset pagination is that users can't jump directly to a specific page, they need to navigate through the data sequentially.
Choosing the right limit number
The limit parameter controls how many items we fetch in each request, and its optimal value depends on the content we're dealing with. For lightweight content, we can use higher limits, while heavier content requires lower limits to maintain good performance.
The ideal limit value varies based on your app and content type, so it's worth experimenting to find the right balance for your specific use case. However, we can broadly evaluate different limit options:
10 to 20 items
Ensures quick response times and minimal data transfer per request. Suitable for highly dynamic feeds with frequent updates.
May require more frequent requests, potentially leading to more loading indicators and a less smooth experience.
30 to 50 items
Provides a good balance between data transfer and the need for frequent requests. Users can scroll through posts for a longer period before needing more data.
Slightly larger data payload per request but usually manageable for most modern mobile networks.
50+ items
Reduces the frequency of data fetches, offering a smoother scrolling experience. Suitable for less dynamic feeds where content does not update as frequently.
Larger data payloads can be slower to load on slower networks or older devices. This could be a concern depending on the scale of the app.
Instead of using a fixed limit number, we could further enhance the solution by implementing adaptive pagination, which dynamically adjusts the limit based on factors like network conditions or user behavior:
For users who scroll quickly, we might increase the limit for a smoother experience.
For users who spend more time on the content, we could lower the limit to reduce unnecessary data transfer.
📌 Remember: Selecting the right limit value in pagination is important as it directly affects both system performance and user experience. The optimal value typically depends on content weight. Generally, a limit between 20 and 50 items strikes a good balance between user experience and efficient data loading.
Pagination comparison table
Table 4 compares key pagination approaches used in mobile apps. Use this reference to quickly evaluate which strategy aligns with your specific requirements and constraints.
Pagination Method
Advantages
Disadvantages
Use Cases
Offset pagination
Simple to implement, easy to navigate specific pages, maps well to database queries.
Performance degrades with large datasets, can be inaccurate with frequent updates, and may cause duplicates.
Apps with moderately sized datasets requiring straightforward navigation such as educational apps, e-commerce platforms, forums.
Example: GET /v1/feed?page=3&limit=30
Cursor- based pagination
Efficient for large-scale datasets, handles frequent updates well, flexible limit per request, stateless backend.
Cannot jump to a specific page without traversing previous pages, may require encoding for security.
Real-time and large-scale applications with high-frequency updates such as social media feeds, event logs.
Example: GET /v1/feed?after=bmV4dF9jdXJzb3IK&limit=30
Table 4: Pagination options comparison
Pagination selection decision tree
When determining which pagination approach to implement, several factors come into play. The decision tree in Figure 14 offers a structured path through these considerations, guiding us to an appropriate pagination strategy based on the app's specific needs and data characteristics.
⚠️ Disclaimer!
While this decision tree and comparison table provide structured guidance for selecting storage options, they intentionally simplify complex considerations.
Real-world implementations often involve additional factors such as backend architecture constraints, existing API patterns, and specific performance characteristics of your data. Use these tools to frame your interview discussion, but be prepared to acknowledge the nuances that might influence your final decision.
🔍 Industry insights:
Slack transitioned from offset-based to cursor-based pagination to efficiently handle large datasets and ensure consistent data retrieval [70].
Discord uses virtualization for infinite lists to handle pagination smoothly. The result was a 14% drop in memory usage on startup for heavy users and faster load times [71].
Shopify moved to relative cursor pagination using a last-seen item ID to fetch the next page [72].
Performance
Performance optimization forms a critical pillar of mobile app quality that directly impacts user satisfaction, retention, and commercial success. As apps grow in complexity and user expectations rise, maintaining responsive experiences becomes increasingly challenging, yet more essential than ever.
🎯 When to bring it up
Performance considerations show our technical depth in creating responsive, efficient applications. We can mention this when discussing data-intensive features, animations, background processing, or systems that need to work on lower-end devices. This topic is universally relevant but becomes critical when designing apps that handle large datasets, complex real-time requirements, or need to operate in challenging network environments.
Poor performance can seriously impact user retention, Google even downranks underperforming apps in the Play Store [73]. Users commonly uninstall apps that suffer from crashes, excessive data usage, battery drain, and UI jank [74].
Holistic performance approach
Effective performance optimization requires a systematic approach that spans the entire app architecture:
UI responsiveness ensures the app feels immediate and fluid. The primary thread should remain free for user interactions by offloading heavy operations to background threads.
Network efficiency minimizes both latency and data consumption.
Memory management prevents crashes and background crashes while enabling smooth multitasking experiences.
Battery optimization extends effective usage time by minimizing power-intensive operations. Location services, continuous network activity, and wake locks are particularly costly for battery life.
Measurement-driven optimization
Performance optimization must be grounded in empirical data rather than assumptions or theoretical bottlenecks:
Baseline metrics through comprehensive performance testing provides objective data against which to measure improvements.
Continuous monitoring via production analytics reveals how your application performs in real-world conditions across diverse devices, networks, and usage patterns.
Targeted instrumentation helps identify specific bottlenecks in critical paths.
Incremental validation after each optimization confirms actual improvements and helps avoid regressions. Small, focused changes with measurable outcomes are preferable to large, speculative refactorings.
During MSD interviews, pay special attention to performance implications when discussing background components. Whether we're designing pre-fetching services or location-based features, we should be prepared to explain how we'll optimize their resource usage to maintain a smooth user experience. The best designs balance functionality with efficient resource consumption.
🔍 Industry insights:
Instagram improves UX by prefetching data in the background, ensuring seamless content delivery even under poor network conditions [75]. Also, they launched features such as Data Saver mode to let users on limited plans control data usage [76].
Robinhood implemented Server-Driven UI to speed up feature delivery [77].
Spotify implemented batched metadata downloads stored on the device's disk, along with pre-computed sorting to reduce startup and view-load times [78].
Lyft achieved a 21% reduction in ANRs by optimizing disk read operations and implementing memory caching strategies [79].
Uber developed a sophisticated failover handling mechanism within its mobile networking infrastructure to ensure reliable and low-latency communication for its apps [80].
Feature development
While solid architecture creates a strong foundation for our app, thoughtful feature deployment strategies ensure users actually experience our innovations smoothly. This section explores practical approaches to releasing and managing features at scale.
While these topics may not be central to every interview question, they demonstrate valuable perspectives that can set candidates apart when discussing how they'd implement a large-scale mobile solution. Interviewers are often looking for candidates who understand not just how to build features, but how to deliver them safely to users. Being prepared to discuss these operational aspects shows we've thought beyond pure implementation to consider the entire product lifecycle.
Gradual release strategy
When deploying new app versions or significant features, a gradual rollout approach helps identify and address potential issues before they affect your entire user base. We can think of it as a safety net, we can spot and fix problems while they're still manageable, rather than having them impact all our users at once.
🎯 When to bring it up
Discussing gradual release strategies demonstrates your understanding of risk management in mobile development. We can mention this when explaining how we'd roll out complex features or significant architectural changes that could potentially impact user experience. It's particularly relevant for apps with large user bases or when designing features that might strain backend resources if released to everyone simultaneously.
Both major app stores support gradual rollouts, though they implement the concept differently:
Google Play Store offers staged rollouts [81] that provide granular control over both timing and audience percentage. You can start with as little as 1% of your user base and incrementally increase availability as confidence grows.
Apple's App Store provides phased releases [82] on a fixed 7-day schedule with predetermined daily user percentages. While less flexible than Google's approach, this system still provides valuable protection against widespread issues.
A crucial difference between platforms concerns rollback capabilities. If serious problems emerge, Google Play allows developers to halt distribution and revert affected users to the previous version. Apple's platform currently lacks this safety feature; once an update is delivered to a user, they remain on that version until a new update is released and installed.
If we need even more controlled testing before a wide release, both platforms provide additional options:
Beta programs (TestFlight for iOS [83], Play Store Beta testing for Android) allow you to distribute builds to registered testers outside your organization.
Internal testing tracks enable team members to validate release candidates using the same distribution channels as production builds.
Employee dogfooding programs formalize the practice of having team members use pre-release versions in their daily lives to catch usability issues and edge cases.
When implementing a gradual release strategy, focus on:
Monitoring capability: Ensure you have robust analytics and crash reporting configured to quickly identify problems during the staged rollout.
Severity thresholds: Define clear metrics that would trigger a rollout pause or rollback (e.g., crash rate increases above 1%).
🔍 Industry insights:
Notion's mobile team has taken an approach of weekly releases on both iOS and Android [18].
Force upgrading
At times, mobile applications need to sunset older versions to ensure security, maintain performance, or deliver critical functionality improvements. Force upgrading is a strategic technique that prompts users on outdated app versions to update before they can continue using the app. This approach balances user experience with technical and business necessities.
🎯 When to bring it up
Force upgrading shows our awareness of maintaining app stability and security across our user base. We can mention this when discussing API versioning strategies, security-critical updates, or scenarios where supporting multiple client versions would significantly increase backend complexity. It's especially relevant when the system design includes breaking changes that would make older app versions incompatible with new backend implementations.
Force upgrades should be implemented with clear justification, as they create friction in the user experience. The most compelling reasons to implement this pattern include:
Backend compatibility changes: When significant API changes or deprecations occur, maintaining backward compatibility with all prior app versions becomes increasingly costly and complex. After verifying the new backend works reliably, you can retire old APIs and require affected users to upgrade.
Security vulnerabilities: When critical security flaws are discovered in older app versions, upgrading users becomes a priority to protect both their data and your systems. In highly regulated industries, security-driven force upgrades may even be a compliance requirement.
Regulatory compliance: New regulations, particularly in healthcare, finance, or privacy domains, may introduce requirements that older app versions cannot satisfy. In these cases, force upgrades help maintain legal compliance across your user base.
Analytics consistency: As your analytics strategy evolves, fragmenting your user base across multiple app versions can compromise data integrity and decision-making. Consolidating users on newer versions could create a more consistent analytics foundation.
Implementation approaches
Force upgrading exists on a spectrum of enforcement, with varying levels of urgency:
Hard upgrades completely prevent app usage until the user updates. This approach is appropriate for critical security vulnerabilities or major backend incompatibilities. The UI typically consists of a modal screen explaining the need to upgrade, with a prominent call-to-action that directs users to their platform's app store.
Soft upgrades encourage updating while still allowing limited app functionality. This approach balances user experience with technical requirements. Users typically see a dismissible prompt when launching the app, with persistent reminders during their session. While less disruptive, this approach takes longer to migrate users to newer versions.
Tiered grace periods offer a compromise by starting with soft prompts that gradually transition to hard requirements after a defined timeframe. This gives users adequate warning while ensuring eventual compliance.
Technical implementation
The standard implementation follows a straightforward flow:
During app initialization, the client sends its version information to a dedicated version-checking endpoint.
The backend evaluates this version against current policies.
Based on this evaluation, the backend returns a response indicating whether an upgrade is required and the type of upgrade (hard or soft).
The client presents the appropriate UI based on the response, either blocking further access or displaying dismissible prompts.
Practical considerations
When implementing force upgrading, several practical factors require attention:
Network conditions: Users in areas with poor connectivity may struggle to download updates. Consider implementing offline grace periods that allow temporary access even when updates are required.
Device constraints: Some users may have older devices that cannot support your newest app version.
Staged enforcement: For non-critical updates, consider rolling out the force upgrade requirement gradually, similar to how you might roll out a new app version. This prevents overwhelming app store infrastructure and support channels.
By thoughtfully implementing force upgrading capabilities, we maintain greater control over our app ecosystem while ensuring users benefit from important improvements and protections. When used well, this approach helps both users and development teams by reducing fragmentation and technical debt.
🔍 Industry insights:
Uber implemented a force-upgrade process to help manage the challenges of scaling their mobile app infrastructure [84].
Feature flags, remote config, and A/B testing
Modern mobile apps need to evolve rapidly while maintaining stability, a challenge that calls for dynamic control systems. Feature flags, remote configuration, and A/B testing form a powerful toolkit that enables controlled experimentation and deployment without requiring app store updates.
🎯 When to bring it up
This topic demonstrates our knowledge of modern, data-driven development practices. We can mention it when discussing how to validate design decisions with real users, implement gradual feature rollouts, or manage complex features across different user segments. It's particularly valuable when explaining how our system could support experimentation without requiring constant app updates through the app stores.
At its core, this approach separates feature availability from code deployment. When a user launches the app, it connects to backend services to determine which features should be activated based on various criteria:
User characteristics (e.g., demographics, subscription tier, or usage patterns).
Device capabilities (e.g., hardware specifications or operating system version).
Environmental factors (e.g., geographic location, or network conditions).
Experimental groups (e.g., random assignment or user cohorts).
Product teams typically manage these rules through dedicated management interfaces (e.g., Content Management System (CMS)) that provide visualization and control without requiring engineering intervention for each update.
Feature flags enable effective A/B testing by showing different variants to different users. The backend controls not just whether a feature is enabled, but which version users see. By tracking analytics for each variant, teams can measure effectiveness and make data-driven decisions.
Strategic applications
This toolkit serves multiple essential functions in mobile apps:
Risk management: By limiting new functionality to a subset of users initially, we can contain the impact of potential issues.
Staged rollouts: Features can be introduced gradually to increasing percentages of users, allowing us to monitor performance impacts, server load, and user reception before committing to full deployment.
Performance optimization: A/B testing provides empirical data about which implementations deliver better performance metrics, helping teams make evidence-based decisions.
Infrastructure updates: When migrating to new backend systems or third-party services, feature flags allow us to control traffic flow between old and new implementations, enabling seamless transitions.
Implementation considerations
While powerful, feature flags and A/B testing require careful management:
Code complexity. Each flag adds branching logic and potential interactions. This complexity grows as we add more flags.
Technical debt. Flags that remain after features are fully launched create unnecessary complexity. Regular cleanup is essential.
Testing challenges. Testing all possible flag combinations becomes increasingly difficult as the system grows.
UX understanding. Multiple active flags make it harder to understand exactly what different users experience.
When properly implemented, feature flags, remote configuration, and A/B testing transform how mobile applications evolve, enabling data-driven development, controlled experimentation, and rapid response to emerging issues or opportunities. This approach has become standard practice at companies operating at scale, where the ability to move quickly while maintaining stability creates significant competitive advantage.
🔍 Industry insights:
Netflix is famously data-driven, running A/B tests on nearly every product change. They built an internal Experimentation Platform (codename “ABlaze”) that lets any team define an experiment, target a subset of users, and track metrics [85].
Duolingo attributes a lot of its product success to extensive A/B testing. On the engineering side, this means building an experimentation framework into the app [86].
Observability, analytics, monitoring, and reporting
Mobile apps require comprehensive visibility into their performance, user behavior, and error states. A robust measurement strategy helps engineering teams deliver stable experiences while providing product teams with insights to drive decision-making.
🎯 When to bring it up
Discussing these elements shows we understand that successful systems require ongoing measurement and optimization. We can mention these when explaining how we'd validate that your design meets performance requirements, identify potential bottlenecks, or track user engagement with key features. This topic is especially relevant when designing systems that need to scale significantly or when proposing complex architecture that would benefit from robust monitoring.
A complete visibility system addresses multiple dimensions of app performance and usage:
Technical performance monitoring tracks system-level metrics such as response times, resource utilization, and error rates. This data helps identify bottlenecks, optimize code paths, and ensure the app remains responsive across varying device capabilities and network conditions.
User behavior analytics captures how people interact with the application, including navigation patterns, feature usage, and conversion metrics. These insights inform product decisions by revealing which aspects of the app deliver value and where friction points exist.
Error tracking identifies crashes, exceptions, and non-fatal errors that impact user experience.
Business metrics reporting connects technical performance to commercial outcomes by measuring key performance indicators that align with organizational goals, such as engagement, retention, and monetization metrics.
Error classification and management
When implementing error tracking, it's crucial to differentiate between different types of failures:
Fatal errors cause the app to crash completely.
Non-fatal errors allow the app to continue running but may prevent specific features from functioning correctly.
Degraded states occur when the app continues functioning but with reduced performance or capability.
Each error type requires appropriate instrumentation to ensure visibility. While crash reporting frameworks capture fatal errors automatically, non-fatal errors and degraded states require explicit instrumentation in the codebase.
Architectural considerations
From an architecture perspective, analytics and monitoring systems should be designed for minimal performance impact while delivering maximum insight:
Sampling strategies reduce data volume while maintaining statistical validity by collecting comprehensive data from a representative subset of users or sessions rather than exhaustively tracking everything.
Efficient data collection typically involves batching events, compressing payloads, and being selective about collection frequency.
Robust offline handling ensures that analytics data isn't lost when the device lacks connectivity.
Contextual information automatically adds relevant metadata to events, such as device information, app version, and user segments. This context makes analysis more powerful by enabling multidimensional filtering and segmentation.
In high-level architecture diagrams, analytics components typically appear as cross-cutting concerns that integrate with multiple subsystems. Figure 15 shows how the Analytics repository is often added to the app high-level architecture diagram.
🔍 Industry insights:
Pinterest built an end-to-end JSON logging system for their iOS and Android clients. The idea was to make logging “schemaless” and easy [87].
Slack developed a bespoke tracing system, SlackTrace, to monitor the flow of notifications across their infrastructure, aiming to standardize data formats and simplify debugging [88].
Signal takes a unique stance on analytics: it collects virtually none in order to protect user privacy. The Signal app does not have the typical mobile analytics or crash-reporting SDKs that most apps use [89].
Localization
Adapting your application for global audiences involves much more than simply translating text. Comprehensive localization transforms every aspect of your app to feel native to users across different regions, languages, and cultural contexts. When implemented thoughtfully, localization significantly expands your potential user base while improving engagement and retention in international markets.
🎯 When to bring it up
Localization demonstrates our awareness of developing for global audiences. We can mention it when designing apps intended for international markets or discussing text-heavy interfaces that would need translation. It's particularly relevant when explaining how our architecture handles variable content lengths, right-to-left languages, or region-specific features that might affect our core design decisions.
Beyond text translation
While text translation forms the foundation of localization, a complete strategy addresses multiple dimensions of cultural adaptation:
Number and currency formatting varies dramatically across regions.
Date and time representation follows different conventions worldwide.
Pluralization rules differ across languages, often in complex ways that go beyond simply adding 's' for plurals.
Text direction requires special consideration for right-to-left (RTL) languages such as Arabic, Hebrew, and Persian.
Visual and cultural elements including colors, symbols, and imagery may carry different meanings or connotations across cultures.
While Android and iOS share similar localization concepts, they handle implementation differently: iOS offers built-in support for exporting translations [90], whereas Android implements localization through its resource system [91].
Localization challenges
Implementing comprehensive localization presents several technical challenges:
Adaptable UI design must accommodate text expansion and contraction across languages. German and Finnish translations typically require 30-40% more space than English, while Chinese often uses significantly less.
Dynamic language switching allows users to change their preferred language without restarting the application. This requires careful management of resource loading and UI refreshing to ensure a smooth transition between languages.
Resource optimization becomes critical as localization assets multiply. Each supported language increases app size, potentially affecting download conversion rates and device storage requirements.
Testing complexity increases exponentially with each supported language.
Backend API localization ensures that content delivered from the backend appears in the user's preferred language. This typically involves including language preference parameters in API requests and designing backend systems to return appropriately localized responses.
By approaching localization as a fundamental aspect of our architecture rather than an afterthought, our apps can deliver truly global reach while maintaining excellent user experiences across diverse markets and cultures.
🔍 Industry insights:
Netflix, available in 190+ countries, built a sophisticated pipeline to ingest, translate, and serve UI strings for all their apps [92].
Netflix even uses pseudo-localization (artificially elongating text and adding accented characters) as a testing step to ensure UIs will accommodate other languages and scripts [93].
Privacy
Privacy considerations have evolved from optional features to essential requirements in mobile apps. As regulations tighten globally and user awareness grows, implementing robust privacy measures is crucial for both legal compliance and maintaining user trust. A thoughtful privacy strategy must address regulatory requirements, technical safeguards, and transparent user experiences.
🎯 When to bring it up
Privacy considerations show we understand the regulatory and ethical dimensions of mobile development. We can mention this when discussing features that handle sensitive user data, systems that require cross-device synchronization, or designs targeting regions with strict privacy laws like Europe (GDPR) or California (CCPA). It's especially important when explaining data storage decisions, authentication mechanisms, or user consent flows.
Navigating regulatory landscapes
Mobile applications often operate across multiple jurisdictions, each with unique privacy frameworks that dictate how user data must be handled:
The European Union's General Data Protection Regulation (GDPR) [94] established a comprehensive framework that fundamentally changed how organizations approach data privacy.
The UK follows the Data Protection Act (DPA) [95] for data protection standards.
Health Insurance Portability and Accountability Act (HIPAA) [96] regulates protected health information in the United States.
Australian apps need to follow the Privacy Principles (APPs) [97].
The regulatory landscape continues to evolve rapidly, with new privacy laws emerging regularly around the world. Staying current with these developments is essential for maintaining compliance across global markets.
Technical implementation strategies
Implementing privacy protection requires a layered approach that secures user data throughout its lifecycle:
Data minimization forms the foundation of modern privacy practice. Collect only the information necessary for your app's core functionality.
Secure data transit protects information as it moves between client and server.
Protected storage safeguards data at rest on both device and server. For example, we should encrypt sensitive information using industry-standard algorithms such as AES-256, with proper key management practices to maintain security.
Access controls ensure that users can only access data they're authorized to view.
Data anonymization and pseudonymization reduce privacy risks by separating personal identifiers from usage data.
Security testing conducts regular penetration testing to identify vulnerabilities, and test both client and server-side security measures.
Beyond these regional requirements, it's essential to stay current with mobile security best practices. The OWASP [98] mobile security risks list, updated annually, provides a comprehensive overview of emerging threats and recommended protections.
🔍 Industry insights:
Meta has been exploring privacy-preserving machine learning to improve products without compromising user data. One cutting-edge approach is Federated Learning with Differential Privacy (FL-DP) [99].
Accessibility
Creating truly inclusive mobile apps means ensuring everyone can use your product effectively, regardless of their abilities or how they interact with their devices. Accessibility isn't just about compliance with regulations, it's about expanding our application's reach and building products that work well for all users.
🎯 When to bring it up
Discussing accessibility demonstrates our commitment to inclusive design principles. We can mention this when explaining interface design decisions, navigation patterns, or interaction models that need to work for all users. It's particularly relevant when designing public-facing applications, especially those subject to legal accessibility requirements such as government, education, or healthcare apps.
Leading platforms provide comprehensive accessibility guidelines that help you build more inclusive apps: Web Content Accessibility Guidelines (WCAG) [100], Apple's Human Interface Guidelines for iOS [101], and Google's Material Design Accessibility Guidelines for Android [102].
Platform implementation techniques
Both Android and iOS provide comprehensive accessibility frameworks that help developers create inclusive apps:
Screen readers (VoiceOver on iOS, Talkback on Android) support enables users with visual impairments to navigate applications through audio feedback.
Dynamic text sizing allows users to adjust text display to their needs.
Color and contrast considerations help users with color blindness or low vision.
Touch targets should be sufficiently large to accommodate users with motor control challenges.
Testing and validation
Comprehensive accessibility testing combines automated checks with human evaluation:
Automated testing tools such as Accessibility Scanner (Android) and Accessibility Inspector (iOS) identify common issues such as missing labels, insufficient contrast, and small touch targets.
Manual testing with assistive technologies provides deeper insight into how real users might experience your application. Navigating the entire app using only VoiceOver or TalkBack reveals usability issues that automated tools might miss.
User testing with people with disabilities delivers the most valuable feedback.
By integrating accessibility considerations throughout your development process rather than treating them as an afterthought, you build more robust applications that work better for everyone.
🔍 Industry insights:
The BBC has led by example with comprehensive Mobile Accessibility Guidelines [103].
Push notifications
Push notifications enable apps to reach users even when they're not actively using the application. This capability is invaluable for sharing important updates, delivering time-sensitive information, or re-engaging users with your app. While powerful, push notifications have inherent limitations that you should understand when incorporating them into your mobile system design.
🛠️ Platform implementation details
Both iOS and Android implement push notifications through platform-specific services: iOS uses Apple Push Notification Service (APNs) [104], while Android relies on Firebase Cloud Messaging (FCM) [105].
These services act as intermediaries between your backend and user devices.
The typical flow for push notifications follows these steps:
Our app registers with the platform's notification service during installation.
The service provides a unique device token to identify that installation.
Our app sends this token to the backend.
When the backend needs to notify a user, it sends the message to the appropriate platform service.
The platform service attempts to deliver the notification to the user's device.
🎯 When to bring it up
Push notifications demonstrate our understanding of user engagement strategies beyond the app itself. If the interviewer is interested in this topic, they usually add it as a functional requirement. If that's not the case, you can mention push notifications when discussing systems that deliver time-sensitive information, require user re-engagement, or include asynchronous interactions. It's particularly relevant when designing messaging apps, social platforms, or any application where users benefit from being notified about events even when they're not actively using the app.
Push notifications delivery challenges
Several factors can prevent successful notification delivery:
Device constraints
Notifications queue when devices are offline or in airplane mode.
Platform servers eventually drop queued notifications that can't be delivered.
Battery-saving modes may delay or block notification delivery.
Platform limitations
Both APNs and FCM implement throttling mechanisms to protect system resources.
Android manufacturer customizations can affect background process handling differently.
Platform-specific payload size limits restrict the amount of data you can include.
User controls
Users can disable notifications through system settings.
They may deny notification permissions during the first app launch.
Do Not Disturb settings and focus modes can temporarily block delivery.
Given these limitations, push notifications should serve as a supplementary communication channel rather than your primary method for delivering critical information. They're excellent for enhancing engagement, but your system design should include alternative mechanisms for essential updates.
Chapter 4: Design a Chat app covers push notifications in detail. Figure 16 shows the push notifications-related components in its high-level architecture diagram.
🔍 Industry insights:
Slack extended their notification system to send broader notification types and not just direct messages and mentions [106].
Duolingo built a high-scale notification system to handle its massive user base and engagement campaigns [107].
App size
App size directly impacts both user acquisition and retention. App size influences user behavior in measurable ways. Google's research shows that each additional 6MB in APK size reduces installation conversion rates by approximately 1% [108]. This effect becomes even more pronounced in markets with limited data plans or on devices with storage constraints.
🎯 When to bring it up
App size considerations show our awareness of practical download and installation constraints. We can mention this when discussing applications targeting regions with limited bandwidth, apps containing substantial offline content, or designs requiring numerous third-party libraries. It's especially relevant when our target audience includes users with storage-constrained devices or limited data plans.
Two primary contributors typically influence app size:
Third-party libraries add functionality but often come with significant size overhead. Each library should justify its footprint by providing essential capabilities that would be impractical to build in-house.
Media assets such as images, videos, and audio files enhance user experience but can quickly inflate app size. When addressing asset management in your interview, discuss strategies such as:
Using vector graphics where appropriate to maintain quality across device resolutions.
Implementing on-demand asset downloading for infrequently accessed features.
Leveraging server-side image optimization based on device capabilities.
When discussing app size optimization in interviews, demonstrate an awareness of platform-specific approaches.
🛠️ Platform implementation details
Both Android [109] and iOS [110] offer comprehensive tools and documentation for reducing app size.
For Android, we can mention techniques like R8 code shrinking, resource shrinking, and App Bundles that deliver only the code and resources needed for specific device configurations. -
For iOS, we can highlight app thinning, on-demand resources, and Swift's whole module optimization.
By integrating thoughtful app size considerations into your mobile system design, we demonstrate awareness of the practical constraints that affect real-world app distribution and adoption.
🔍 Industry insights:
Instagram built an Instagram Lite Android app with an initial size of just 573 KB [111].
CI/CD
Mobile apps depend heavily on automation for consistent, reliable delivery. Continuous Integration and Continuous Delivery/Deployment (CI/CD) practices streamline the testing and release process, ensuring high quality across development stages.
🎯 When to bring it up
CI/CD knowledge demonstrates our understanding of the complete development lifecycle. We can bring this up when discussing how our design would be implemented in practice, especially for complex systems requiring frequent updates or when explaining how to maintain quality across multiple platforms. It's particularly relevant when describing how your architecture supports testability or when proposing designs that would involve complex integration requirements.
Continuous Integration (CI)
Continuous Integration focuses on frequently merging code changes into a shared repository. Each time developers push changes, automated pipelines perform these essential functions:
Building the app to catch compilation errors early.
Running unit and integration tests to ensure functionality.
Analyzing code quality through static analysis tools.
This creates a valuable feedback loop where issues are detected immediately rather than accumulating over time. Tools such as Fastlane [112], GitHub Actions [113], or Bitrise [114] handle these automated checks, ensuring consistent quality without manual intervention.
Continuous Delivery (CD)
While CI focuses on code quality, Continuous Delivery automates the preparation and distribution of releases. Once code passes CI checks, CD pipelines handle:
Configuring app signing and credentials.
Setting environment-specific variables.
Generating release builds.
Distributing builds to testing environments.
🛠️ Platform implementation details
Mobile apps have unique CD requirements around code signing:
Android uses keystore files to verify app authenticity.
iOS requires provisioning profiles and certificates, often managed through tools such as Fastlane Match [115].
Each environment (e.g., development, QA, and production) also needs its own configuration:
Android uses build.gradle flavors and buildConfigField.
iOS uses Xcode build configurations and schemes.
Continuous Deployment
In its purest form, Continuous Deployment automatically pushes changes to production after they pass all quality checks. Unlike web or backend deployments, releases aren't instantaneously available to users because app store review processes can introduce unpredictable delays.
The key benefit of CI/CD is consistency! It removes manual steps that could introduce errors while ensuring every release follows the same proven process. Knowledge on this area shows interviewers we're not just focused on architectural excellence, but also on the practical aspects of delivering high-quality software reliably and efficiently.
🔍 Industry insights:
Duolingo drastically improved its mobile CI/CD pipeline, cutting Android and iOS build times by 68% [116].
Pinterest's iOS team transitioned to using Bazel as their build system resulted in a 21% reduction in clean build times [117].
Security
Security forms an essential foundation for any mobile app. At its core, mobile security involves protecting user data, ensuring system integrity, and preventing unauthorized access. All while maintaining a smooth user experience.
🎯 When to bring it up
Security considerations show your awareness of protecting user data and system integrity. Mention this when discussing features that handle sensitive information, authentication workflows, or data storage decisions.
It's particularly relevant when designing finance, healthcare, or enterprise applications, or when explaining how your architecture safeguards against common mobile vulnerabilities.
Rather than diving deeply into implementation details, let's explore the main security domains that mobile devs should be familiar with. While security is a complex topic that would require specialized expertise to fully address, a general understanding of these areas will help you navigate MSD interviews effectively.
Device security
Mobile devices operate in varied and often unpredictable environments. Key considerations include:
iOS Jailbreak [118] / Android Root [119] detection: Identifying compromised operating systems that bypass security controls.
App integrity verification: Ensuring the application hasn't been tampered with.
On Android, the Play Integrity API [120] verifies the app's authenticity and flags modifications.
On iOS, App Attest [121] ensures the app runs as intended, unaltered by external interference.
Secure local storage: Properly handling sensitive data stored on the device.
Code obfuscation: Making it harder for attackers to reverse-engineer your application.
On Android, tools such as R8 [122] can automatically scramble your code, changing the names of classes and methods while keeping the app's functionality intact.
Network security
Protecting data in transit requires multiple security layers:
Transport Layer Security (TLS): Encrypting all client-server communications.
Certificate pinning [123]: Preventing man-in-the-middle attacks by validating server certificates.
API security: Defending against common web vulnerabilities like injection attacks.
Secure offline operations: Maintaining security even when connectivity is intermittent.
Data security
Even when stored locally, sensitive data requires protection:
Encryption at rest: Securing stored data using strong encryption algorithms.
Sensitive data handling: Minimizing exposure of PII [124] and confidential information.
Data minimization: Collecting and storing only essential information.
Balancing security and user experience
While robust security is essential, it shouldn't come at the expense of usability. Consider these principles:
Apply stricter security measures to high-risk operations, using contextual security.
Provide clear explanations when requesting sensitive permissions.
Implement security measures proportional to the sensitivity of protected data.
Use security measures that align with platform conventions and user expectations.
Remember that client-side security is just one layer of defense. A comprehensive security strategy requires both strong mobile protections and a well-secured backend working together.
🔍 Industry insights:
Signal's entire system design centers on user privacy. All messages and calls are end-to-end encrypted, meaning that not even Signal's servers can read user content [125].
Supporting different devices
Building for a wide range of devices and platforms introduces unique challenges that can strongly influence your design choices.
In MSD interviews, demonstrating awareness of device fragmentation shows depth of understanding that extends beyond purely functional concerns. The ability to build solutions that work consistently across different hardware capabilities, screen sizes, and operating system versions reveals a mature perspective on mobile development challenges.
While these topics might not dominate interview discussions, they could emerge during the deep dive phase as interviewers assess how thoroughly candidates consider the practical implementation challenges of the design. Being prepared to address these concerns demonstrates both technical insight and product awareness.
Phone, tablets, and other form factors
Supporting multiple device types isn't just a nice-to-have feature, it's often a core business requirement that can significantly expand your app's reach. While phones remain the primary platform for most apps, tablets, foldables, wearables, and even TVs offer unique opportunities to engage users in different contexts.
🎯 When to bring it up
Discussing multi-form factor support shows our ability to design adaptable interfaces and architecture. We can mention this when explaining how our system would accommodate different screen sizes, input methods, or device capabilities. It's particularly relevant when designing applications that need to provide consistent experiences across phones, tablets, foldables, or other specialized hardware.
The key to a successful multi-form factor strategy lies in strategic modularization. The app's core business logic and data layer can generally remain consistent across devices, as these components operate independently of screen size or input methods. It's primarily the UI and navigation layers that require device-specific adaptations to deliver optimal user experiences.
Consider how different form factors change user expectations and interaction patterns:
Tablets benefit from larger screens that can display more content simultaneously. A tablet interface might show both a list of messages and their content side-by-side, while a phone would present these as sequential screens.
Foldables present a hybrid challenge, functioning as both phones and tablets depending on their state. Well-designed apps adapt dynamically as the device transforms between folded and unfolded states.
Wearables demand extremely focused interfaces with glanceable information and simplified interactions due to their limited screen real estate.
TVs require interfaces that work well with remote controls rather than touch, with larger visual elements optimized for viewing from a distance.
Modern UI frameworks such as Jetpack Compose for Android and SwiftUI for iOS have made developing adaptive interfaces substantially easier. These declarative UI systems allow developers to create responsive layouts that automatically adjust to different screen dimensions and orientations.
Beyond the UI layer, certain data layer optimizations may be necessary for different form factors. For example:
Adjusting caching strategies based on available device memory.
Implementing form factor-specific image resolutions to balance quality with performance.
Tailoring prefetching algorithms based on expected connectivity and usage patterns.
For more information about building for different form factors, check out Android [126] and Apple [127] documentation.
🔍 Industry insights:
Spotify adapts their app to different screen sizes and resolutions, ensuring that users have a seamless experience regardless of the form factor [128].
Google Photos enhanced user engagement on large screens by implementing responsive layouts tailored for tablets, foldables, and ChromeOS devices [129].
Microsoft enhanced the user experience of Outlook, Teams, and Office on large-screen Android devices by optimizing layouts and incorporating multi-window and multi-instance capabilities, resulting in increased active users and retention [130].
OS and SDK versions
Supporting multiple OS versions poses a challenge that involves balancing user reach with development complexity. Each decision in this space involves trade-offs between backward compatibility and leveraging the latest platform capabilities.
🎯 When to bring it up
OS and SDK version support demonstrates our understanding of platform evolution and backward compatibility challenges. We can mention this when discussing feature implementation strategies that might depend on newer platform capabilities, security considerations across different OS versions, or approaches to maintain functionality on older devices. It's especially relevant when targeting platforms with fragmented version adoption such as Android or when designing features that leverage cutting-edge platform capabilities.
Minimum OS version support
The minimum OS version establishes which devices can install and run the app. This decision directly impacts the potential user base: choosing a higher minimum version may exclude users with older devices, while supporting very old versions can significantly increase development and testing complexity.
When selecting a minimum version, we should consider not just market share statistics but also the specific capabilities our app requires. For example, features such as augmented reality, or certain security protocols may only be available from specific OS versions forward.
This decision should be data-driven, weighing several factors:
Current OS distribution among your target market.
Critical platform capabilities needed for core functionality.
Testing resources available to validate across multiple versions.
Security and performance considerations of older OS versions.
Target OS version
While the minimum version defines backward compatibility, the target version determines which newer platform features the app can fully utilize. This is typically set to the most recent stable OS release.
Regularly updating your target version allows us to:
Implement performance improvements offered by newer SDKs.
Access enhanced security features and privacy protections.
Utilize modern APIs that may replace deprecated functionality.
Offer users the best possible experience on current devices.
The gap between the minimum and target versions determines how much version-specific code your app will need to maintain. Wider gaps could potentially require more conditional logic and compatibility layers, increasing complexity and potential for runtime issues.
API deprecation management
Platform evolution inevitably leads to API deprecation as operating systems improve and replace older functionality. Proactively addressing deprecation warnings prevents technical debt from accumulating and reduces the risk of critical failures when APIs are eventually removed.
Effective deprecation management involves:
Regularly reviewing compiler warnings and deprecation notices.
Creating a prioritized migration plan for affected code.
Testing thoroughly on both older and newer OS versions.
Maintaining clear documentation of version-specific implementations.
Strategic testing approach
Testing across supported OS versions requires a systematic approach to ensure consistent behavior. For example, rather than testing every feature on every version, we could focus on:
Full coverage testing on minimum, target, and one middle version.
Smoke testing on all supported versions.
Deeper testing of features that rely on version-specific implementations.
Prioritizing test scenarios based on real-world usage analytics.
📌 Remember!
OS update adoption rates vary significantly between platforms. iOS users typically upgrade more quickly than Android users, who may be constrained by manufacturer limitations or device age.
The OS version strategy should evolve over time. We should regularly reassess minimum version requirements as user analytics shift, using each major app update as an opportunity to potentially drop support for older versions that represent a diminishing percentage of the user base.
This appendix provides a helpful reference list of topics to consider during your MSD interviews. They're organized by domain, making them easier to navigate.
• UI states: loading, empty, error, content. • Input handling: validation on client and server side, sanitization, feedback for errors. • Search: local vs. server-side search, indexing, typo tolerance.
Feature development
Category
Key considerations
Version management
• Force upgrading: soft vs. hard upgrades, when to require updates, graceful prompts, version compatibility policies. • Safe rollout: phased rollouts, feature flags, rollback procedures. • CI/CD: automate build, test and deployments, code quality and security checks, ensure reproducible builds.
Dynamic configuration
• Remote config: feature control without app updates, default values for offline scenarios. • A/B testing: experiments with clear metrics, user segmentation. • Analytics: performance and business metrics, crash monitoring, logging.
Code architecture
• Modularization: separation of concerns, clear interfaces, balance granularity with practical maintenance. • Dependency injection: testability, object lifecycle management, minimize global state and singletons. • Third-party libraries: security and maintenance evaluation, size impact.
User experience
• Localization: text expansion/contraction, cultural and regional differences. • Accessibility: screen readers, contrast, touch targets, test with accessibility tools. • Crash reporting: automated collection, issue prioritization by impact and frequency, ensure right PII handling.
• Caching strategy: cache appropriate responses, invalidation policies, multi-level caching. • Lazy loading: on-demand components and data loading, defer heavy processing until needed, prioritize visible content first. • Concurrency: proper threading models, avoid blocking main thread, manage thread contention and race conditions. • Hardware acceleration: GPU usage for animations and rendering, specific hardware optimizations.
Monitoring
• Observability: performance metrics, proactive alerting, traces for complex operations. • Business metrics: connect performance to business outcomes, track user engagement, user funnels, identify bottlenecks affecting revenue.
• Available resources: infra constraints, team size and expertise, budget, in-house development vs. 3rd party investments. • Business priorities: objectives alignment, target markets, monetization strategies, short-term needs vs. long-term platform health. • Outage handling: escalation procedures, recovery playbooks, appropriate redundancies. • Tech stack: integration with existing systems, platform consistency, future ecosystem evolution, standardization vs. specialized tools.
📌 Remember: This list isn't meant to be a checkbox exercise where you cover everything. Strategic selection is key! Focus on the considerations most relevant to your specific design challenge, and be ready to explain why those topics are important. Your ability to make thoughtful trade-offs based on the system's unique requirements demonstrates stronger design thinking than attempting to cover every possible topic.